How to Set Up Postman Proxy Settings for API Testing
If you’re diving into API work with Postman, you know how handy it is for testing and building out those interfaces. But to keep things secure and adaptable, especially when sending requests from different spots-also known as different locations, which allows you to simulate API calls from various geographic regions-or handling sensitive data, adding a Postman proxy can make a real difference. In this walkthrough, we’ll walk through how to set up a proxy in Postman, from the basics to fixing glitches, and even touch on solid options like MangoProxy to keep your setup running smoothly.
Basics of using proxies in Postman
Think of a Postman proxy as that middleman who handles the handoff between your app and the API server-keeping things private and giving you more control over how requests flow. The proxy acts as an intermediary between the client application and the destination server, relaying API requests and responses. Additionally, a proxy can serve as a security barrier, protecting internal networks by filtering requests and preventing direct access to sensitive resources.
What is Postman and its features
Postman streamlines API tasks, letting you create, test, and document endpoints in one clean interface, and it facilitates communication with any online service through proxies. It’s a go-to for developers and analysts who want to refine APIs without getting bogged down. Throw in a proxy in Postman, and you’ve got extra security for your data plus the ability to test APIs from any location, which takes the tool to the next level.
When to use a proxy in Postman
Postman proxies come in handy for several key tasks. For geo-targeting, they let you send requests as if you’re in different countries or cities, showing how APIs behave in real-world conditions. For privacy, they hide your IP address, keeping your data safe during tests. They also help with load balancing by spreading requests across multiple IPs to keep servers from choking. Proxies can also help avoid API rate limits by distributing requests across multiple IP addresses, reducing the risk of hitting restrictions or getting IP bans. And for debugging, Postman proxies capture request and response details to track down issues. Adding a proxy in Postman to your workflow makes testing more secure and dependable.
Network requirements for using proxies in Postman
Before you dive into configuring a proxy server in Postman, it’s important to make sure your network environment is ready to support proxy connections. First and foremost, a stable internet connection is essential—without it, your client application (Postman) won’t be able to communicate with the destination server or send API requests reliably.
Next, your network should allow for proxy settings to be configured, either through your operating system’s system proxy settings or directly within Postman’s own configuration options. If you’re using a manual proxy setup, double-check that the proxy address and port are correctly entered and that your network isn’t blocking these connections.
It’s also crucial that your network supports the protocol your proxy server uses, whether that’s HTTP or HTTPS. Some environments may have firewalls or security barriers that restrict certain types of network traffic, so make sure these don’t interfere with your ability to send requests through the proxy. If your network requires specific configuration settings, such as authentication or custom ports, ensure these are set up in both your system proxy and Postman proxy settings.
By confirming these network requirements-stable internet, proper protocol support, open firewall rules, and accurate configuration-you’ll set yourself up for smooth API development and testing with Postman and your chosen proxy.
How to set up a proxy in Postman: step-by-step
Getting a Postman proxy up and running doesn’t take long-here’s how to do it, one bit at a time, including how to configure Postman to use a proxy.
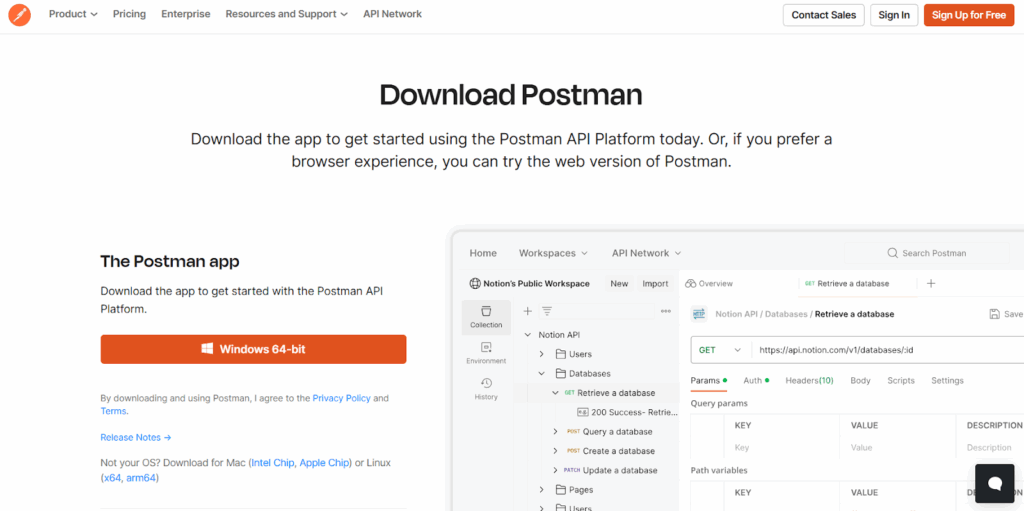
Step 1: download and install Postman
Head over to the Postman site and grab the download for whatever OS you’re on-Windows, macOS, or Linux. The installer walks you through it pretty quickly.
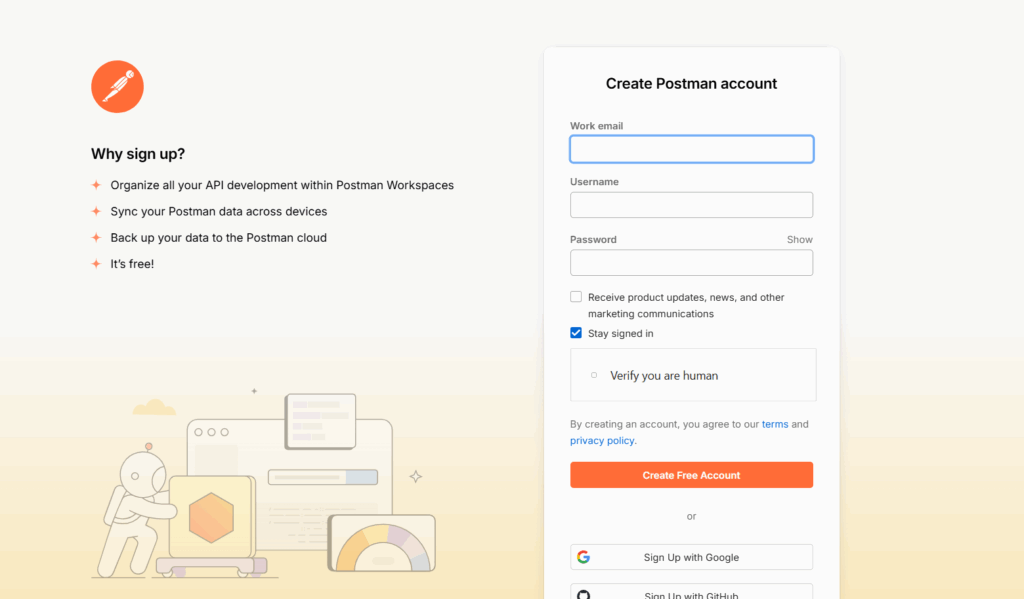
Step 2: sign up and log in
Fire up Postman, pop in a real email to sign up, and log in. That gets you into your main workspace where the magic happens.
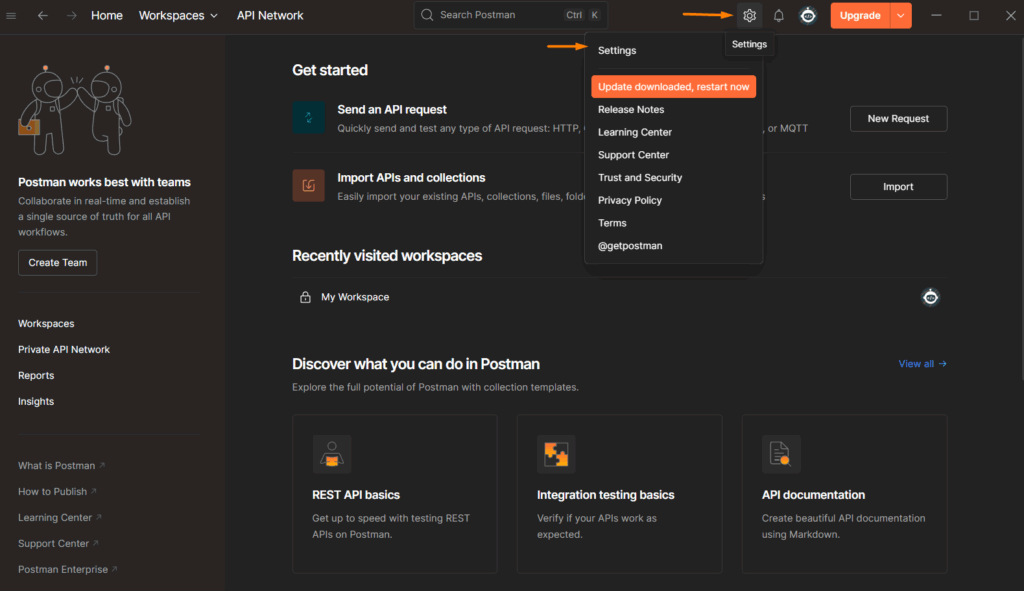
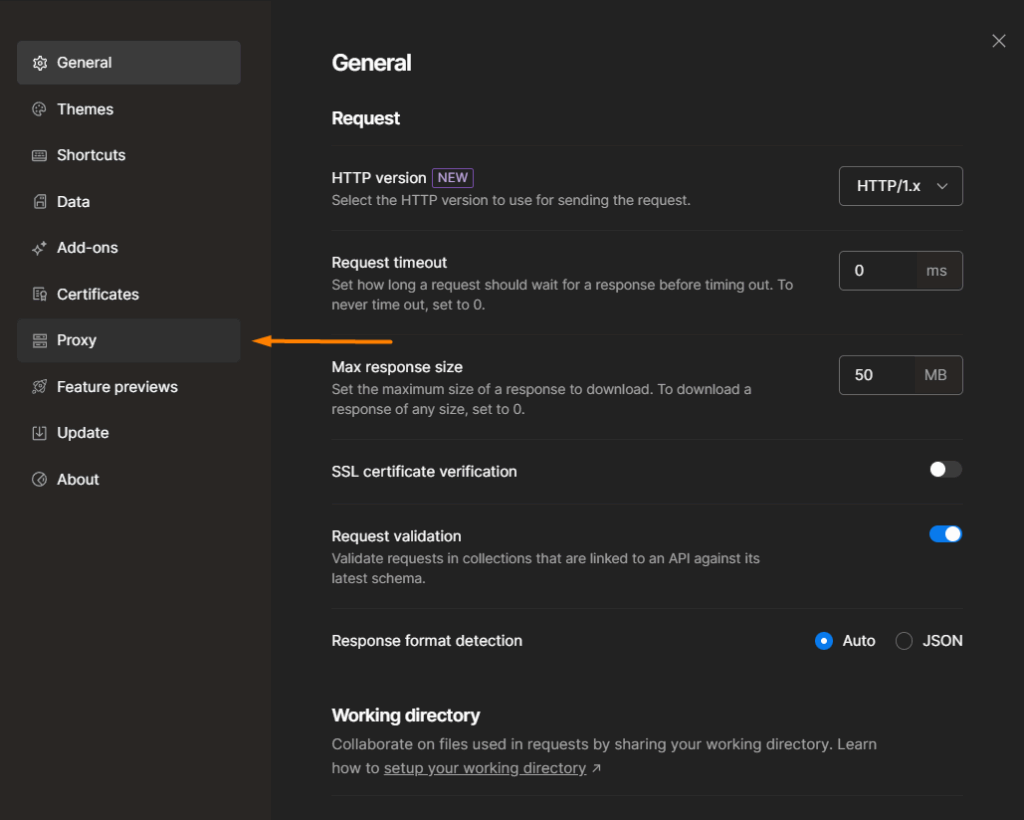
Step 3: access settings
Spot that little gear icon up in the top-right? Click it, and you’ll land in the Settings area, ready to tweak things. This is where you can find the network proxy option to enable proxy use in Postman.
Step 4: go to the proxy tab
From there, flip over to the Proxy tab-that’s where you handle the Postman proxy settings that control how your requests go out. Proxy configurations are primarily managed through the Proxy tab in the global Postman Settings, allowing you to set up and troubleshoot different proxy configurations for secure and anonymous API requests.
Step 5: enable “use a custom proxy configuration”
Flip the switch for Use a custom proxy configuration to enable and add custom proxy settings. This allows you to select from different proxy types (such as HTTP, HTTPS, or SOCKS), and you must specify the proxy server’s hostname or IP address and the proxy port. If your proxy requires authentication, enable Proxy requires authentication and enter your username and password in Postman’s settings. You can also enter authentication details for the default proxy configuration in the Postman desktop app if needed. If both system and custom proxy options are enabled, the custom proxy configuration takes precedence.
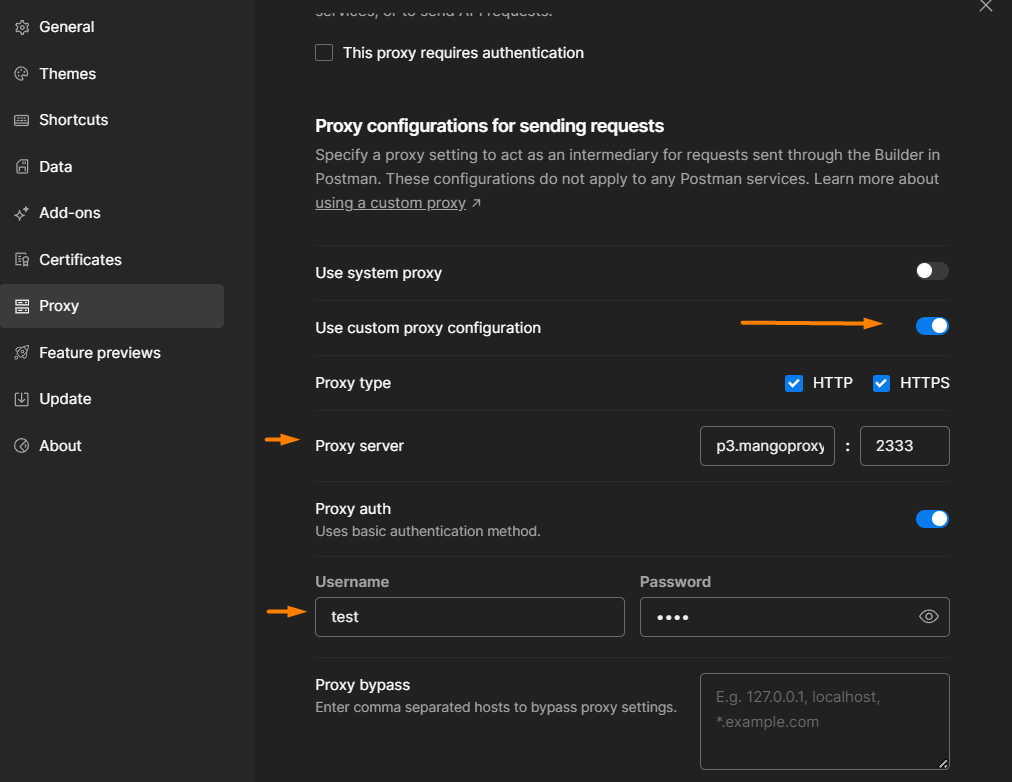
Step 6: enter proxy details
Input the proxy details provided by your provider:
- Host: e.g., proxy.example.com
- Port: e.g., 8080
- Login/Password: Include credentials if required (enable Proxy Auth for premium proxies).
In the Proxy bypass section, you can enter a comma-separated list of hosts to exclude them from using the custom proxy.
Note: Postman respects HTTP_PROXY, HTTPS_PROXY, and NO_PROXY environment variables by default, which can influence proxy behavior and request routing.
Troubleshooting tip: If you encounter connection refused errors, this may indicate misconfigured or missing proxy settings.
Step 7: check proxy functionality
Send a GET request to http://api.ipify.org to verify the proxy. If the returned IP matches your proxy’s address, the Postman proxy settings are correctly configured.
For example, you can also send an HTTP request to https://httpbin.org/ip. This single request will show the IP address seen by the target server, helping you confirm that your proxy is working as expected.
Postman’s proxy settings apply globally to all requests sent from the desktop app. However, you can configure Postman to route specific requests through the proxy or bypass it for certain URLs or IPs, giving you flexibility for different testing scenarios.
If you encounter SSL errors while sending HTTP or HTTPS requests through the proxy, you may need to disable SSL certificate verification in Postman settings.
If changes to your proxy settings do not seem to take effect, try to restart Postman to ensure the new configuration is applied.
Capturing API requests with Postman proxy
One of the standout features of the Postman proxy is its ability to capture API requests directly within the Postman app, giving you a clear window into your network traffic. By configuring a custom proxy configuration in the Proxy tab of your Postman settings, you can route both HTTP and HTTPS requests through your chosen proxy server. This setup allows Postman to intercept and log every API request you make, making it easy to analyze request headers, bodies, and responses in detail.
Once your proxy settings are enabled, all captured API requests will appear in the History tab, letting you review and troubleshoot your API development workflow. This is especially useful when working across different environments or testing how your APIs behave from various locations, as the Postman proxy can capture requests regardless of where they originate.
For even deeper insights, you can pair the Postman proxy with the Postman Interceptor extension in your Chrome browser. This combination allows you to capture and inspect API requests made not just from the Postman app, but also from your browser, providing a comprehensive view of your application’s network activity.
By leveraging the Postman proxy to capture API requests, you gain powerful tools for debugging, monitoring, and optimizing your API traffic—all within a single, streamlined interface. This makes it easier to spot issues, validate configurations, and ensure your APIs are performing as expected, no matter where or how you’re sending requests.
Setting up proxies for different operating systems
If Postman relies on system proxy settings, configure them in your operating system. Keep in mind that setting up proxies for different operating systems may require adjusting your network connection settings to ensure a proper network connection.
For Windows
- Navigate to Settings → Network & Internet → Proxy.
- Enable Manual proxy setup.
- Enter the proxy address and port, then click Save to ensure the settings take effect.
For Linux
- Open Settings → Network.
- Activate Network Proxy.
- Choose Manual, input the proxy address and port, then click Save to apply the changes.
For macOS
- Go to System Settings → Network.
- Click Advanced → Proxies.
- Select the proxy type, enter the address, port, username, and password, then click Save to confirm the configuration.
Common proxy setup issues in Postman
If your Postman proxy is not working, consider these common issues and solutions. Proxy setup issues can disrupt network requests, preventing Postman from properly intercepting or forwarding HTTP communication. Timeout errors in Postman signal that the request took too long to complete, which may be caused by slow APIs, network issues, or proxy problems. Additionally, SSL errors with HTTPS proxies are often related to certificate issues between Postman and the proxy or between the proxy and the target HTTPS server.
Authentication error 407
A 407 error occurs when the proxy requires authentication and the credentials are missing or invalid. This means the proxy server is demanding a username and password, but either they were not provided or are incorrect. Verify the proxy string format: host:port:login:pass.
Outdated Postman version
Older Postman versions may cause proxy issues. Update to the latest version from the official website.
SSL/TLS problems
For proxies using SSL/TLS, ensure SSL Certificate Verification in Settings is properly configured.
Unstable network
A weak internet connection can disrupt proxies. Confirm network stability before retrying.
Firewall blocking
Firewalls or antivirus software may block connections. Add Postman and the proxy server to the firewall’s exceptions.
Proxy server unavailable
If the proxy server is unresponsive, contact your provider or test an alternative server.
Benefits of using a proxy in Postman
Using a proxy in Postman offers:
- Privacy: Hiding your IP address to protect data.
- Geo-targeting: Testing APIs from various locations.
- Load balancing: Distributing requests across IPs.
- Debugging: Analyzing requests and responses.
Datacenter proxies are another option, but they are easier to detect and lack certain key features compared to residential proxies.
These advantages streamline API testing workflows.
Tips for using proxies in Postman
To optimize your Postman proxy experience:
- Choose HTTPS proxies for secure data transfer.
- Assign different proxies to separate environments to avoid conflicts.
- Use environment variables such as http_proxy and https_proxy to configure proxy settings in Postman. Tip: You can set up proxies in different locations by creating environment variables for each location you are testing.
- Monitor proxy performance to prevent delays.
- Select trusted providers like MangoProxy for reliable connections.
Trusted proxy providers
MangoProxy provides access to more than 90 million residential IPs in over 200 countries, ensuring speed and reliability. These proxies are perfect for secure API testing in Postman, with support for HTTP, HTTPS, and SOCKS5, plus city-level geo-targeting. Priced from $0.6/GB and equipped with an IP rotation API, MangoProxy streamlines Postman proxy integration for efficient testing. Integrating custom proxy settings with Postman’s Collection Runner can automate proxy management and enable efficient data gathering., with support for HTTP, HTTPS, and SOCKS5, plus city-level geo-targeting. Priced from $0.6/GB and equipped with an IP rotation API, MangoProxy streamlines Postman proxy integration for efficient testing.

Frequently asked questions
Here we answered the most frequently asked questions.
What proxy types are best for Postman APIs?
Residential proxies excel for privacy and geo-targeting, while data-center proxies offer higher speed. MangoProxy provides both options for flexible Postman proxy settings.
Can HTTP and SOCKS proxies be used together in Postman?
Yes, Postman supports HTTP, HTTPS, and SOCKS proxies. SOCKS5 is suited for complex tasks, while HTTPS ensures secure connections.
Can proxy switching be automated in Postman?
Automate IP rotation using a provider’s API, such as MangoProxy’s, combined with Postman scripts for dynamic Postman proxy management.
How to test proxy stability in Postman?
Send multiple requests to http://api.ipify.org through Postman. Consistent IPs and low latency indicate a stable proxy in Postman.