
How to Set Up Proxies in GoLogin: Profiles, Authentication, and IP Checks
Published: ≈ 12 min read
Quick Answer
In GoLogin, a proxy is assigned to a profile. Use Settings, Proxy, then Your proxy to enter the server, port and proxy credentials. Save after checking the connection. Click Run and inspect the exit IP on an IP-check page in the profile’s browser window.
Key Takeaways
1. Copy the issued proxy credentials; keep your GoLogin and website passwords separate.
2. Recheck the exit inside the profile after changing its proxy.
3. Record the provider’s session duration alongside the profile so a later IP change has an explanation.
4. Keep the authorized source IP in your connection record if the provider uses an allowlist.
What Is GoLogin, and What Does a Profile Keep Separate?
GoLogin is a browser-profile manager. Each profile keeps its own cookies, storage, extensions and fingerprint settings, with the proxy selected separately in that profile’s settings.
What Do You Need Before Configuring a Proxy?
Take the connection details from the provider’s issued-proxy list or connection generator. Keep these values and settings together:
Server address: The endpoint supplied for this proxy or gateway.
Port and protocol: Copy the port together with its HTTP, HTTPS or SOCKS5 setting.
Proxy access: The provider’s proxy credentials, or an authorized source IP if the connection uses an allowlist.
IP behavior: Record whether the exit is fixed, held for a session, or rotated.
When the destination uses HTTPS, an HTTP proxy can carry HTTPS website traffic through a CONNECT tunnel. Choose the proxy protocol from the provider’s connection details rather than from the website’s URL.
Get the Connection Details from MangoProxy
MangoProxy Static ISP supplies a dedicated ISP address for the paid rental period and offers HTTP and SOCKS5.
In the MangoProxy dashboard, the route to an issued ISP proxy is Static proxies, ISP, then Proxy list. Choose an active entry and use the controls below the table to select the protocol and output format. Copy the string and transfer its address, port, login and password to GoLogin.
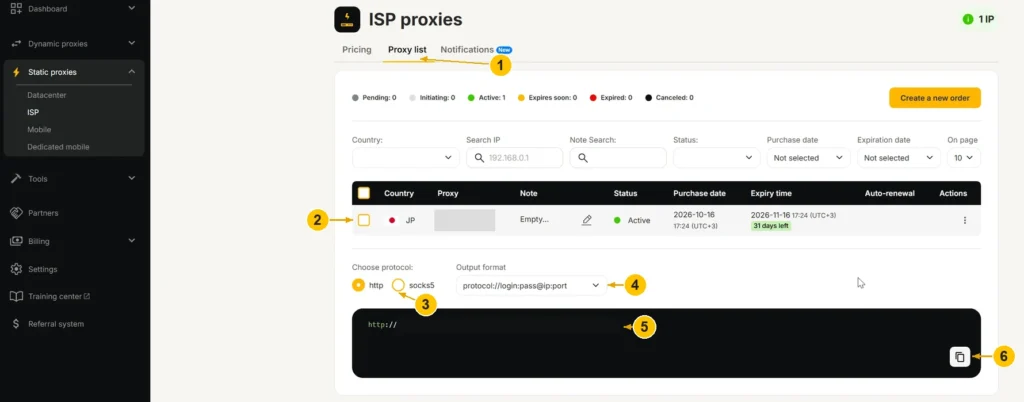
For a dynamic connection, choose a location and session duration in MangoProxy’s configuration panel. Keep those parameters with the profile’s configuration record; the gateway can allocate different exits under different session rules.
How Do You Set Up a New GoLogin Profile with a Proxy?
Create the profile with Your proxy selected and check the connection before using it. The steps below follow GoLogin’s English desktop documentation; the exact layout can vary between app versions.
Create and Save the Profile
1. Click Add profile. Name it for the account or project you will use it for.
2. Select Your proxy on the Proxy tab.
3. Copy the issued server address and port into the form. Add proxy credentials if that connection requires them.
4. Check the protocol. If GoLogin detects it automatically, confirm it matches the provider’s instructions.
5. Use Check Proxy where that control is available. Read any error before proceeding.
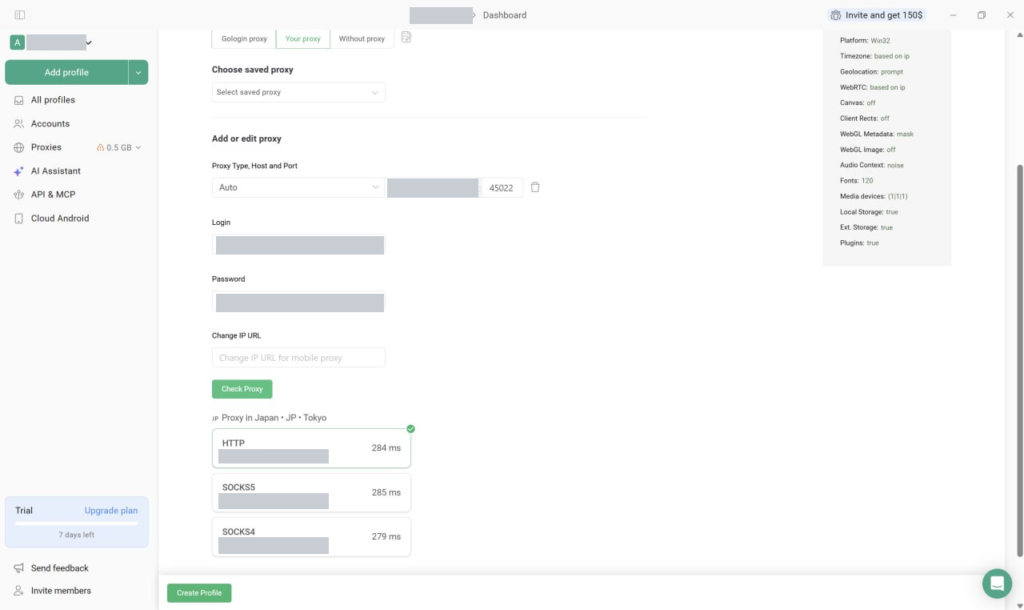
6. Click Create Profile to save the profile.
Keep proxy credentials out of the profile name and notes intended for sharing. A project name and an internal proxy reference are enough to identify the configuration later.
Paste a Full Connection String
GoLogin accepts a full connection string in the profile’s Proxy & Location column. In the manual form, the IP field takes the address alone.
This dummy string illustrates one supported format:
192.0.2.10:8000:demo_user:demo_passwordIt separates into:
Address: 192.0.2.10
Port: 8000
Username: demo_user
Password: demo_password
Use your provider’s values for a real connection. Before saving the pasted string, check how GoLogin split it into fields: the port should be in its own field, and the username should retain all provider-supplied parameters.
Leave Change IP URL empty unless the provider supplies a rotation link. This field is not for a dashboard URL.
How Do You Change the Proxy on an Existing Profile?
Close the profile, edit its saved proxy configuration, and relaunch it before checking the result. On All profiles, open the profile’s three-dot menu, then Settings, Proxy, and Your proxy. Enter the new details and save.
From the Location column, use the plus button and the computer icon to enter your proxy, then click Connect. GoLogin shows a green or red connection indicator.
After a change, check the running profile’s exit again. The proxy record you intended to assign and the address the browser actually uses should agree with your task’s requirements.
How Does Proxy Authentication Work in GoLogin?
Proxy authentication authorizes access to the intermediary server. Your GoLogin sign-in password and the password for a website inside the profile do not provide that authorization.
Username and Password
Use the credentials issued for the proxy connection. For a MangoProxy sub-account connection, take the proxy login and password from that sub-account. Check the copied values for spaces or a line break.
A provider’s generated login may include country or session parameters as well as the user name. Copy it as issued. Use the generator when you need different parameters.
An HTTP 407 Proxy Authentication Required response calls for proxy authentication, so compare the saved credentials and access method with the provider’s issued details. If you pasted a string, inspect how GoLogin split it into fields. Changing your website password will not resolve a proxy authentication challenge. MangoProxy’s guide to 407 Proxy Authentication Required explains the error in more detail.
IP-Based Authorization
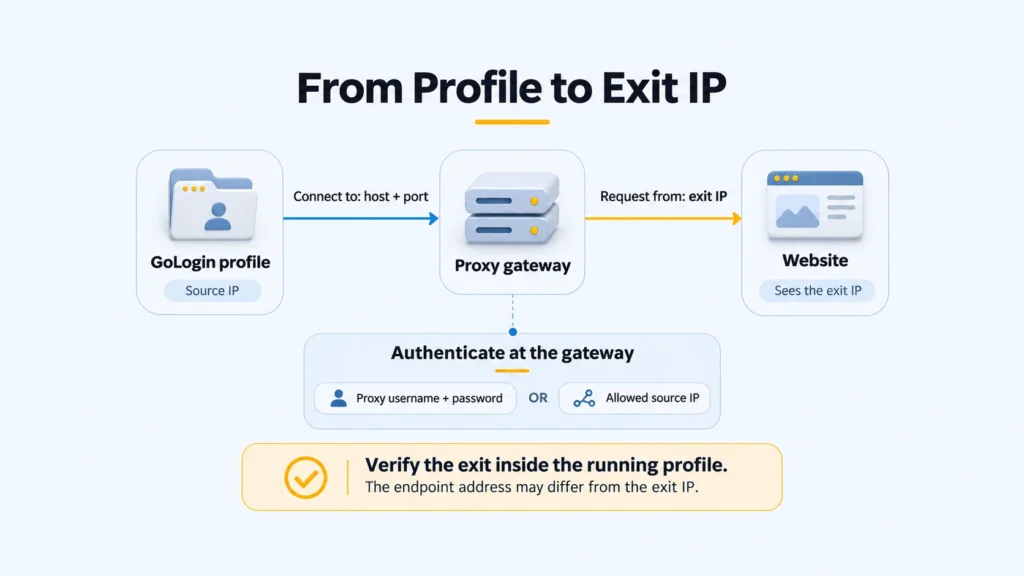
If your provider supports an IP allowlist, authorize the public source address from which it receives your proxy connection. For a desktop profile, this is normally your internet connection’s public IP. Check that source again when a VPN changes the route or the profile moves to another computer or a cloud environment. The address used for authorization is the one arriving at the proxy, before traffic leaves through an exit IP.
For a connection configured for IP-only access, enter the endpoint and port and leave the credential fields blank. If the provider requires credentials as well, use its instructions for that connection.
Should You Use a Static, Sticky, or Rotating IP?
Choose according to how long the profile needs the same exit. Browser-session persistence and proxy-session persistence are controlled separately.
Static IP: Fits repeat visits that require a fixed address, subject to the provider’s assignment and rental conditions.
Sticky session: Holds an allocation for a limited period. Check its duration and what happens if the exit becomes unavailable.
Rotating IP: Changes under the provider’s request, timer, or session rules. Fits research tasks that intentionally need different exits.
Suppose the proxy holds an exit for 30 minutes. That timer can expire while the profile is still open and its login cookies remain saved. If your task needs longer address continuity, choose an appropriate session setting or fixed-address product beforehand.
Where profiles need different network identities, compare their observed exits. Two saved proxy entries can use the same gateway or even produce the same exit. Different names in the profile list do not establish separate public IPs.
How Do You Verify the IP Used by a GoLogin Profile?
Check the outgoing IP inside the profile you configured. An IP-check page opened in your regular browser measures that browser’s connection instead.
1. Run the proxy connection check in GoLogin and read the result.
2. Click Run to launch the configured profile.
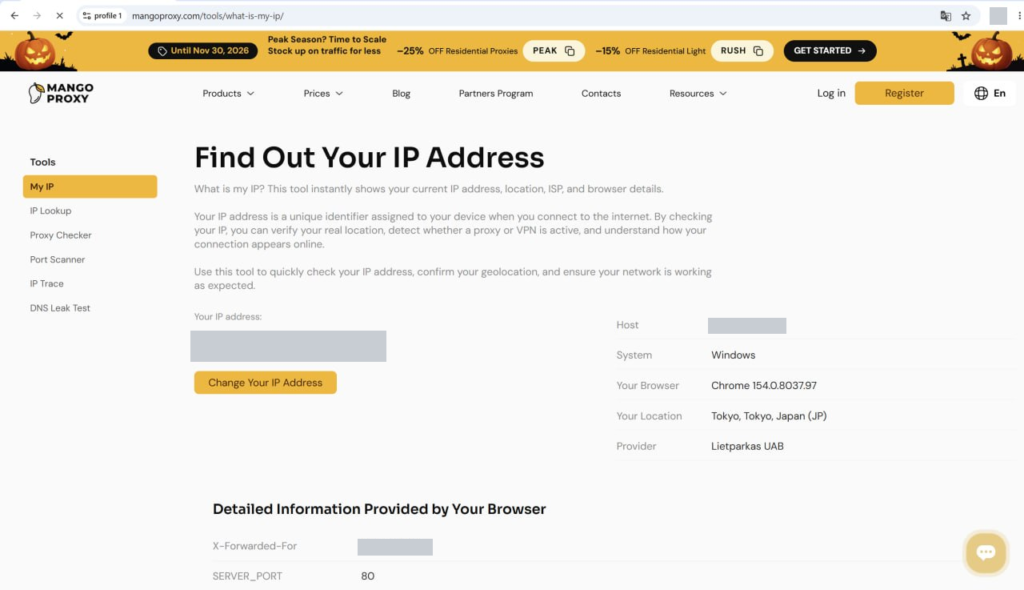
3. Open MangoProxy My IP inside that window.
4. Note the public IP, location, and provider displayed on the page.
5. Check a fixed proxy against its assigned IP. With a pool, check the requested location and session behavior: the gateway is the entry point, so its address need not be the exit shown here.
6. Open the website needed for your task and verify the required action separately.
Record the profile name, check time, protocol, observed exit, and website result. If persistence matters, repeat the IP check after restarting the profile or after the provider’s session interval.
An IP-check page reports the address observed for that page request. Two matching observations support continuity at those times; they do not measure uninterrupted availability between them.
Review Location and Browser Settings
If two checkers show the same address with different city names, compare their geolocation records. The city label alone is not enough to conclude that the browser used another exit.
GoLogin also has browser settings that are separate from the IP lookup. In Timezone, Fill timezone based on the external IP follows the proxy location. In Geolocation, review both the permission mode and Fill geolocation based on the external IP. A website’s permission to request coordinates is a separate decision from the country assigned to your IP by its database.
Check WebRTC separately in the advanced settings. GoLogin offers Based on IP and Off. Off disables the feature, so consider any audio or video calling functions the website needs. A public-IP lookup alone cannot verify WebRTC behavior.
Why Does a GoLogin Proxy Fail or Show an Unexpected Result?
A wrong connection value, rejected access or an inactive service can stop the profile from connecting. Read the expanded error to narrow down the cause. Make one correction and retest before editing another setting.
Observation: The connection indicator is red.
Next check: Hover to read the expanded message. If it points to connection settings, compare the saved address, port and protocol with the issued record. Also check service expiry and remaining traffic.
Observation: An HTTP connection reports 407.
Next check: Compare the proxy credentials with the issued record. For IP-based access, verify the source IP on the allowlist. Keep this separate from website login troubleshooting.
Observation: The browser shows an unexpected IP after a successful connection check.
Next check: Confirm the profile and saved assignment, then check rotation rules and software that can affect routing. GoLogin documents a specific conflict with NordVPN Threat Protection that can cause a VPN address to appear.
Observation: One website fails while other pages load.
Next check: Review that destination’s error and the provider’s access restrictions. A reachable proxy does not establish that every destination accepts traffic through it.
Observation: The configuration works on a hotspot but fails on the usual network.
Next check: Investigate network filtering. When using source-IP authorization, account for the changed address before comparing the tests.
Observation: Custom DNS is configured with an HTTP or HTTPS proxy.
Next check: Remove that custom DNS configuration for the test. GoLogin documents that its custom DNS setting does not work with HTTP/HTTPS proxies.
What Quick Fix Changes
GoLogin’s Quick fix can replace a failed third-party proxy with a built-in GoLogin proxy from the same country, using GoLogin proxy traffic. Select Not now if you want to diagnose and retain your own provider’s connection.
Practical Examples
Example 1: The Gateway and Exit Addresses Differ
Suppose a provider gives you a gateway and the browser check shows a different exit. In this hypothetical example, both addresses are reserved for documentation.
Server entered in GoLogin: 192.0.2.10, port 8000.
Exit displayed by the IP-check page: 203.0.113.20.
Provider’s service: A gateway into a proxy pool.
The differing addresses alone do not establish a fault. GoLogin connects to the gateway; the IP-check page observes the address used to reach it. The useful questions are whether the exit matches the requested location and whether its behavior matches the chosen session mode.
Example 2: Authorization Fails After a Network Change
In this hypothetical workflow, a profile connects from an office network whose public IP is on the provider’s allowlist. The operator switches to a hotspot and the proxy stops authenticating.
Before changing the profile, compare the hotspot’s public source IP with the allowlist. If it is missing, authorize it and repeat the connection check using the same endpoint. This isolates the access change from the saved GoLogin settings.
Choose Your GoLogin Proxy
For a recurring workflow that requires a dedicated ISP address retained during the rental period, review MangoProxy Static ISP Proxies. If the task needs rotation, select the location and session duration before generating the connection. Use the profile’s observed exit and actual website result to assess the configuration you chose.
Glossary
IP: Internet Protocol, which provides addressing and routing for network traffic.
Endpoint: The host and port a client uses to reach a proxy.
Gateway: A proxy entry point that may send connections through different exits.
Exit IP: The source IP a destination sees when it receives a proxied request.
HTTP/HTTPS: HTTP is used for web requests. HTTPS encrypts an HTTP connection. An HTTPS proxy encrypts the client-to-proxy connection; an HTTP proxy can carry HTTPS website traffic through a tunnel.
CONNECT: An HTTP method used to request a tunnel, commonly for HTTPS traffic through an HTTP proxy.
SOCKS5: A protocol for forwarding supported connections through a proxy.
ISP: Internet service provider; here, the network associated with an address.
IP allowlist: Source addresses authorized to access a service.
Sticky session: A temporary proxy allocation governed by the provider’s session rules.
DNS: Domain Name System, used to resolve names to network information such as addresses.
WebRTC: Browser technology used for features such as real-time audio and video communication.
Browser fingerprint: Browser and device characteristics observable by websites.
Final Thoughts
Keep the profile, proxy credentials, and session rules together. Verify the outgoing address in the running profile, then check the website action you need. That gives you a useful baseline when the connection or its behavior changes.
Frequently asked questions
Here we answered the most frequently asked questions.
Can I use third-party proxies instead of GoLogin’s built-in proxies?
Yes. Select Your proxy in the profile settings. External proxy traffic uses your provider’s allowance rather than GoLogin’s built-in proxy balance.
Can I use the same proxy in several GoLogin profiles?
Yes, but the profiles can share a public exit IP. Separate browser data does not remove that common network signal.
Do I need a proxy extension inside GoLogin?
Use the profile’s proxy settings for this setup. GoLogin advises against relying on VPN or proxy extensions inside Orbita because they can cause routing and connection problems.
Can I import multiple proxies?
Yes. GoLogin supports bulk import. Check the resulting proxy-to-profile assignments before launching the profiles for work.
Does a mobile proxy make the profile a mobile device?
No. A mobile proxy changes the network exit. It does not change the profile’s reported operating system or other browser fingerprint settings.