
How to Use Proxies in Node.js: Fetch, Axios, and HTTP Clients
Published: ≈ 12 min read
Quick Answer
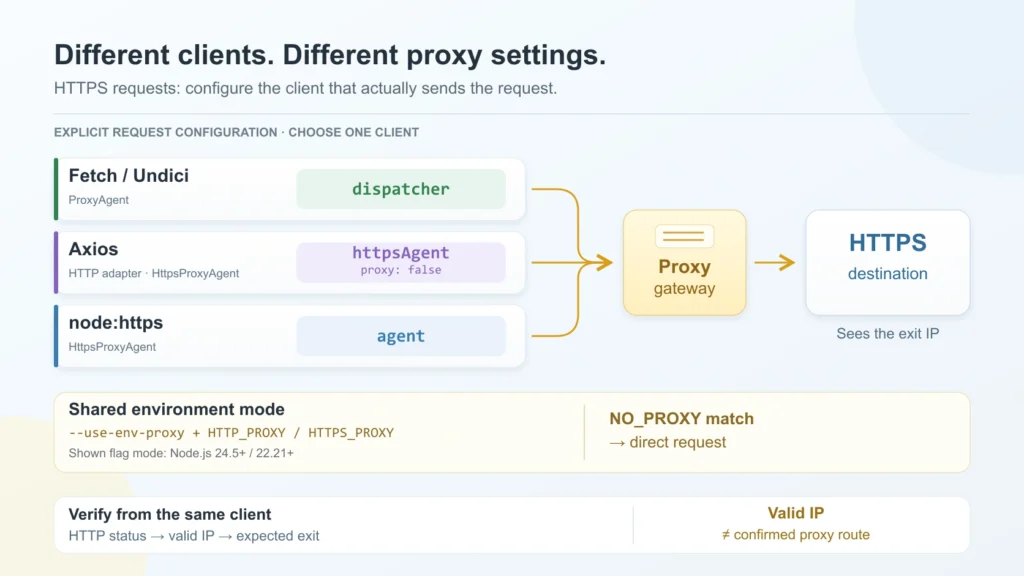
Fetch from Undici takes a dispatcher when you set a proxy in code. In Axios, connect a proxy agent through the HTTP adapter; in Node’s https module, pass it as agent. If Node’s default HTTP clients should share one route, start Node with environment proxy support enabled and set HTTP_PROXY, HTTPS_PROXY, and NO_PROXY.
Each example below calls the same IP service. Read the client label beside the reported address to tell which connection you just checked.
Key Takeaways
- Follow the request to the client that sends it. Another library’s proxy setting will not apply to that call.
- The gateway address you enter can differ from the IP returned by the server. Interpret that result according to your proxy service, especially when rotation is enabled.
- A NO_PROXY exception can send a request directly even when environment proxy support is on.
- Proxy credentials and access credentials for the destination API serve separate purposes.
- Count the check as successful only after checking the HTTP status, reading the reply, and validating its IP field.
Where Is Your Request Configured?
Look at the request call in your code. An axios.get call needs Axios settings, while a built-in Fetch call can use the environment or a compatible dispatcher. Keep the client you already use and choose whether the proxy belongs in its request options or in the process configuration.
The built-in Fetch is based on Undici, but that does not make every object called an agent compatible with it. HttpsProxyAgent, for example, works with the agent system used by Node’s standard HTTP modules. It cannot take the place of an Undici dispatcher in a Fetch request.
The Axios adapter matters too. The examples below explicitly select adapter: ‘http’, so the agent settings apply to the Node.js HTTP adapter. If your application selects the Fetch adapter, review its routing configuration separately.
These settings belong to the Node.js process. A script running in a browser follows that browser’s network settings.
Which Files Should You Create First?
Put the shared checking module and your chosen client file in one folder. The other client variants are optional. Use a current Node.js 24.x installation, with 24.5 as the minimum for the commands below. Check the version before starting:
node --versionInitialize the project in this folder:
npm init -yGive the files the .mjs extension; they use import and top-level await. Install only the packages listed for your chosen client. There are none to add for the built-in Fetch variant.
The agent and dispatcher examples read PROXY_URL from .env:
PROXY_URL=http://USERNAME:[email protected]:8080Replace the sample host and port with your proxy’s details, adding credentials if the connection needs them. You can find those details using How to Find Your Proxy Server Address and Port.
Before saving .env, check the credentials in the URL. A literal @ in the password must appear as %40. Encode each credential separately so the URL separators stay intact, and leave an already encoded connection string as supplied. Keep this file out of version control.
The proxy URL specifies how to reach the gateway. With an http:// gateway and an HTTPS target, the client uses CONNECT to open a tunnel before starting TLS with the target. The authentication exchange with an HTTP gateway remains outside that TLS connection. To use HTTPS at the gateway too, get its HTTPS connection details; changing the scheme alone is not sufficient.
What Should the Shared Check Accept?
All five clients will hand their reply to one function. A status outside 200–299 ends the check. Otherwise, inspect reads the response data and checks the JSON ip value with isIP.
Save the following as check-result.mjs:
import { isIP } from 'node:net';

export const checkUrl = 'https://api.ipify.org?format=json';

export async function inspect(client, send) {
  try {
    const { status, content } = await send();
    if (!Number.isInteger(status) || status < 200 || status > 299) {
      throw Object.assign(new Error('HTTP_STATUS'), { status });
    }
    const record = typeof content === 'string' ? JSON.parse(content) : content;
    if (typeof record?.ip !== 'string' || isIP(record.ip) === 0) {
      throw Object.assign(new Error('IP_FIELD_MISSING'), { code: 'IP_FIELD_MISSING' });
    }
    console.log(JSON.stringify({ client, status, exitIp: record.ip }));
  } catch (problem) {
    console.error(JSON.stringify({
      client,
      result: 'failed',
      type: problem.name,
      code: problem.code ?? problem.cause?.code ?? problem.cause?.cause?.code,
      status: problem.status ?? problem.response?.status,
    }));
    process.exitCode = 1;
  }
}
The check uses ipify’s public API, which is a separate service from MangoProxy. Its IPv4 endpoint gives us the source address seen by that service. Passing isIP establishes that the value is an IP address; comparing it with the expected exit is a separate step.
On success, the output contains client, status, and exitIp. On failure, it contains failed and the available error fields. Only those selected fields are logged: the handler leaves out the password, PROXY_URL, and the full error object. Check logs from other parts of the application before sharing them.
Fetch: When Is Environment Configuration Enough?
Use this option when Node’s standard HTTP clients should share a proxy. Start Node with environment proxy support switched on, as in the command below. A proxy variable by itself does not enable that support for the built-in Fetch.
Save native-fetch.mjs beside check-result.mjs:
import { checkUrl, inspect } from './check-result.mjs';

await inspect('Fetch / env', async () => {
  const reply = await fetch(checkUrl, {
    signal: AbortSignal.timeout(15000),
  });
  return { status: reply.status, content: await reply.text() };
});
For the built-in Fetch variant, put these variables in .env.native:
HTTP_PROXY=http://USERNAME:[email protected]:8080
HTTPS_PROXY=http://USERNAME:[email protected]:8080
NO_PROXY=localhost,127.0.0.1
Start Node with this file and proxy support enabled:
node --use-env-proxy --env-file=.env.native native-fetch.mjsThe https:// target selects HTTPS_PROXY. Inside that variable, an http:// URL is valid for a gateway reached over HTTP. Put destinations that should go directly in NO_PROXY.
The minimum release depends on which part you use:
Fetch with environment proxy support: 24.0.0 or 22.21.0.
The http/https modules and –use-env-proxy flag: 24.5.0 or 22.21.0.
For an older installation, choose a connection method compatible with that release.
If the shell or service has already set a variable, that value wins over the same entry in the file. Look there if an edit to .env seems to have no effect. Check lowercase variants as well. An agent or dispatcher explicitly passed to a client can also select its own route.
Fetch: How Can One Request Use Its Own Proxy?
For a route chosen in code, pass a dispatcher with the request. Here both fetch and ProxyAgent come from the installed undici package, so the two components use the same implementation.
Install the package branch compatible with the environment used here:
npm install undici@7Create undici-fetch.mjs:
import { fetch, ProxyAgent } from 'undici';
import { checkUrl, inspect } from './check-result.mjs';

await inspect('Fetch / dispatcher', async () => {
  const gateway = new URL(process.env.PROXY_URL);
  const user = decodeURIComponent(gateway.username);
  const password = decodeURIComponent(gateway.password);
  const token = user || password
    ? 'Basic ' + Buffer.from(user + ':' + password).toString('base64')
    : undefined;
  gateway.username = '';
  gateway.password = '';
  const route = new ProxyAgent({ uri: gateway.href, token });
  try {
    const reply = await fetch(checkUrl, {
      dispatcher: route,
      signal: AbortSignal.timeout(15000),
    });
    return { status: reply.status, content: await reply.text() };
  } finally {
    await route.close();
  }
});
Run it with the main .env file containing PROXY_URL:
node --env-file=.env undici-fetch.mjsProxyAgent receives its authorization value separately from the gateway URL. The example builds that value from the decoded username and password. Those credentials authorize the proxy connection. An API token, if required, belongs in the request to that API.
Here, finally closes the dispatcher after one response. For a task with several requests, reuse the dispatcher until all of them finish, then close it. That lets the client reuse connections.
The built-in Fetch also accepts a compatible dispatcher. Before passing it one from a separate Undici installation, check the version bundled with Node.js.
How Does Axios Use the Proxy Agent?
The request below gives httpsAgent a HttpsProxyAgent instance. The accompanying proxy: false tells Axios to leave proxy routing to that instance.
Install the packages for this variant:
npm install axios@1 https-proxy-agent@7Save axios-proxy.mjs:
import axios from 'axios';
import { HttpsProxyAgent } from 'https-proxy-agent';
import { checkUrl, inspect } from './check-result.mjs';

await inspect('Axios / HTTPS agent', async () => {
  const route = new HttpsProxyAgent(new URL(process.env.PROXY_URL));
  try {
    const reply = await axios.get(checkUrl, {
      adapter: 'http',
      httpsAgent: route,
      proxy: false,
      maxRedirects: 0,
      signal: AbortSignal.timeout(15000),
    });
    return { status: reply.status, content: reply.data };
  } finally {
    route.destroy();
  }
});
Run:
node --env-file=.env axios-proxy.mjsThis setting handles an HTTPS destination. An HTTP target needs the corresponding httpAgent; the http-proxy-agent package is one option. The name HttpsProxyAgent does not itself require an https:// gateway URL.
Automatic redirects are disabled here. With maxRedirects: 0, a 301 or 302 is reported as an error instead of being followed. Before allowing redirects, check which protocols the new URLs may use and provide agents for them.
Axios can also take connection details through its own proxy object. That alternative is outside the agent configuration shown here; consult the documentation for your installed version before using it.
How Do You Run the Same Check with the Standard https Module?
With https.get, you pass the agent directly, without Axios in between. Its response callback receives a stream. Read that stream before handing the content to inspect.
Only the agent package is needed:
npm install https-proxy-agent@7Save https-proxy.mjs:
import https from 'node:https';
import { HttpsProxyAgent } from 'https-proxy-agent';
import { checkUrl, inspect } from './check-result.mjs';

await inspect('node:https', async () => {
  const route = new HttpsProxyAgent(new URL(process.env.PROXY_URL));
  try {
    const reply = await new Promise((received, failed) => {
      https.get(checkUrl, {
        agent: route,
        signal: AbortSignal.timeout(15000),
      }, received).once('error', failed);
    });
    reply.setEncoding('utf8');
    let content = '';
    for await (const part of reply) content += part;
    return { status: reply.statusCode, content };
  } finally {
    route.destroy();
  }
});
Run:
node --env-file=.env https-proxy.mjsThe for await loop reads response chunks until the stream ends. Holding the small IP reply in memory is enough for this check. A large download needs streaming processing and a limit on its size. For a 301 or 302, your code must decide whether to follow the redirect; https.get does not do that automatically.
Which Agent Handles a SOCKS Connection?
A SOCKS URL needs SocksProxyAgent in this example. An HTTP proxy agent cannot speak SOCKS; changing PROXY_URL without changing the agent will not configure that connection.
Install:
npm install axios@1 socks-proxy-agent@8.env.socks supplies PROXY_URL for this variant:
PROXY_URL=socks5h://USERNAME:[email protected]:1080Choose socks5h:// when the destination name should be resolved through the proxy. With socks5://, this library does the lookup on the client. Get the SOCKS host and port from your service settings. An HTTP gateway’s settings do not tell you which SOCKS connection is available.
Save axios-socks.mjs:
import axios from 'axios';
import { SocksProxyAgent } from 'socks-proxy-agent';
import { checkUrl, inspect } from './check-result.mjs';

await inspect('Axios / SOCKS', async () => {
  const route = new SocksProxyAgent(new URL(process.env.PROXY_URL));
  try {
    const reply = await axios.get(checkUrl, {
      adapter: 'http',
      httpAgent: route,
      httpsAgent: route,
      proxy: false,
      maxRedirects: 0,
      signal: AbortSignal.timeout(15000),
    });
    return { status: reply.status, content: reply.data };
  } finally {
    route.destroy();
  }
});
Run:
node --env-file=.env.socks axios-socks.mjsThe code in this article is provided for illustration. It may behave differently or fail to run depending on your environment settings, software and library versions, or changes to the services and APIs it uses. Before using the examples, test them in your own environment and adapt them as needed.
Both httpAgent and httpsAgent point to this SOCKS agent. Redirects are still off. Test the SOCKS configuration separately if your application also has an HTTP proxy connection.
Where Do node-fetch and Got Accept an Agent?
Keep the client you use and find where it accepts an agent. In node-fetch, this is the agent option, which can also be a function that selects an agent based on the request URL. That differs from the dispatcher accepted by Fetch from Undici.
Got uses agent.http for an HTTP target and agent.https for an HTTPS target. Check that nesting when moving settings into your application. This describes HTTP/1.1; HTTP/2 requires a separate review of the client’s capabilities.
How Should You Interpret exitIp?
Read client and status before comparing exitIp. They identify the check that produced the address. The IP validation only rules out a malformed value; your service settings determine which address to expect and whether it should persist.
Compare exitIp with the expected connection. A rotating service may present different addresses on repeated requests. If a static exit changes unexpectedly, revisit the settings and service conditions. Logs at the gateway or destination, if available, can help trace the request.
Suppose a Fetch check succeeds but reports an unexpected IP. One place to look is .env.native: an api.ipify.org entry in NO_PROXY permits a direct request. Remove that exception if the check must use the proxy. A successful HTTP status alone would not reveal this routing mistake.
The IP check may pass while the application API returns 401. Check the credentials and request format for that API. Changing this proxy agent will not provide a missing API token.
When investigating a failure, work through the connection stages:
Before an HTTP response arrives. Start with the gateway URL and port. For ECONNREFUSED, investigate the refused connection. For ENOTFOUND, identify which hostname failed to resolve before assuming the problem is at the destination.
While creating the tunnel. Check proxy access and whether the destination is allowed. A 407 rejection may appear inside a Fetch error’s cause, so a missing status field on the outer error does not rule out an authentication problem.
While establishing TLS. Check the connection protocol and the certificates Node is configured to trust. A corporate network may require a certificate authority supplied by its administrator. Disabling certificate verification changes the connection’s protection.
After receiving a response. Identify its source before interpreting the status. For a 403 or 429 from the API, inspect that API’s permissions and limits. The content matters too: an HTML page in place of JSON can cause SyntaxError in inspect. IP_FIELD_MISSING tells you that the reply contained no valid ip value.
The AbortSignal deadline limits the wait in these examples. If it expires, you still need to find where the delay occurred. Get one request working before adding parallel calls or automatic retries.
Use these as setup examples and verify them in the environment where they will run. A reply from the IP endpoint does not guarantee that another destination is reachable.
Which Connection Should You Use?
With existing proxy details, you can return to the client example. If you still need a service, base the choice on the exit location and whether the IP should stay fixed or rotate. Which Proxies to Choose: Proxy Types Comparison helps connect those requirements to the available options.
For further integration examples, visit MangoProxy for Developers. Store the routing settings alongside the client code so they remain easy to trace after an environment change.
Glossary
Gateway: the entry point the client connects to at a proxy service.
Exit IP: the address the destination server sees as the source of a request.
Dispatcher: an object implementing Undici’s interface for dispatching requests.
Agent: manages the connections used by an HTTP client.
Axios adapter: the part of Axios that sends a request in its runtime environment.
CONNECT: HTTP’s method for requesting a tunnel through a proxy.
TLS: protects the connection carrying HTTPS traffic.
DNS: looks up IP addresses for hostnames. Here, the important detail is whether the client or the proxy performs that lookup.
SOCKS5: a proxy protocol with its own connection establishment procedure.
API: a service’s programmatic interface.
JSON: the text data format returned by the selected IP service.
HTTP/1.1 and HTTP/2: protocol versions that transmit requests differently.
Final Thoughts
Keep track of the client making the request and where its proxy settings come from. The shared result function helps compare clients while preserving their different connection methods. Finish by checking the integration against the API your application needs.
Frequently asked questions
Here we answered the most frequently asked questions.
Does an HTTPS destination require port 443 on the proxy?
Use the port supplied for your gateway and connection protocol. The destination server’s port and the proxy entry port have different jobs; you should not infer one from the other.
Can I replace the ipify address with my application API?
Yes, but the shared inspect function expects JSON containing an ip field. For another API, change the content validation to match its response. Otherwise, a correct response from that service may be reported as a format error.
Is creating a new agent enough to get a different IP?
Creating a new agent changes how client connections are managed. Exit address assignment depends on the proxy service’s mode. Use the rotation settings provided by the service rather than treating agent closure as a universal command to change IPs.