
How to Configure a Proxy on Windows 11
Published: ≈ 8 min read
Quick Answer
With a hostname and port ready, you can use the manual entry on the Windows Proxy page: Settings → Network & internet → Proxy. Select Set up beside Use a proxy server. The dialog contains a switch for enabling the entry, an address box, and a port box. Enter your details and select Save. A configuration URL belongs under Use setup script. Automatically detect settings is intended for a network that provides proxy information through discovery.
There is one more job after saving: checking the program you need. Try the website or operation that brought you to these settings. A working browser alongside a failing app is a reason to inspect the app’s own proxy configuration. Replacing the server may leave the actual problem untouched.
Key Takeaways
- Your connection instructions determine which Windows option to use.
- A password cannot replace a missing server address or port.
- An exception may explain why a particular website takes a direct route.
- An IP lookup is useful, but the website or operation you need must work too.
- Write down existing settings before editing them; restoring a connection is easier with the original values available.
Step 1. Gather the Connection Details
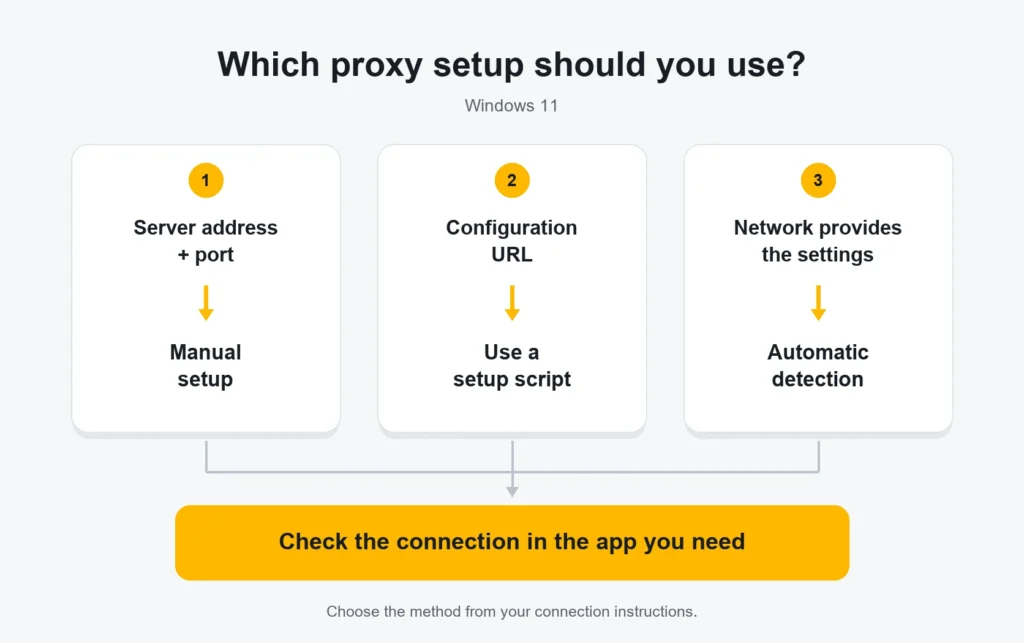
Look at the connection instructions before opening Settings. Locate the server’s hostname or IP and the associated port. A provider’s export may put everything on one line. Identify the individual values before copying anything into Windows.
Also check the protocol and access method. A provider may give you credentials, while an organization may specify another authentication arrangement. Those details matter later, even though the manual Windows dialog has no username and password boxes.
For script-based setup, the supplied URL is the detail you need. Copy that address in full. There is no need to open the file and pick a server out of its rules.
On a company laptop, you may find that a control is unavailable or that an old setting returns after saving. Ask your IT team about the required configuration in that case; repeated local edits may not resolve it.
Step 2. Open Proxy Settings
The Win + I shortcut opens Settings. From there, Network & internet contains the Proxy page. Before changing it, make a note of any existing address and the options currently enabled. You may need those details again.
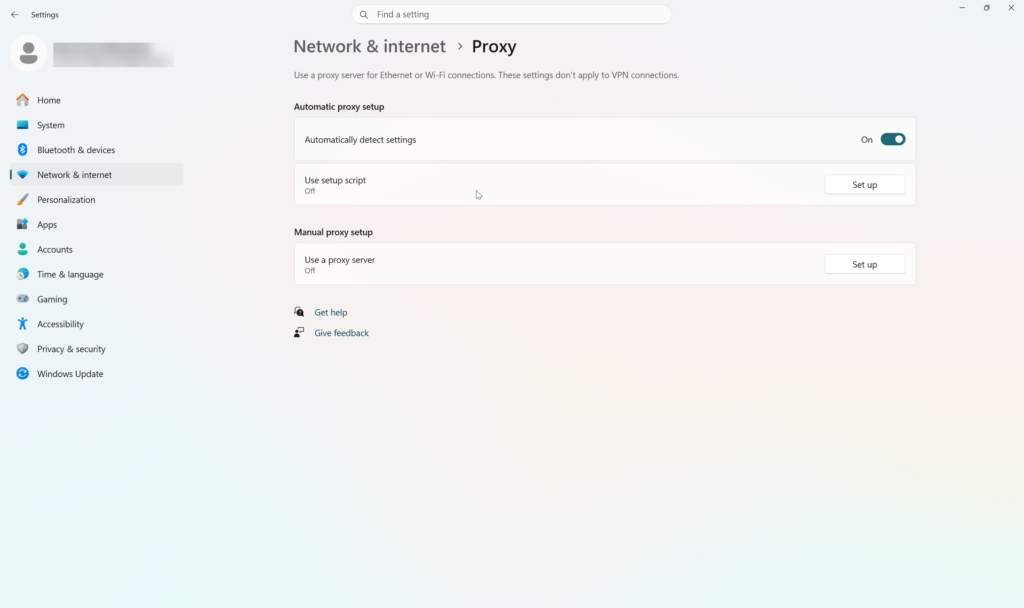
You will see automatic options alongside Manual proxy setup. Choose the section identified in your connection instructions. Wi-Fi and Ethernet use the setup described here. When the proxy belongs to a VPN connection, Windows provides a separate configuration for that VPN.
Step 3. Add the Server Manually
Open Set up beside Use a proxy server and turn the option on. Put only the server name or IP in the address box. The port number has its own field labelled Port. Save the entry.
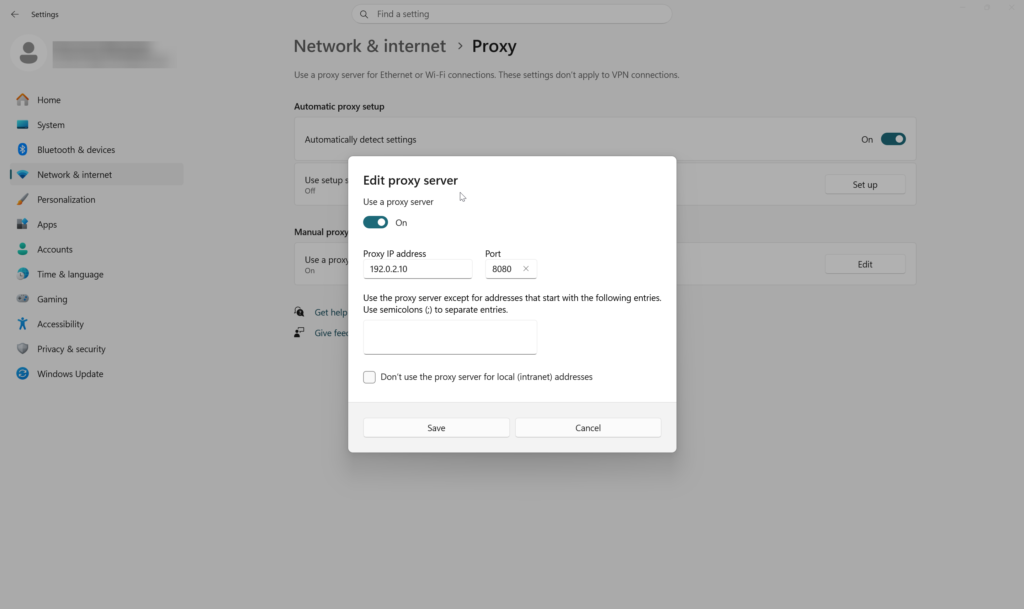
For illustration, the two fields might contain:
Address: 192.0.2.10
Port: 8080
Use the values from your provider in place of this example. Nothing in the guide supplies a working proxy connection.
Below the server fields, check the exceptions. An exception sends matching destinations outside this proxy configuration. A semicolon separates one entry from the next. There is also a checkbox for local intranet addresses; your network’s instructions should tell you whether those resources need the proxy.
Check that your chosen IP-lookup site is not among these exceptions. Otherwise, a request sent directly to that site could make a correctly saved proxy look unused.
Step 4. Enter the Script URL, If Your Network Uses One
For a supplied configuration URL, open Set up beside Use setup script. Enable the script and enter its URL in the address field provided by this dialog, then save. The manual server entry serves a different purpose and should not contain that URL.
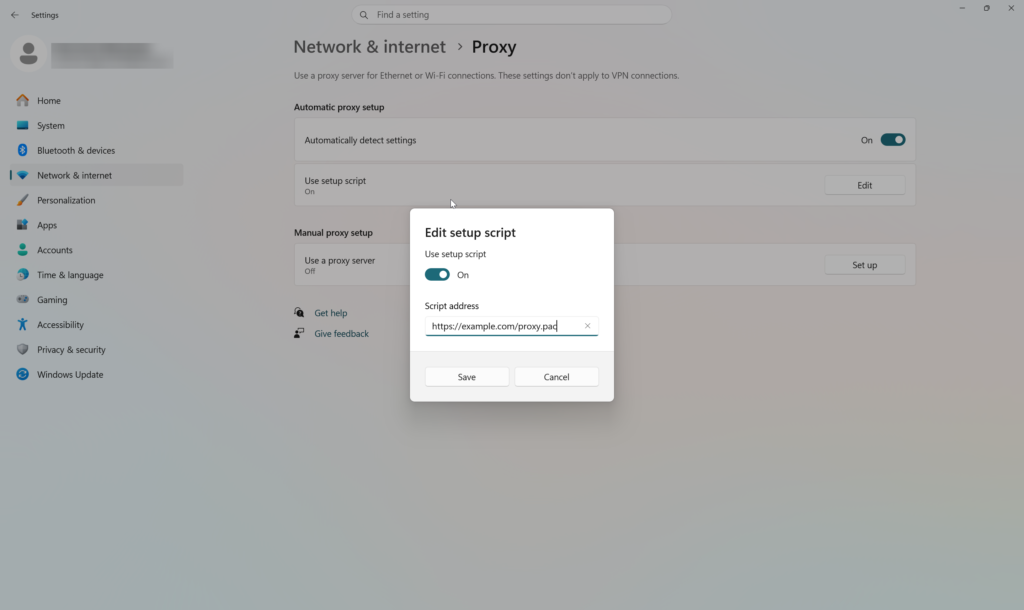
Automatic detection needs no pasted URL. Enable Automatically detect settings when the network administrator tells you that discovery is available. Turning it on cannot provide a proxy in a network that has no suitable configuration to discover.
Your network may prescribe more than one enabled option, so use its documented configuration. With a script, direct access to one destination can be intentional even when another destination requires a proxy.
Step 5. Try the Connection
Open an IP lookup in the browser you will use. If your provider supplied an expected exit address, compare it with the result. Then visit your target site or repeat the operation you needed.
Seeing an address on a lookup page and getting your work done are separate checks. An IP lookup observes the request reaching that service. Opening your target site checks whether the required task works. Neither result establishes the route of every other application on the PC.
Keep the comparison controlled. Switching networks or connecting a VPN between requests can change the observed address too. If a script is active, remember that its decision may depend on the destination.
Firefox is a useful example of why the app matters. Its connection options include system settings, an independent manual entry, a configuration URL, and no proxy. Look there if Firefox appears unaffected by your Windows change.
Step 6. Narrow Down a Failure
Keep the failed request available while you investigate. Compare one setting with the supplied details, make any necessary correction, and try that request again.
- No pages load: compare the saved address and port with your connection details. A matching entry leaves other questions open, including whether the server is available and whether the client has the required access.
- One destination behaves differently: inspect the exception list or script decision for that destination.
- One app fails: inspect its connection preferences. Also check whether an extension supplies a different proxy.
- The trouble occurs with a VPN connected: investigate the configuration associated with that VPN session.
A useful support report identifies the affected program and destination, the configured hostname and port, the error text, and when it occurred. That gives them a concrete failure to investigate. Credentials should stay out of the report.
Why Can a Windows Service Behave Differently From a Browser?
A service may run under another account and obtain its proxy information through different networking facilities. The settings visible to the signed-in user are therefore only part of the investigation.
This also explains the limits of netsh winhttp. Commands in that context manage WinHTTP settings; their output cannot describe every browser profile and client on the device. The service’s own instructions are the appropriate starting point for its proxy setup.
Practical Examples
Consider these two possible cases. They are examples for explanation, without measured test results.
After a manual edit, the lookup page still displays the previous IP. Two details deserve attention before changing servers: the browser’s selected connection mode and any exception matching that page. The lookup might have used a direct route.
A company configuration script lets an internal portal load while an external site fails. The portal’s success does not validate the proxy endpoint selected for the external request. Check the rule for the failing destination.
What to Do Next
Still missing the server details? The guide to finding a proxy server address and port covers where to look. An ERR_PROXY_CONNECTION_FAILED message calls for checking the proxy selected by the affected browser. Different results in two programs call for a comparison of their active settings.
Glossary
Endpoint: the address and port identifying the server side of a connection.
System proxy configuration: connection information supplied through Windows for participating applications.
PAC script: a configuration file containing rules for choosing a proxy or direct access.
Bypass entry: an exception for destinations that should avoid this proxy.
WinHTTP: Windows networking facilities whose proxy settings require their own investigation.
Final Thoughts
Return to the website or operation you needed when you began. Save the appropriate Windows settings, inspect that app’s connection mode, and test the actual task. A short record of the previous configuration and your edits will help if the same fault returns later.
Frequently asked questions
Here we answered the most frequently asked questions.
Where Should I Enter My Password?
Keep credentials out of the hostname and port fields. A browser can request them during connection, but the available authentication method depends on the client and proxy. Use the provider’s instructions to resolve a rejected login or an expected prompt that never appears.
Where Is the SOCKS5 Setting?
The manual dialog covered here has no separate SOCKS5 selector. Configure a SOCKS5 connection in software that documents support for it; that software determines where the server details and credentials belong.
Does Every Program Use This Entry?
You need to check the programs involved. Some read Windows settings; others have a separate connection configuration. A successful browser request gives no answer about those other clients.
How Can I Restore My Previous Connection?
The Proxy page lets you return to the manual or script dialog you edited. Restore the settings you recorded earlier, or disable the manual entry or script you enabled yourself and save. Follow your administrator’s instructions on a managed computer.
Why Am I Still Seeing the Same IP?
The lookup has reported the source address of the request it received. Check for an exception affecting that site, a script choosing direct access, or a browser using its own connection mode. Correct one item and repeat the lookup without changing networks or other conditions.