


How to Set Up a Proxy on macOS
Published: ≈ 13 min read
Quick Answer
Your Mac’s proxy controls are under System Settings → Network. Open Details → Proxies for the connection you are using. With an HTTP proxy, complete Web Proxy (HTTP) and Secure Web Proxy (HTTPS). With SOCKS5, complete SOCKS Proxy. Each needs the server and port; enter the proxy login too if required. Click OK when finished.
Then check the IP in your browser. That check covers the browser’s request only. Firefox can have its own proxy settings, and Chrome does not support a SOCKS5 connection that requires a username and password.
Key Takeaways
- Choose the active network service. Configuring a proxy for Wi-Fi leaves the Ethernet service unchanged.
- Enter the IP or hostname in Server, with the port and credentials in their own fields.
- HTTP proxies can carry HTTPS requests. Complete the HTTPS section too, using the same details if that is what your provider supplied.
- Test in the app you need. The settings window records a configuration, while a request shows the result for that app.
Which Details Should You Have Ready?
Your provider or network administrator should supply the server address, port and protocol, along with any instructions for proxy authentication. Use the connection credentials they issue. The dashboard account may use a different password.
To compare the two protocols before setup, see HTTP vs SOCKS5 Proxy: What Is the Difference?.
Before you edit anything, record the IP shown by What Is My IP. Also record the current servers, enabled proxy modes and exceptions on the Mac. Those notes let you compare addresses and restore the original setup. For a Mac managed by your organization, agree the change with its administrator first.
For help locating the details, see How To Find Your Proxy Server Address and Port. Your router address and the IP reported by a checking page are not substitutes for those details.
Where Can You Find Your MangoProxy Connection Details?
If you need a fixed address from an internet service provider’s network, a static ISP proxy is one option. With MangoProxy, the address stays assigned to you for the paid rental period, with HTTP and SOCKS5 available. Whichever IP type you choose, macOS still needs the same connection fields filled in.
Already have an active static ISP proxy? In the MangoProxy dashboard, go to Static proxies → ISP → Proxy list and find its active entry. Choose HTTP or SOCKS5 and the connection string format you want to copy. You will enter the address and port separately from the username and password in macOS.
For a new order, the ISP section lets you choose a country, how many IPs you need and the rental period. Once your proxy appears as active, open the proxy list to collect its connection details.
The screenshot below identifies the protocol selector and the connection details you need to take from the dashboard into macOS.
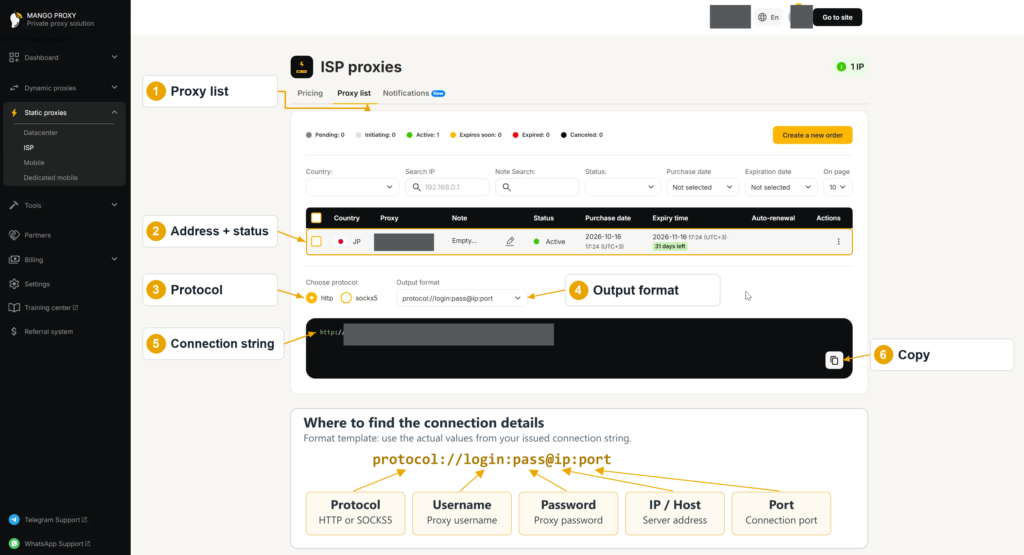
Choose the HTTP option if you will use Chrome with a proxy username and password. Copy each part of the string to its matching field in macOS.
How Do You Configure a Proxy in macOS System Settings?
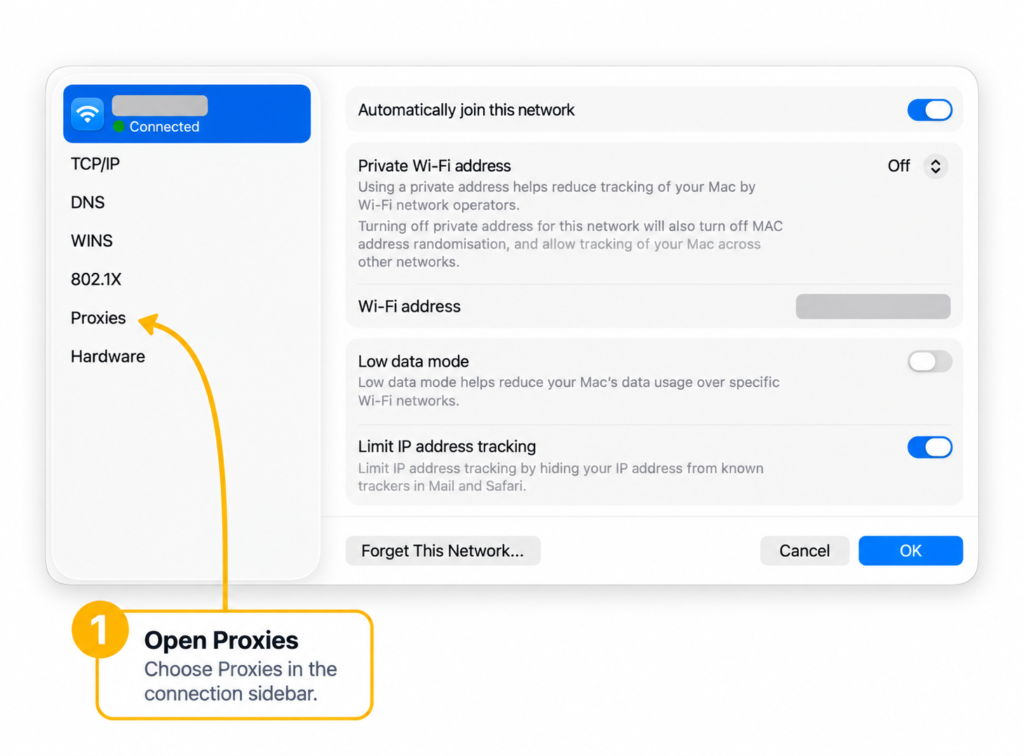
Choose the network service carrying your current connection. This walkthrough uses the macOS interface with Details → Proxies. If your Mac has a different layout, use the version selector in Apple’s proxy setup guide to find the matching instructions.
An HTTP Proxy for HTTP and HTTPS Sites
- Open System Settings from the Apple menu. Go to Network.
- Choose the active service: Wi-Fi or Ethernet. Click Details → Proxies.
- Switch on Web Proxy (HTTP). Copy your proxy’s address into Server and its port number into Port.
- If the proxy needs a login, switch on Proxy server requires password. Enter the issued username and password.
- Switch on Secure Web Proxy (HTTPS). If one HTTP proxy was supplied for both HTTP and HTTPS sites, copy the address, port and credentials into this section as well.
- Click OK. Try loading a page in the browser you are setting up.
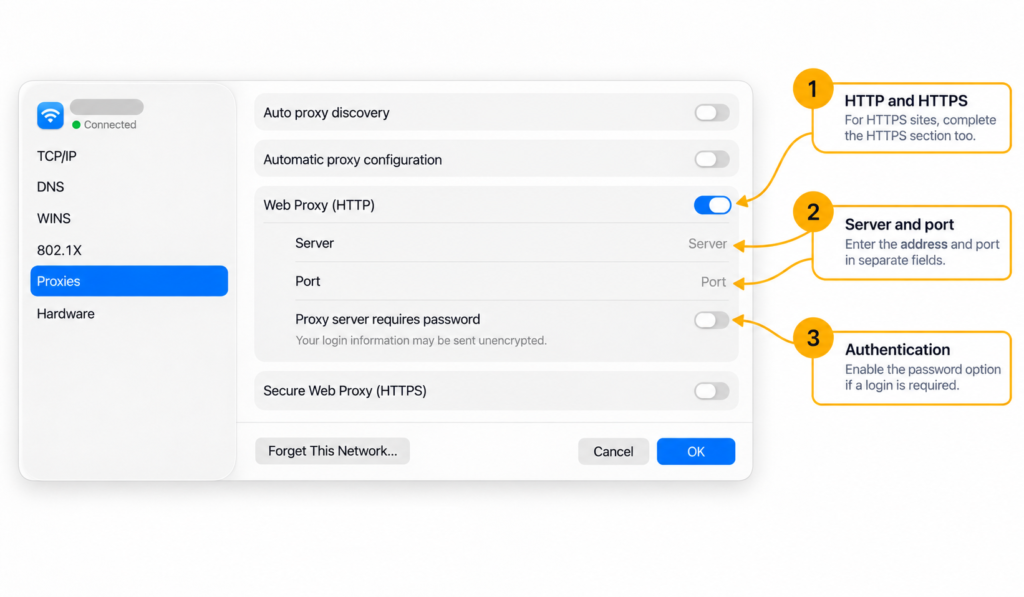
Remove any http:// prefix, username or port from Server. Only the address belongs there. Use the port in your issued proxy details. Website ports such as 80 and 443 do not determine that value.
An HTTP proxy can carry HTTPS by opening a CONNECT tunnel for the browser’s encrypted exchange with the site. Whether the browser-to-proxy connection is itself encrypted is a different question, which the macOS toggle’s name does not answer.
A SOCKS5 Proxy
- In Network, open the active service and choose Details → Proxies.
- Disable the HTTP and HTTPS options if you added them for the previous test.
- Turn on SOCKS Proxy and fill in the issued SOCKS5 address and port.
- Turn on Proxy server requires password for an authenticated connection. Fill in the proxy username and password.
- Save with OK. Use a compatible app to send a test request.
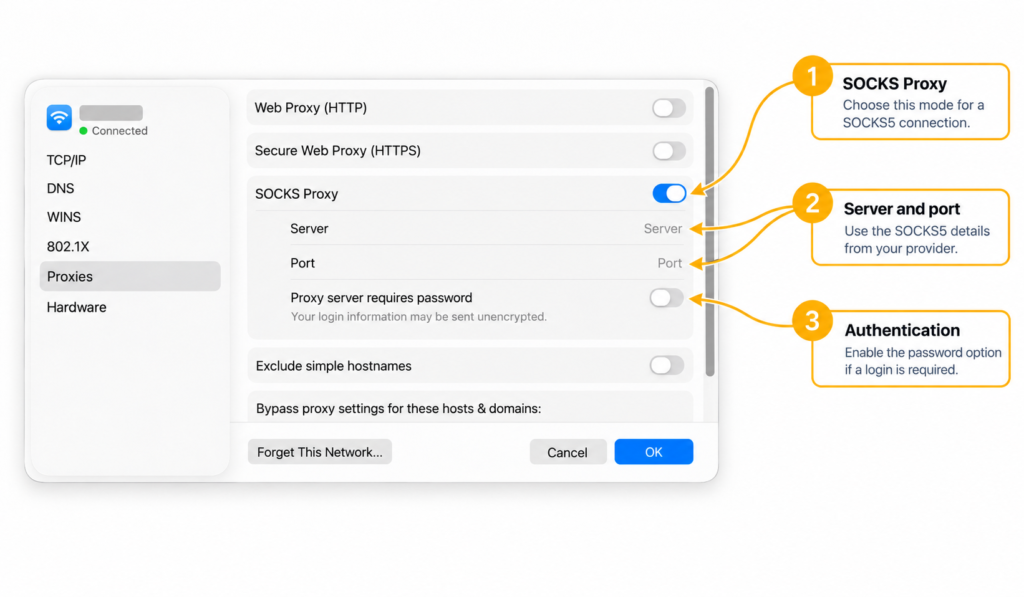
For Chrome with proxy credentials, choose HTTP. Chrome does not support SOCKS5 authentication. Saving the password in macOS does not enable it. For authenticated SOCKS5, use a different client whose documentation confirms support.
When Should You Use PAC or Bypass Rules?
Use automatic configuration when you have been given a PAC file URL containing connection rules. Switch on Automatic proxy configuration and paste the file address into URL. Its rules may send one destination through a proxy while connecting directly to another. A server address and port alone are not a PAC file URL.
Auto proxy discovery is another way to obtain settings from the network. Leave it off when you are simply entering the address and port manually.
Put hosts and domains in the bypass list when you want a direct connection to them, separating entries with commas. Exclude simple hostnames covers names with no dot, such as a single-word internal server name.
Preserve existing entries unless changing those exclusions is part of your setup. Your checking page should not be excluded: a matching bypass entry would send it directly.
Will Your Browser Use the macOS Settings?
Safari follows the Mac’s network settings. Chrome normally does too. Firefox offers a choice between the system configuration and its own settings. Check installed proxy extensions as well, since one may control the browser’s connection.
For more on which apps follow these settings, see System Proxy Explained: How OS-Level Proxy Settings Work.
Safari
Try opening the site in Safari after saving the macOS configuration. Safari also offers a shortcut to those controls: open Safari → Settings → Advanced and click Change Settings beside Proxies. You will be taken to the Mac’s network settings, where the change is not limited to a single Safari window.
Google Chrome
Try a page in Chrome after saving the Mac’s settings. A proxy sign-in prompt may still appear. Answer it with the proxy credentials. Chrome may ask for them despite their being saved in macOS.
Check Chrome extensions and managed settings if the browser still connects differently. After each adjustment, retry the page before making the next change. That keeps a server, protocol or exception change from being confused with another adjustment.
Other Chrome setup methods are covered in How to Set Up a Proxy in Google Chrome.
Mozilla Firefox
Search for “proxy” in Firefox Settings to find its connection options. To follow the macOS configuration, select Use system proxy settings..
If manual configuration is selected, check the server and port saved there or switch to the system mode. For the remaining browser options, see Firefox Proxy Settings.
How Can You Check That Your Browser Uses the Proxy?
Use an IP check and a visit to your target site together. They answer different questions: which address the checking service sees, and whether the site you need actually loads in that browser.
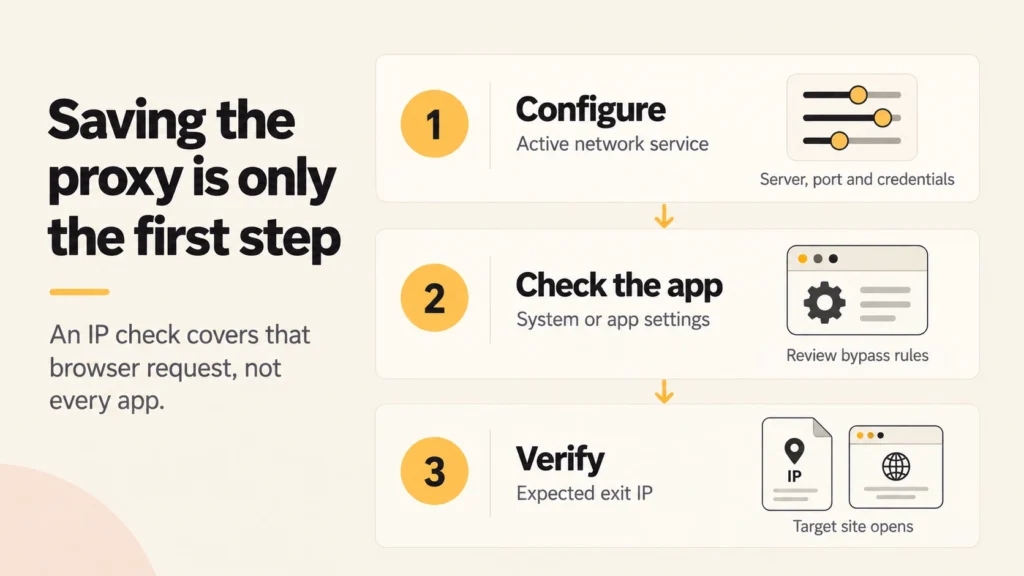
- Refresh the IP-checking page from before setup in the same browser. Keep the network and VPN unchanged for this comparison.
- Compare the old address, the new result and the expected exit IP. A gateway’s connection address need not be its exit address, and rotation may change the exit between requests.
- Go to your target site and try a normal action, such as opening a page on your own website.
- Check any other browser you plan to use separately.
Seeing the expected IP in Safari confirms the result of Safari’s request to the checking service. Another app may connect differently. Compare the IP numbers first. The country comes from a location database and may be wrong.
For an unexpected IP, check which network service is active, which settings the browser uses and whether the test site matches a bypass entry. Account for a running VPN too. The timing of an IP change alone cannot tell you whether the proxy caused it.
What Should You Check If the Connection Fails?
Pages Stop Loading After You Enable the Proxy
Put back the configuration you recorded before setup and try the same page. If the page returns, inspect the added proxy settings against the issued details: the Server field, the protocol’s port and the credentials. Check the proxy status with your provider. If the earlier configuration does not restore access, try another site you know works and check the network connection.
If Chrome specifically shows ERR_PROXY_CONNECTION_FAILED, follow the checks in ERR_PROXY_CONNECTION_FAILED: Causes and Fixes.
Why Does the Browser Keep Asking for a Proxy Password?
A 407 response asks for authentication to the HTTP proxy. Re-enter the proxy credentials under both HTTP and HTTPS. If that does not resolve the error, confirm the required authentication method with your provider. The password for the website you are opening will not resolve this problem.
The IP Changes in One Browser but Not Another
Look at the second browser’s connection options. A manual proxy entry or extension may be controlling the connection. A bypass rule can instead send the test address directly. In Chrome, an authenticated SOCKS5 proxy is another possibility to rule out, since that combination is unsupported.
The Proxy Is No Longer Used After You Connect an Ethernet Cable
Select Ethernet in Network and inspect its proxy settings. An entry saved under Wi-Fi needs to be configured for Ethernet too when you switch to the cable.
The IP Is Correct, but One Site Will Not Open
Write down the error and reopen that URL after restoring your previous settings. If it still fails, check the site’s status. If removing the proxy restores access, tell your provider what happened and include the URL, browser, protocol, time and error message. Leave the password out. This tells support which combination failed; the cause still needs investigation.
How Do You Turn Off the Proxy and Restore Your Previous Connection?
Open the active service in Network and return to Details → Proxies. Switch off the options you enabled during setup. For an HTTP setup, disable HTTP and HTTPS. For SOCKS, disable SOCKS Proxy. Revert automatic configuration too if you changed it.
Save the change and reload the page. Put back any proxy that was configured before you started. If Firefox still has a manual entry, or Chrome has an active proxy extension, change that configuration in the browser too.
Example: Matching Connection Details to the Fields
The example below shows which field takes each part of an HTTP proxy connection that supports HTTPS sites. The following details are made up to explain the form; they are not a working connection:
Server: proxy.example.com
Port: 8000
Username: demo-user
Password: demo-password
Only proxy.example.com goes in the macOS Server field. The remaining values go in Port, username and password. Enable password authentication before entering the login details. For this example, repeat the values in the HTTP and HTTPS sections. For a real connection, replace all four with your issued details, including the port.
What Is the Next Step?
MangoProxy static ISP proxies are an option when you need a fixed address from an internet service provider’s network. Confirm that your app supports the protocol and authentication method before you transfer the details. An existing proxy is enough to begin: check its credentials and try the connection.
Glossary
Proxy server: an intermediary through which an app sends supported requests.
IP address: a network address of a device or node involved in a connection.
Port: a number identifying a connection point for a service on a server, used together with its address.
HTTP and HTTPS: web protocols. HTTPS adds encryption to the exchange with the site.
CONNECT: the HTTP method used to request a tunnel through a proxy to a destination server.
SOCKS5: a protocol used to connect through a proxy. The client also determines which connection and authentication features can be used.
ISP: an internet service provider. A static ISP proxy uses a fixed IP from such a provider’s network.
PAC: a rules file an app uses when deciding whether a request should go through a proxy or directly to its destination.
Exit IP: the source address the destination site sees when a request arrives through the proxy.
VPN: a virtual private network connection. Its configuration sets which connections use it.
Final Thoughts
After saving the configuration, check the IP and open the site in your chosen app. If a check fails, use the error to narrow the search: the active network service, proxy protocol, authentication and the app’s configuration are the places to inspect.
Frequently asked questions
Here we answered the most frequently asked questions.
Do I Need to Install a Proxy Client?
The system HTTP, HTTPS and SOCKS fields are already part of macOS, so no extra software is needed for this setup. A separate client may be necessary for an app that does not read those settings, or for separate control of its connections.
Will This Change the IP of a Phone on the Same Wi-Fi Network?
No. Changing a network service’s settings on your Mac does not configure a proxy on your phone. The phone needs its own configuration. Sharing Wi-Fi does not apply the Mac’s proxy settings to the phone.
Will a Hostname Work in the Server Field?
Yes, when that hostname is the connection address supplied by your provider. Leave off any protocol prefix and path, and enter the port separately. Use the proxy’s address, not the IP of the site you want to open.
Is This the Same as a VPN Connection?
No. This configures apps that can read the system proxy settings; it does not establish a VPN. Saving a proxy here also does not demonstrate that every connection on the Mac passes through it.
For a broader comparison, see Proxy vs. VPN: What Is the Difference?.