
How to Set Up a Proxy in ExitAnty: Step-by-Step Guide
What Is ExitAnty Used For?
ExitAnty is a mobile antidetect browser for iOS devices that allows users to create separate browser sessions with individual device, browser, and network settings.
Unlike most antidetect browsers designed for Windows and macOS, ExitAnty is built specifically for iPhone and iPad. Each session operates as an independent environment with its own browser configuration, device parameters, and network connection.
This approach makes it possible to run multiple isolated sessions simultaneously for different purposes, including account management, mobile website testing, e-commerce, advertising platforms, and other online activities.
One of the most important components of session configuration is the proxy server. It provides the external IP address used by a particular session.
Why Use Proxies in ExitAnty?
Each session in ExitAnty can operate either through the device’s regular internet connection or through a dedicated proxy server.
Using proxies allows you to:
- connect through different countries and regions;
- assign a separate IP address to each session;
- isolate different projects and workflows;
- test localized versions of websites;
- manage browser network settings more flexibly.
ExitAnty supports two popular proxy protocols – HTTP and SOCKS5 – and includes a built-in proxy manager for storing connections for future use.
The proxy type you choose directly affects how your browser session connects to websites and online services. If you would like to learn more about how proxies work and the differences between them, we recommend reading:
ExitAnty Plans and Availability
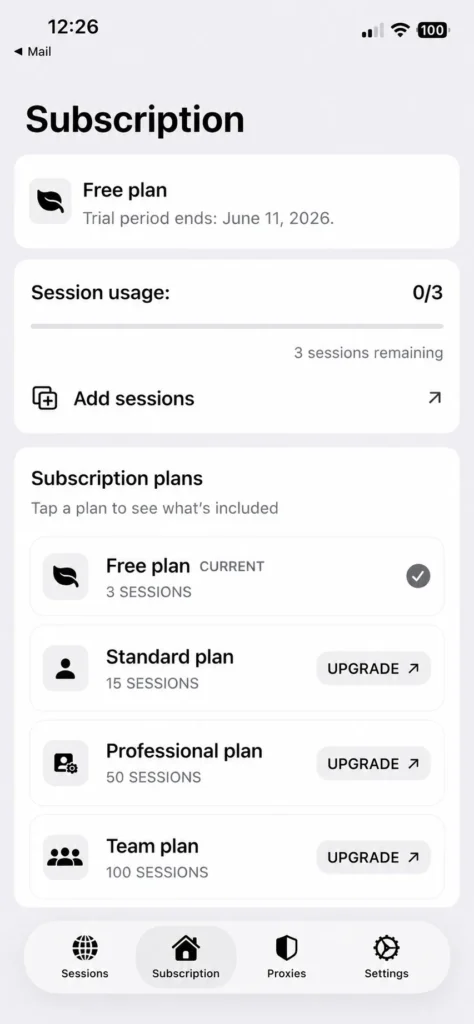
ExitAnty is distributed as a mobile application and uses a subscription-based model. After installation, you can review the available plans and the number of sessions included in each subscription.
Setting Up a Proxy in ExitAnty
Step 1. Create a New Session
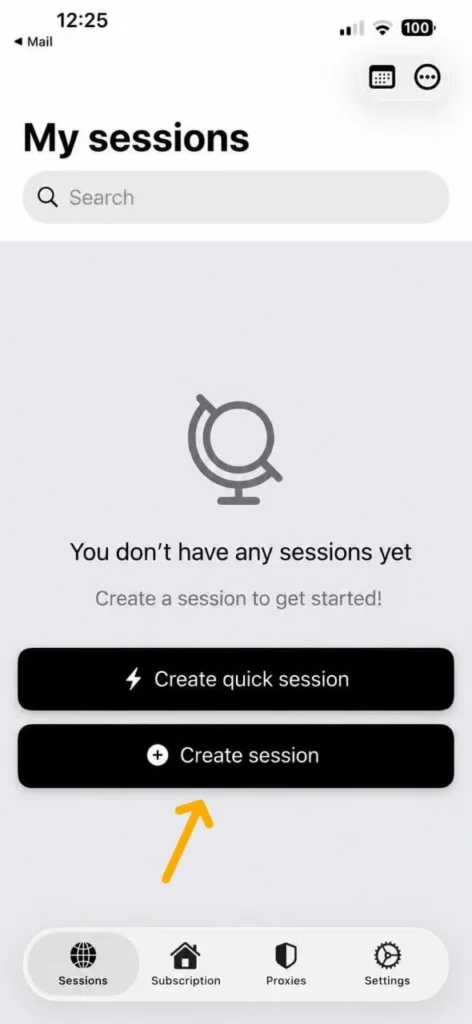
Launch the application and open the Sessions section.
If no sessions have been created yet, ExitAnty will display an option to create a new profile. Tap Create Session.
Step 2. Open Network Settings
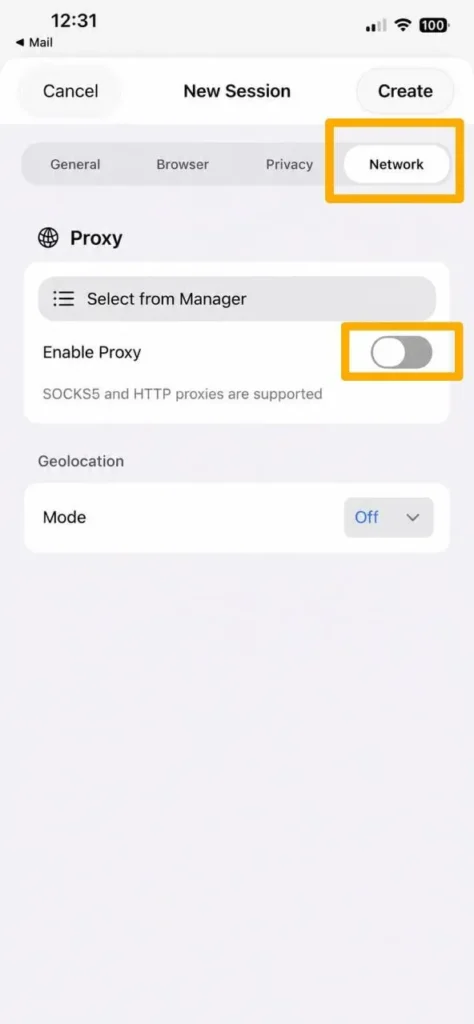
In the session creation window, switch to the Network tab.
This section contains all settings related to network connectivity, proxies, and geolocation configuration.
Step 3. Enable Proxy Usage
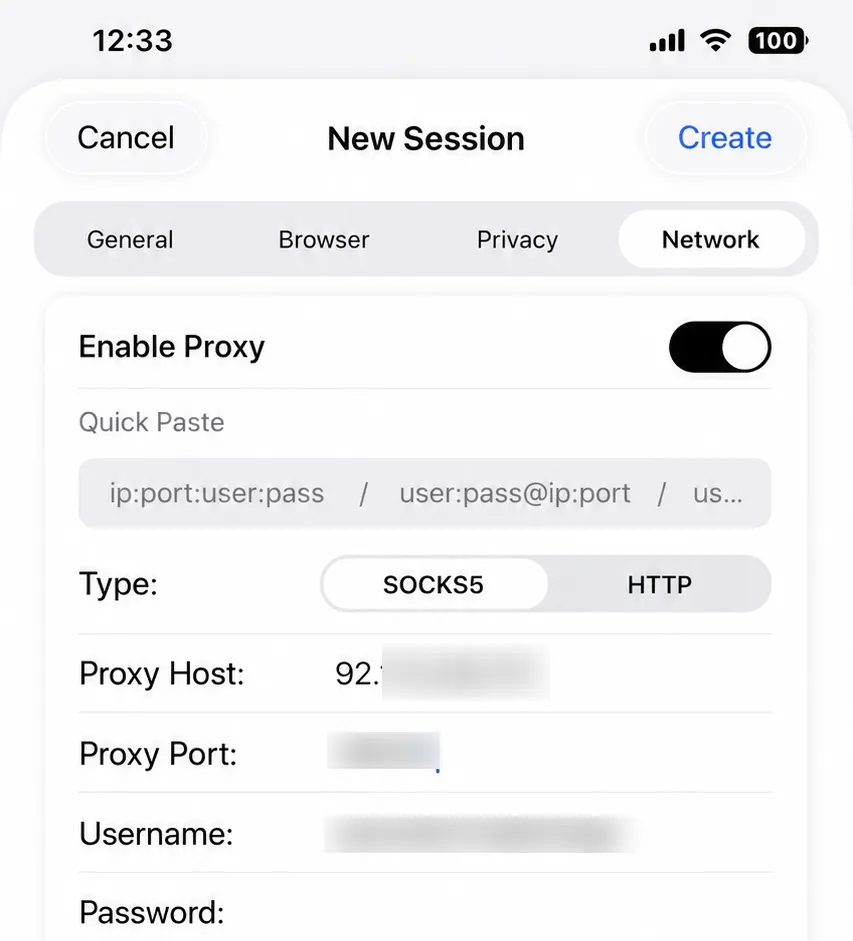
Turn on the Enable Proxy toggle.
Additional connection fields will become available.
ExitAnty supports:
- SOCKS5 proxies;
- HTTP proxies.
You can select the preferred connection type directly in the session settings.
Step 4. Enter Proxy Credentials
Fill in the following fields:
- proxy type;
- host or IP address;
- port;
- username;
- password.
If your proxy provider supplies credentials in a single line, you can use the Quick Paste field.
ExitAnty automatically recognizes supported formats and populates the fields for you.
Step 5. Test the Connection
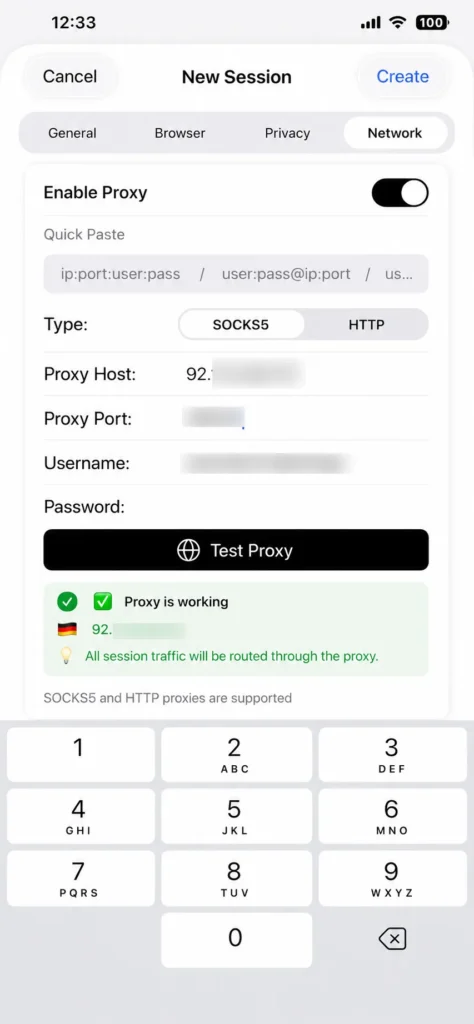
After entering the proxy information, tap Test.
ExitAnty will verify the connection and display information about the current network.
A successful test shows:
- IP address;
- connection country;
- proxy status.
The application also confirms that all traffic from the selected session will be routed through the configured proxy server.
Step 6. Configure Browser Settings
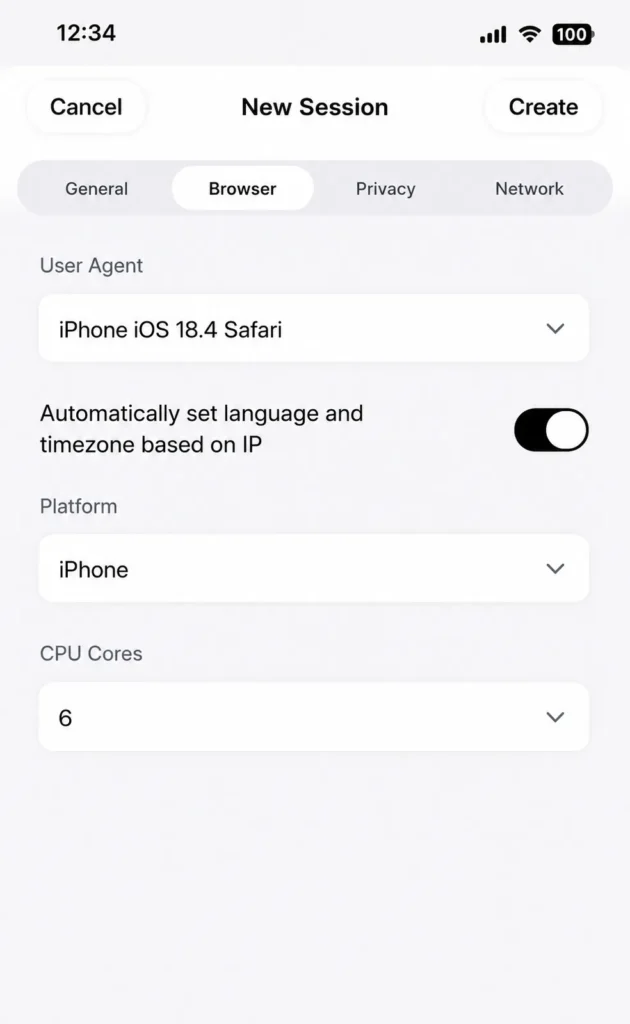
Before creating the session, you can customize additional browser and device parameters.
ExitAnty allows you to configure:
- User-Agent;
- device platform;
- automatic language adjustment based on IP;
- automatic timezone adjustment based on IP;
- CPU core count.
When using a proxy from a specific country, it is recommended to keep automatic language and timezone synchronization enabled. This helps align browser settings with the selected network location.
Step 7. Create and Launch the Session
Once the configuration is complete, tap Create.
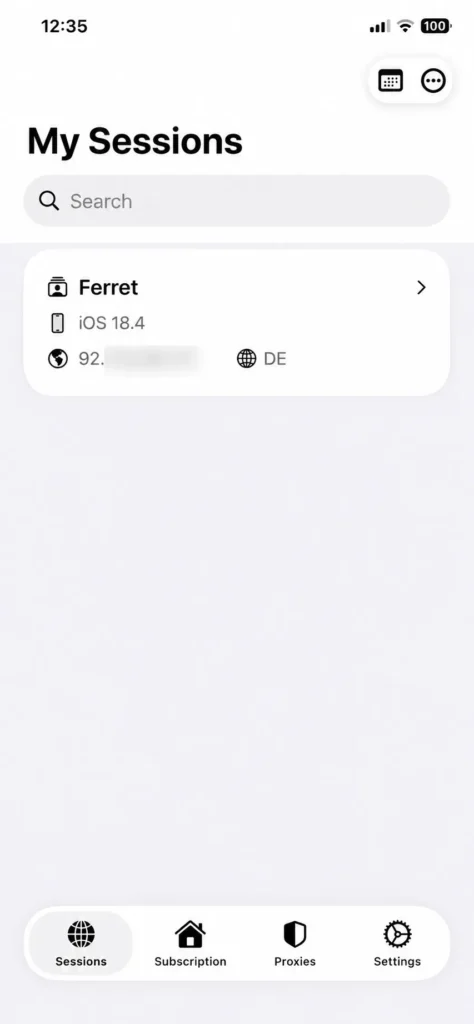
The new session will appear in the session list.
Its card displays key connection details, including the assigned IP address and the detected country.
To begin working, open the newly created session from the list.
Using the Built-In Proxy Manager
ExitAnty allows you to store proxies separately from browser sessions.
This makes it easier to create new sessions and quickly assign previously saved connections.
Open the Proxy Manager
Navigate to the Proxies section from the bottom navigation menu.
All saved proxy connections are displayed here.
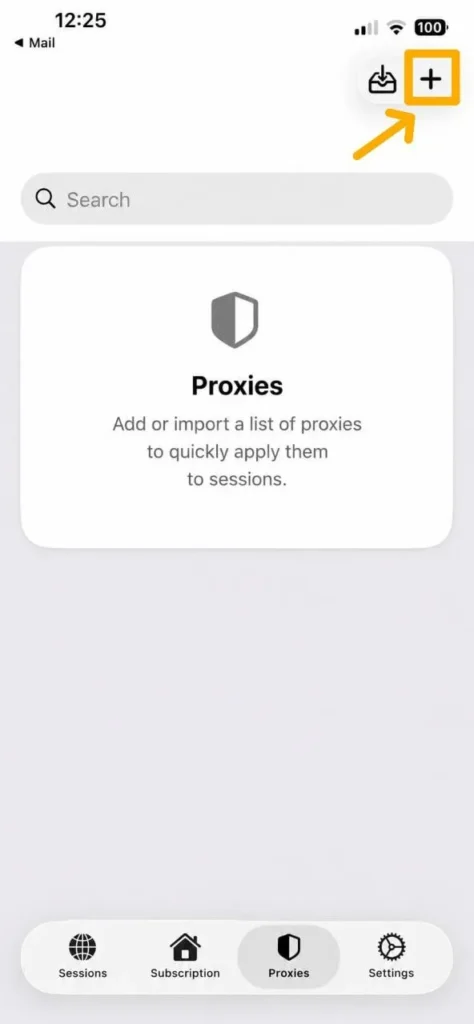
Add a New Proxy
Tap the button for adding a new proxy and enter:
- proxy name;
- connection type;
- IP address;
- port;
- username;
- password.
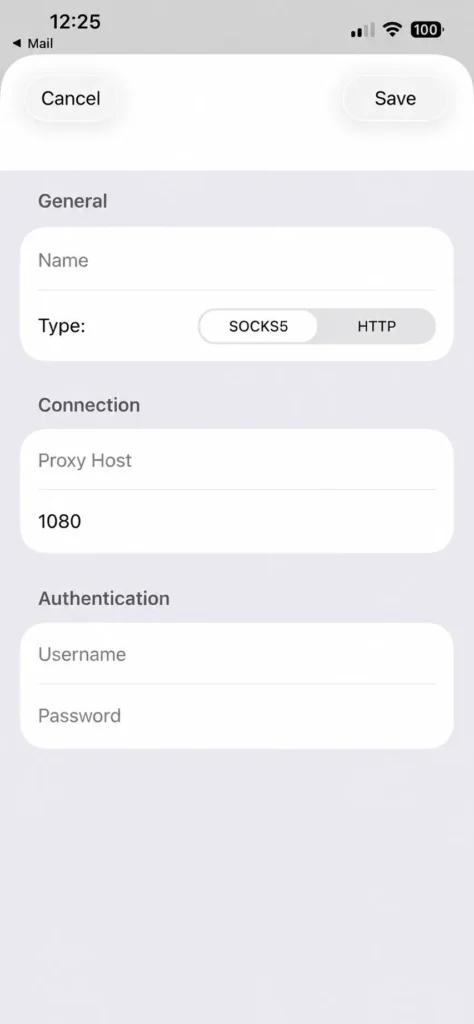
After saving, the proxy becomes available in the manager and can be assigned to future sessions in just a few taps.
Additional Connection Verification
After configuration, it is a good idea to verify that the proxy is correctly detected and that no real network information is exposed.
You can use the following tools:
👉 IP Address and GEO Check: IP Lookup
👉 Proxy Availability Check: Proxy Checker
👉 DNS, WebRTC, and IPv6 Leak Detection: DNS Leak Test
👉 Open Port Verification: Port Scanner
Which Proxy Type Is Best for ExitAnty?
ExitAnty does not restrict the type of proxy you can use, so the best option depends on your specific requirements.
For website testing and localized browsing, datacenter proxies are often preferred because of their speed and performance.
For long-term account management, ISP proxies provide an excellent balance between stability and trustworthiness.
If you need connections that closely resemble regular residential users, residential proxies are usually the preferred choice.
For certain mobile-focused platforms and applications, mobile proxies may provide additional advantages.
Learn more about proxy types here:
👉 Residential vs ISP vs Datacenter vs Mobile Proxies
ExitAnty Features
Some of the key features available in ExitAnty include:
- support for iPhone and iPad;
- HTTP and SOCKS5 proxy compatibility;
- built-in proxy manager;
- automatic language and timezone synchronization based on IP;
- customizable User-Agent settings;
- multiple isolated browser sessions;
- Quick Paste proxy import;
- dedicated proxy assignment for each session.

Frequently asked questions
Here we answered the most frequently asked questions.
What proxy protocols does ExitAnty support?
ExitAnty supports both HTTP and SOCKS5 proxy connections.
Can I use different proxies for different sessions?
Yes. Each session can be configured with its own proxy server and IP address.
Does ExitAnty include a built-in proxy manager?
Yes. You can save proxy connections in advance and quickly assign them when creating new sessions.
Which devices support ExitAnty?
ExitAnty is designed for Apple devices running iOS, including both iPhone and iPad.
Pretty straightforward guide. ExitAnty works great as long as you don’t cheap out on the proxies.