
How to Set Up a Proxy in HideMyAcc: Step-by-Step Guide
Published: ≈ 5 min read
Working with Proxies in HideMyAcc
HideMyAcc is an anti-detect browser for Windows and macOS designed to create isolated browser profiles with separate browser, device, and network settings. Each profile operates independently, allowing you to keep accounts separated and use individual configurations for different projects.
One of HideMyAcc’s key features is its flexible proxy management. You can either configure a proxy while creating a new profile or save it in the built-in Proxy Manager for future use. This approach makes it easier to manage large proxy lists and significantly speeds up the process of creating new profiles.
Why Use Proxies in HideMyAcc
When working with multiple accounts, it is important to separate not only browser fingerprints but also network connections. Your external IP address is one of the main factors websites use to identify and link browsing sessions.
Using proxies in HideMyAcc allows you to:
- assign a unique IP address to each profile;
- use connections from different countries;
- reuse saved proxies;
- import multiple proxies at once;
- work with different proxy types within the same browser.
HideMyAcc supports HTTP, SOCKS4, SOCKS5, and SSH (Proxy over SSH), and also integrates with TM and Tinsoft services.
If you’re new to proxies and want to understand how they work, we recommend reading our guide first:
Setting Up a Proxy in HideMyAcc
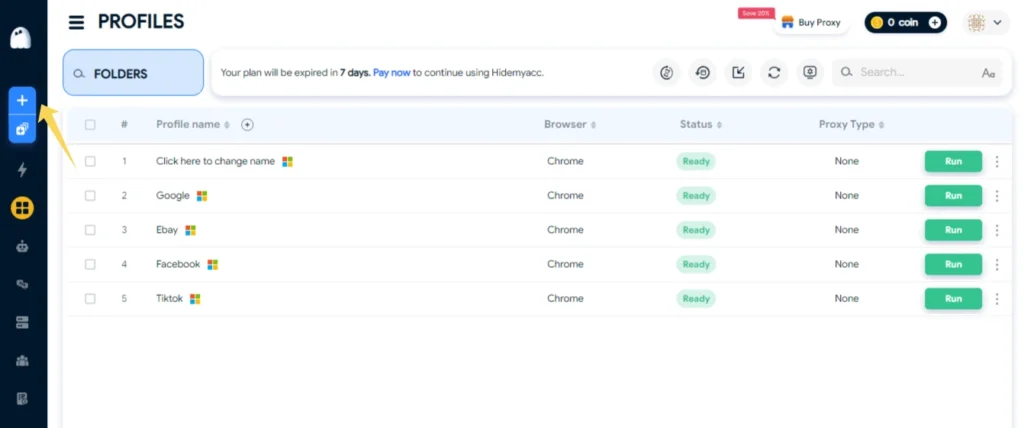
Step 1. Create a New Profile
After launching the browser, open the Profiles section and click Add Profile.
The new profile creation window will open.
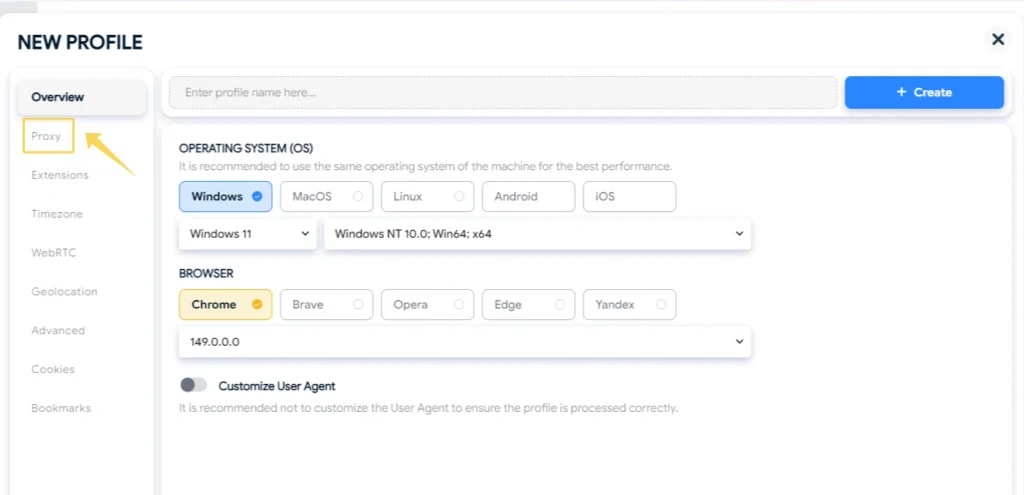
Step 2. Open the Proxy Section
In the left-hand menu, select Proxy.
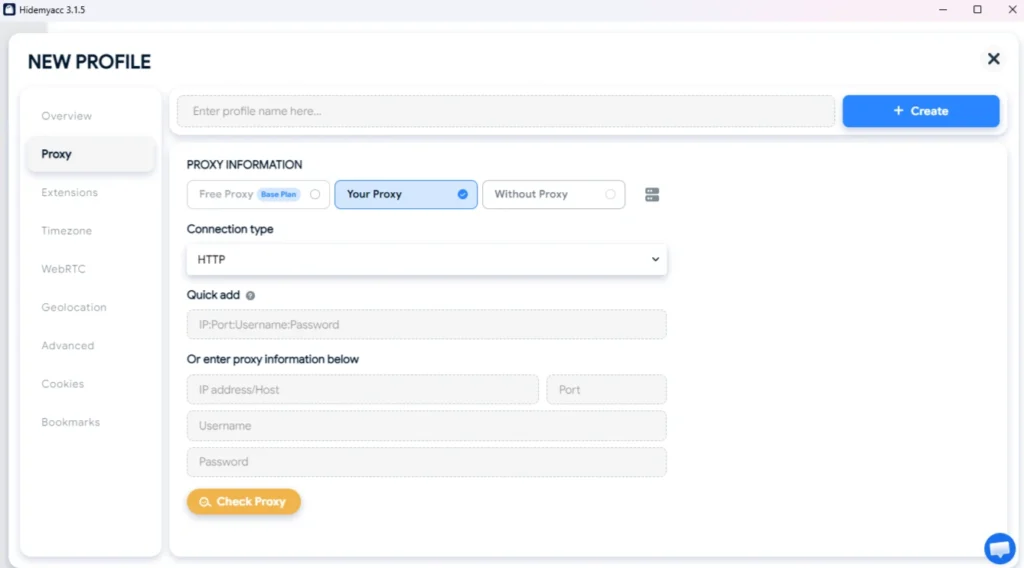
Here you can choose one of three connection options:
- Free Proxy – use a built-in proxy (if available);
- Your Proxy – connect your own proxy;
- Without Proxy – create the profile without a proxy.
To use your own proxy, select Your Proxy.
Step 3. Select the Connection Type
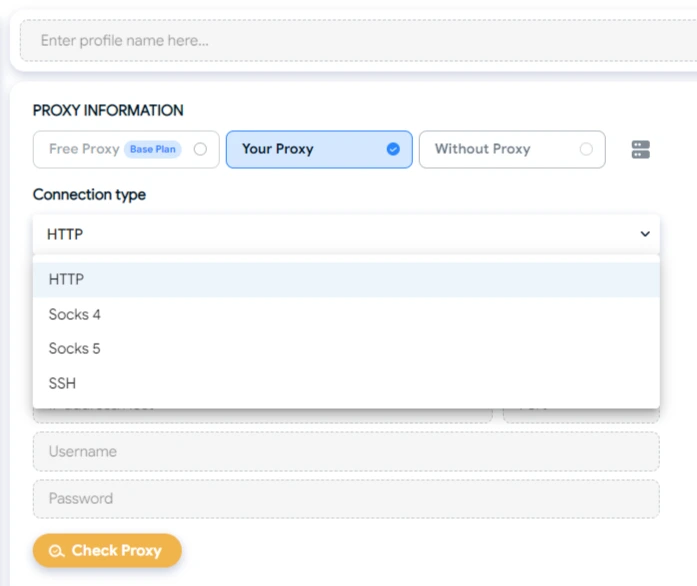
In the Connection type field, choose the protocol that matches your proxy.
HideMyAcc supports:
- HTTP;
- SOCKS4;
- SOCKS5;
- SSH (Proxy over SSH).
The browser also supports integrations with TM and Tinsoft.\
Step 4. Enter Your Proxy Details
You can configure the proxy in two different ways.
The first option is to use Quick add by pasting the connection string in the following format:
IP:Port:Username:Password
The second option is to fill in the fields manually:
- IP Address / Host;
- Port;
- Username;
- Password.
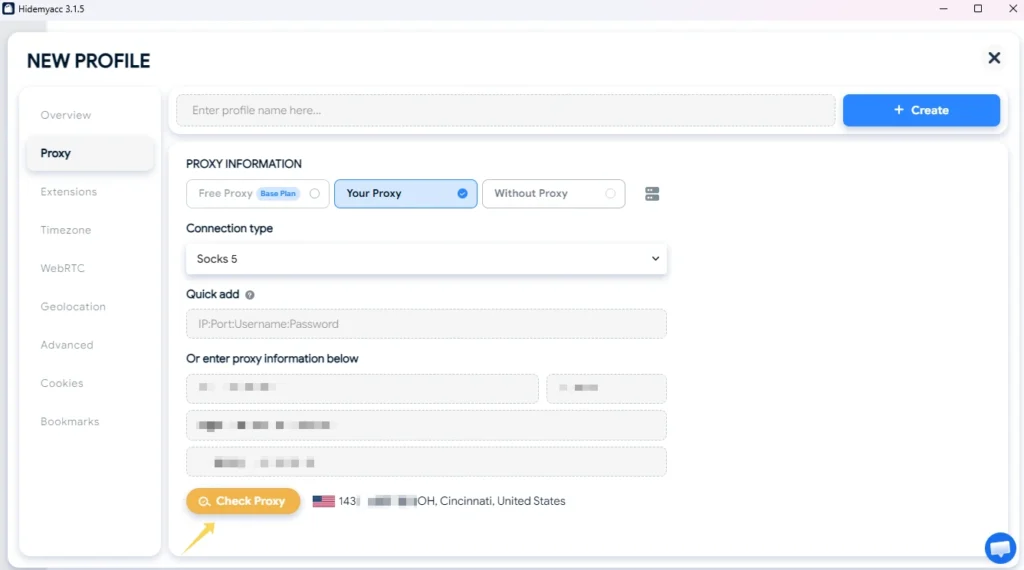
Step 5. Test the Connection
After entering all required information, click Check Proxy.
If the connection is successful, HideMyAcc will detect your current IP address and display information such as the country and city, allowing you to verify that the correct proxy is being used.
Step 6. Create the Profile
Once the proxy has been successfully tested, click Create.
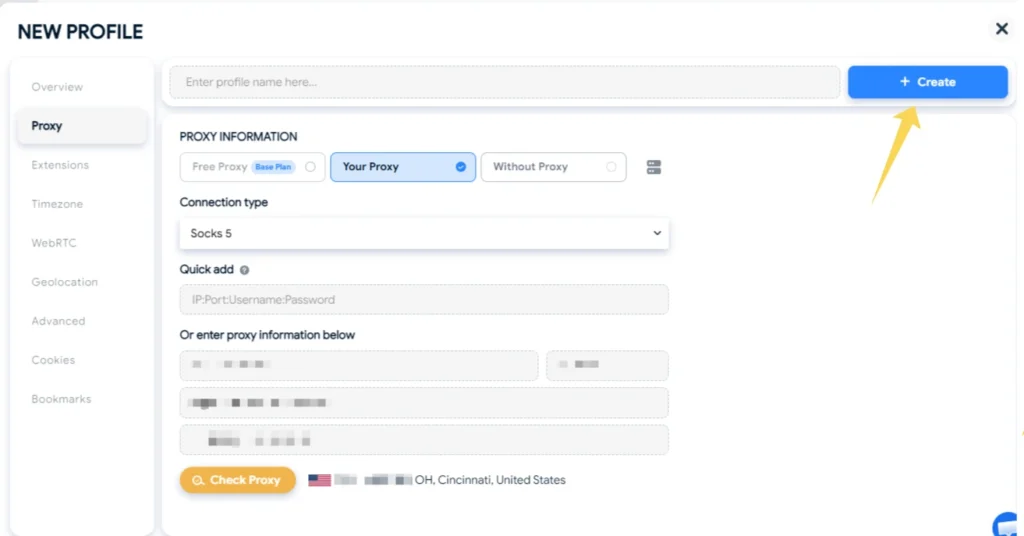
The new profile will appear in the profile list and will be ready to launch.
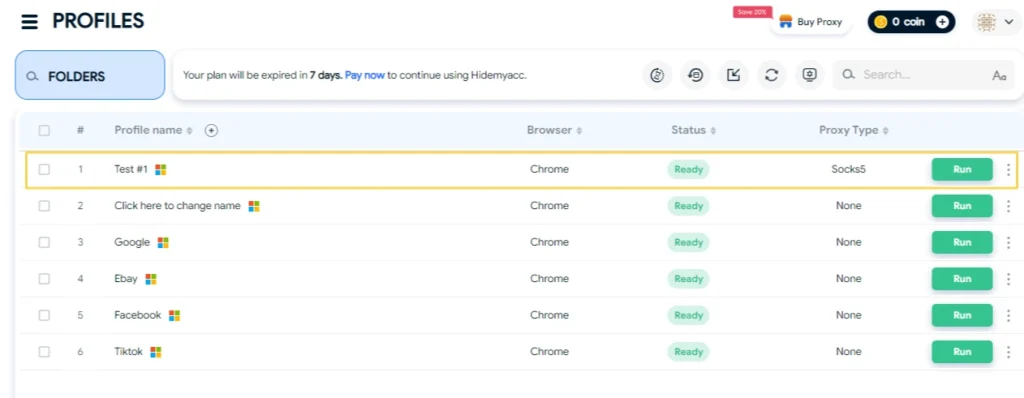
Using Proxy Manager
If you regularly work with large numbers of proxies, it’s more convenient to store them in Proxy Manager before creating profiles.
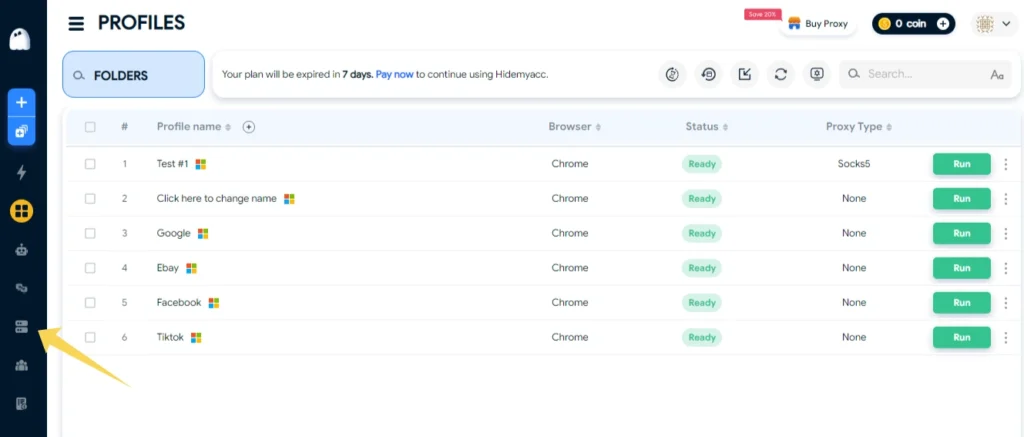
Step 7. Open Proxy Manager
From the left-hand menu, open Proxy Manager.
All saved proxy connections are displayed here.
Step 8. Add a New Proxy
Click Add Proxy.
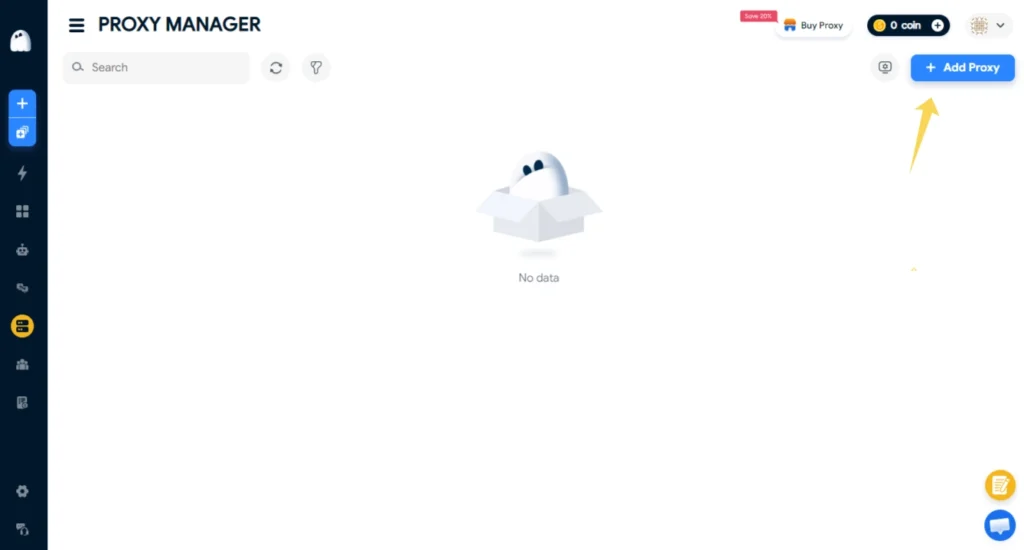
The proxy creation window will open.
You can choose one of the following connection types:
- HTTP;
- SOCKS4;
- SOCKS5;
- SSH;
- TM;
- Tinsoft.
Then paste your proxy information.
HideMyAcc supports bulk proxy import – simply add one proxy per line using the following format:
IP:Port:Username:Password
Optionally, you can also specify:
- Tags – for easier organization;
- Expires – expiration date;
- Notes – additional comments.
After completing the fields, click Add.
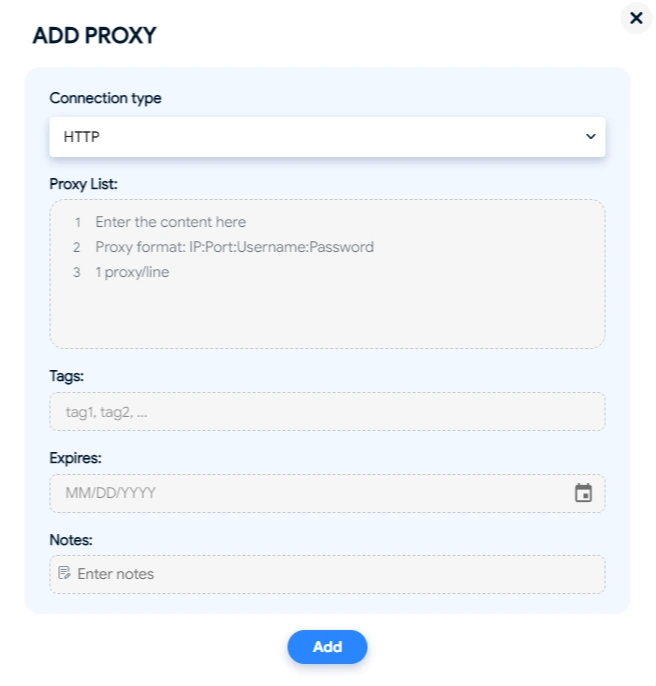
The saved proxy will then be available when creating future browser profiles.
Additional Connection Verification
Although HideMyAcc includes a built-in proxy checker, it’s recommended to verify your connection using specialized external tools before starting work.
You can use the following free tools from MangoProxy:
👉 IP Lookup – Check your IP address and geolocation
👉 Proxy Checker – Verify proxy connectivity
👉 DNS Leak Test – Detect DNS, WebRTC, and IPv6 leaks
👉 Port Scanner – Check open ports
Which Proxies Are Best for HideMyAcc?
The best proxy type depends on how you use your browser profiles.
- Residential proxies are ideal when you need IP addresses assigned to real residential users.
- ISP proxies are commonly used for long-term sessions thanks to their stable connections and trusted IP reputation.
- Datacenter proxies are a good choice for automation, bulk operations, and other tasks where speed and performance are the priority.
- Mobile proxies are suitable when your workflow requires connections through mobile carrier networks.
To learn more about the differences between proxy types, read our detailed comparison:
👉 Residential vs ISP vs Datacenter vs Mobile Proxies: What’s the Difference?
HideMyAcc Features
Some of the browser’s key features include:
- creating isolated browser profiles;
- support for HTTP, SOCKS4, SOCKS5, and SSH proxies;
- Quick Add for fast proxy import;
- bulk proxy importing;
- a dedicated Proxy Manager;
- storing tags, notes, and expiration dates for proxies;
- reusing saved proxies when creating new profiles;
- browser fingerprint and environment customization.
Frequently asked questions
Here we answered the most frequently asked questions.
Can I import multiple proxies at once?
Yes. Proxy Manager supports bulk importing, allowing you to paste multiple proxies at once, with each proxy placed on a separate line.
Should I use Quick Add or manual setup?
What are Tags, Expires, and Notes used for?
These fields help organize your proxy list. You can label proxies by project, specify expiration dates, and leave notes to make future management easier.
Can I use the same saved proxy for multiple browser profiles?
Yes. Once a proxy has been added to Proxy Manager, it can be assigned to multiple profiles. However, for better account isolation, it’s generally recommended to use a separate IP address for each profile.