
How to Set Up a Proxy in Lalicat: Step-by-Step Guide
Published: ≈ 6 min read
How Profiles Work in Lalicat
Lalicat is an anti-detect browser designed for creating separate browser profiles with individual environment and network settings.
When creating a profile, users can choose its name and group, configure the operating system, browser version, User-Agent, and other parameters. The settings also include a dedicated proxy section.
You can configure profile environments for Windows, macOS, or Linux. Lalicat also allows you to use a random User-Agent and create multiple profiles depending on the limits of your selected plan.
A proxy can be connected directly while creating a profile. This means you do not need to create the environment first, launch it, and then return to the network settings — all required connection details can be added immediately.
What Changes After Connecting a Proxy
Without a proxy, the profile accesses the internet through your computer’s current connection. After adding a proxy, the external IP address changes to the address of the selected proxy server.
This is useful when you need to:
- assign different IP addresses to different profiles;
- use an IP from a specific country or region;
- separate network activity between different projects;
- avoid using the same local connection for all profiles;
- save a specific proxy connection directly in the profile configuration.
Lalicat supports HTTP, HTTPS, SOCKS4, and SOCKS5, so you can select the protocol that matches the credentials provided by your proxy service.
If you want to better understand what a proxy changes and how the connection to a website works, we recommend starting with this guide:
How to Connect a Proxy in Lalicat
Step 1. Create a Browser Profile
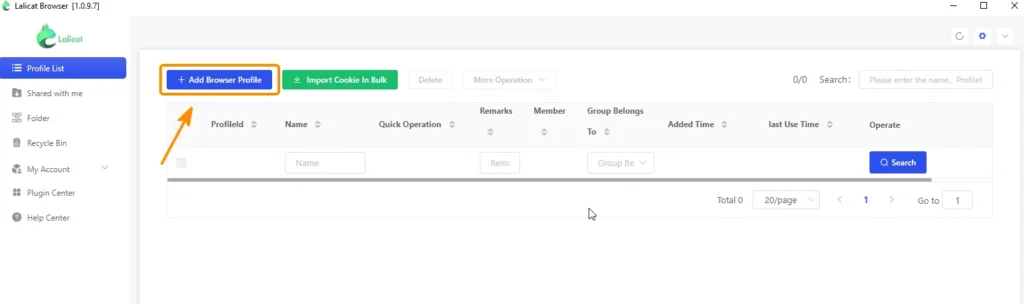
On the Lalicat home screen, open Profile List and click Add Browser Profile.
The new profile creation window will open.
Here you can immediately enter a profile name, choose a group, and continue configuring the environment.
Step 2. Find the Proxy Settings Section
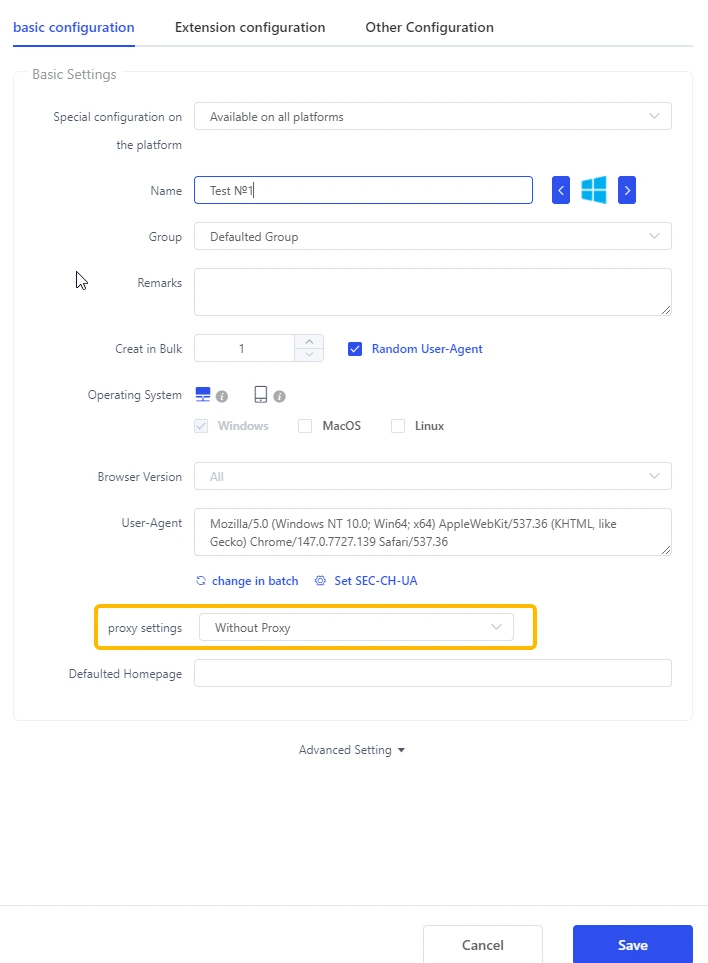
Stay on the Basic Configuration tab and scroll down to the proxy settings field.
By default, Without Proxy may be selected. In this mode, the profile will use your computer’s regular internet connection.
To assign a separate IP address, open the drop-down menu.
Step 3. Choose a Protocol
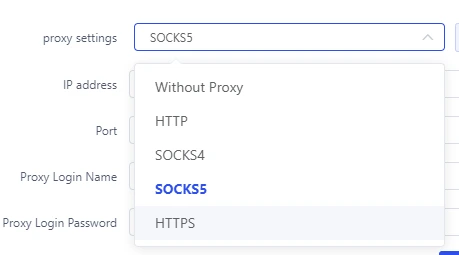
The proxy settings menu includes the following options:
- HTTP;
- HTTPS;
- SOCKS4;
- SOCKS5.
Choose the protocol specified in your proxy credentials.
It is better not to change the connection type arbitrarily. For example, if your provider gives you a SOCKS5 proxy, you should also select SOCKS5 in Lalicat.
Step 4. Enter the Proxy Details
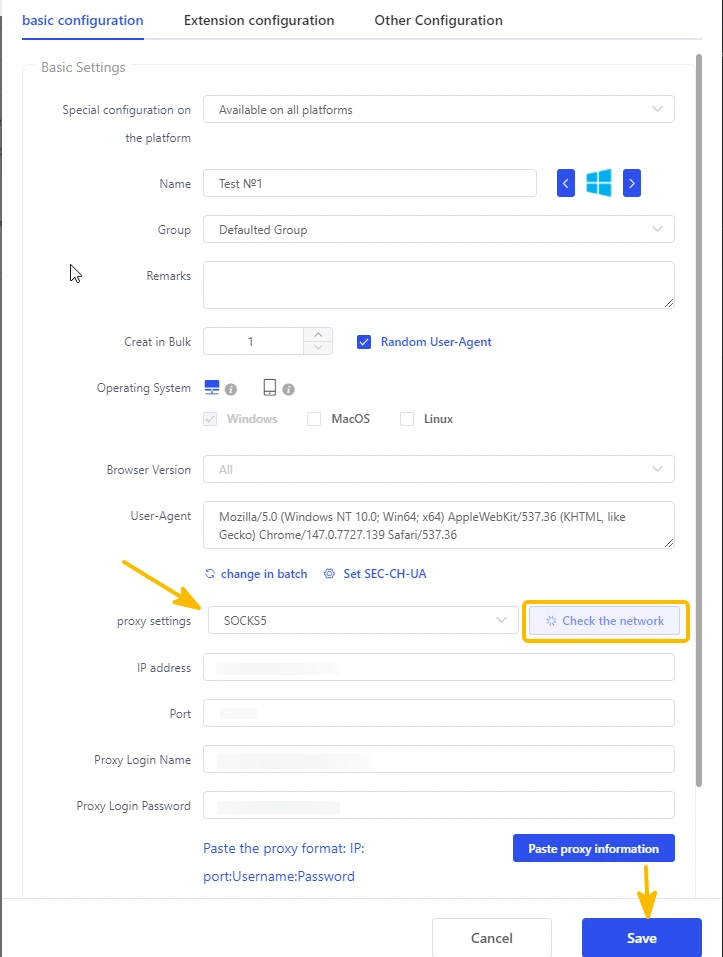
After selecting the protocol, the proxy configuration fields will appear.
Enter:
- IP address;
- Port;
- Proxy Login Name;
- Proxy Login Password.
Lalicat also lets you avoid filling in every field manually. If your credentials are already provided in the following format:
IP:Port:Username:Password
you can paste them using the Paste proxy information button.
This is especially convenient when copying proxy credentials directly from your provider’s dashboard.
Step 5. Test the Network
Before saving the profile, click Check the network.
Lalicat will check whether the connection works through the specified proxy. If the test fails, first make sure that:
- the correct protocol is selected;
- there are no mistakes in the IP address or port;
- the username and password are correct;
- the proxy itself is active.
It is better to run the test before launching the profile so you do not have to troubleshoot connection issues later.
Step 6. Save the Profile
If the connection test is successful, click Save.
The new profile will appear in Profile List. When launched, it will use the saved proxy settings.
Lalicat Pricing
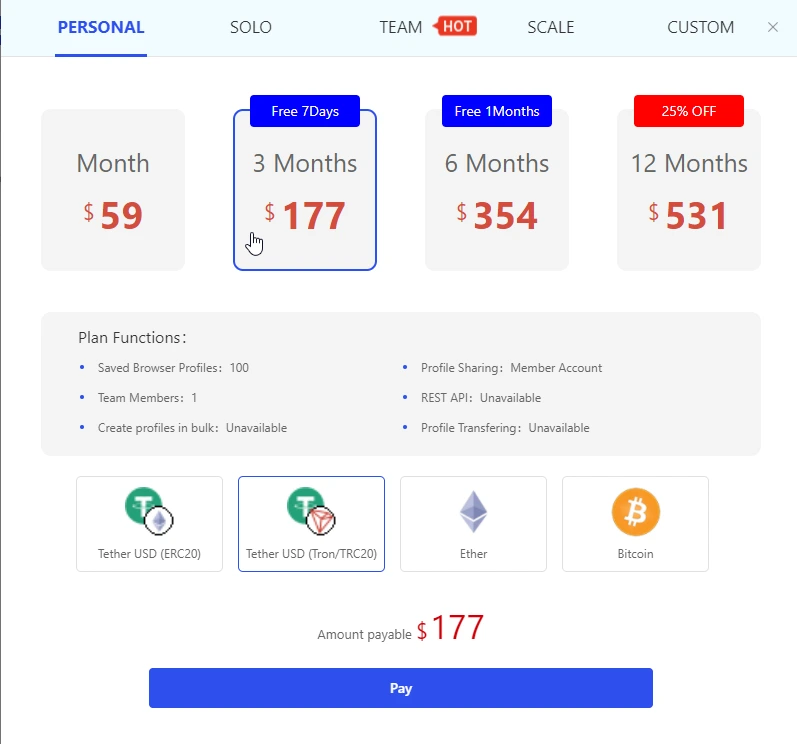
Lalicat uses a subscription model. The Personal plan is available for 1, 3, 6, or 12 months. Pricing starts at $59 per month, while longer subscription periods may include additional bonuses and discounts.
The Personal plan allows users to store up to 100 browser profiles and is designed for individual use. The interface also includes Solo, Team, Scale, and Custom plans for more advanced requirements.
Payment options include cryptocurrencies such as USDT ERC20, USDT TRC20, ETH, and BTC.
What to Check After the First Launch
Lalicat’s built-in network test confirms that the proxy is reachable, but after launching the profile it is also useful to see what network information external websites detect.
You can use the following free MangoProxy tools:
👉 IP Lookup – check your external IP and GEO
👉 Proxy Checker – check whether the proxy is available
👉 DNS Leak Test – check DNS, WebRTC, and IPv6
👉 Port Scanner – check open ports
If the selected IP and geolocation are detected correctly and your real network details are not exposed, the connection is configured properly.
How to Choose a Proxy for Lalicat
Lalicat does not require any single specific type of IP. The best choice depends on the task the profile is created for.
- Residential proxies – suitable for scenarios where you need IP addresses associated with home internet connections and broad GEO coverage.
- ISP proxies – a good option for profiles that require a consistent IP and long sessions.
- Datacenter proxies – useful for tasks where connection speed and IP cost are more important.
- Mobile proxies – relevant for workflows that require IP addresses from mobile carrier networks.
When choosing a proxy, consider not only its type, but also the GEO, authentication format, supported protocol, and whether you need to keep the same IP for the entire session.
👉 Learn more: Residential, ISP, Datacenter, and Mobile Proxies — What’s the Difference?
Lalicat Profile Configuration Features
Based on the Lalicat interface, profile configuration includes more than just network settings. When creating a profile, you can configure:
- profile name and group;
- multiple profile creation;
- Random User-Agent;
- operating system parameters;
- browser version;
- User-Agent;
- HTTP, HTTPS, SOCKS4, and SOCKS5 proxies;
- proxy import in IP:Port:Username:Password format;
- network testing before saving;
- additional options through Advanced Setting.
This means the IP address is only one part of the overall configuration and should be considered together with the other browser environment settings.
Frequently asked questions
Here we answered the most frequently asked questions.
Should I Change the Proxy for an Existing Profile?
It depends on the use case. If a profile has been used with the same account and a consistent IP for a long time, frequent IP changes may be undesirable. For such workflows, it is usually better to choose a stable connection in advance and keep it assigned to that profile.
Should the Proxy GEO Match Other Profile Settings?
Why Can Check the Network Fail Even If the Proxy Works?
Possible reasons include an incorrect protocol, authentication errors, temporary unavailability of a specific IP address, or restrictions on the proxy provider’s side. In this case, it is useful to test the same proxy in an external Proxy Checker first and then compare the settings in Lalicat.