
How to Set Up a Proxy in MasLogin: Step-by-Step Guide

How Proxies Work in MasLogin
MasLogin allows users to create isolated browser environments for different tasks and accounts. Each environment can use its own network connection through a proxy server.
Once a proxy is connected, the profile receives a separate external IP address that will be used when visiting websites, logging into services, and performing other online activities.
This approach provides greater flexibility when managing multiple profiles and allows different projects to operate through separate network connections.
Benefits of Using Proxies in MasLogin
When working with multiple browser profiles, it is important to consider not only browser fingerprint settings but also how websites perceive your network connection.
Using proxies in MasLogin makes it possible to:
- assign a unique IP address to each profile;
- connect through specific countries and regions;
- separate projects from one another;
- manage network settings more effectively;
- create independent browser environments for different workflows.
If you’d like to learn more about how proxy servers work, we recommend starting with the following guide:
Setting Up a Proxy in MasLogin
Step 1. Create a New Environment
After launching MasLogin, click the Create Environment button.
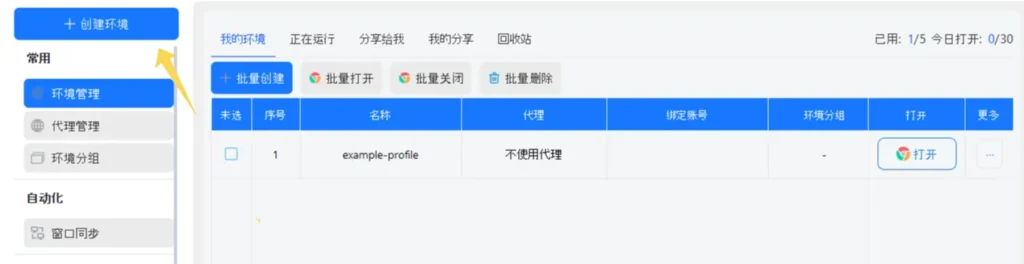
A new profile configuration window will open.
Step 2. Configure the Profile
Enter a profile name and adjust any additional account settings if required.
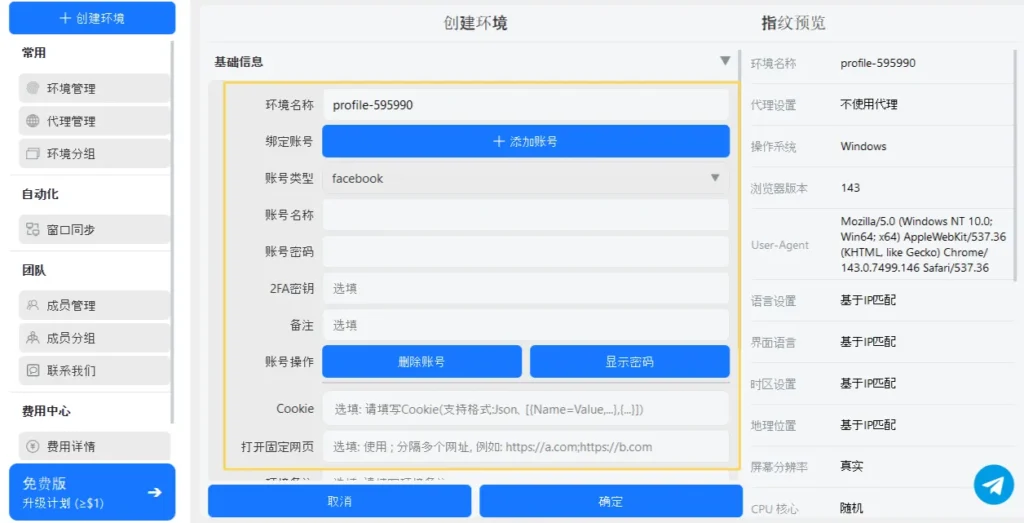
Then scroll down to the proxy configuration section.
Step 3. Enter Proxy Details
In the Proxy Settings section, select Custom Proxy.
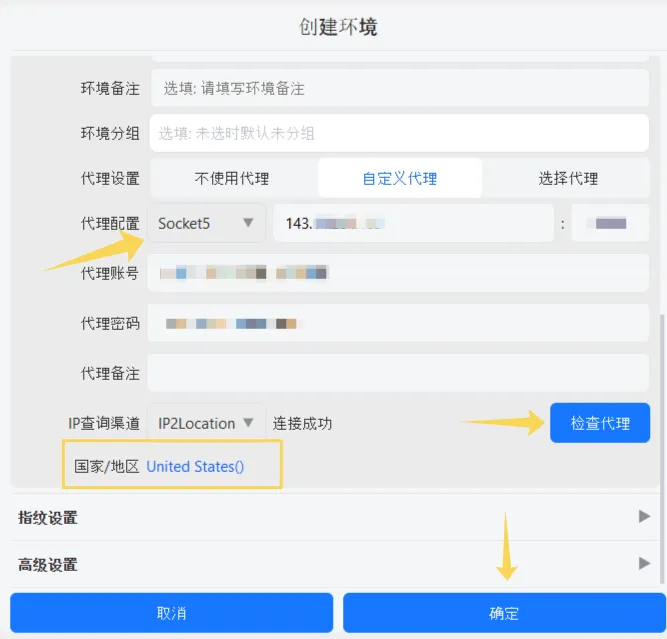
Fill in the following fields:
- connection type – SOCKS5;
- proxy host or IP address;
- port;
- username;
- password.
You can also choose the IP detection service in the IP Query Channel field.
Step 4. Verify the Connection
After entering the proxy information, click Check Proxy.
MasLogin will test the connection and display the detected IP address and location.
If the connection is successful, save the settings by clicking Confirm.
Step 5. Launch the Profile
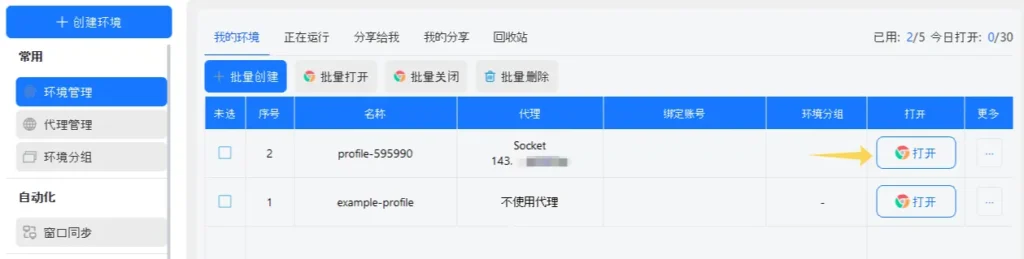
After saving the configuration, the new environment will appear in the profile list.
Click Open next to the profile to launch it.
Additional Network Checks
Before starting work, it is a good idea to verify that the profile is using the correct IP address and that external services detect it properly.
You can use the following tools for additional diagnostics:
👉 IP Address and GEO Check: IP Lookup
👉 Proxy Availability Test: Proxy Checker
👉 DNS, WebRTC, and IPv6 Leak Detection: DNS Leak Test
👉 Open Port Verification: Port Scanner
Choosing the Right Proxy Type
The best proxy type depends on how you plan to use the profile.
Residential proxies are commonly used for social media, advertising platforms, and e-commerce activities. ISP proxies are a strong choice for long-term account management because they combine stable connectivity with a high level of trust.
Datacenter proxies are often selected for automation, monitoring, and large-scale operations thanks to their speed and affordability. Mobile proxies are generally preferred for platforms that apply stricter anti-fraud checks.
To learn more about the differences between proxy types, see:
👉 Residential vs ISP vs Datacenter vs Mobile Proxies
Common Use Cases for MasLogin
MasLogin is frequently used for:
- multi-account management;
- advertising campaigns;
- social media operations;
- e-commerce activities;
- browser automation;
- web application testing.
Things to Check Before Launching a Profile
Before opening a profile, it is recommended to verify a few important settings:
- whether the IP address matches the intended region;
- whether the proxy test completes successfully;
- whether each profile uses a dedicated proxy;
- whether the detected country is correct;
- whether the proxy credentials are valid.
These checks take only a few moments but can help prevent connection issues later.

Frequently asked questions
Here we answered the most frequently asked questions.
What proxy protocols does MasLogin support?
The current version of MasLogin supports custom SOCKS5 proxies configured directly within the profile settings.
Can I create a profile without a proxy?
Yes. MasLogin can operate using your local network connection. However, when managing multiple accounts, assigning a separate proxy to each profile is generally recommended.
Why should I test the proxy connection?
The built-in test helps confirm that the proxy is working correctly and that the browser can access the internet through the specified IP address.
How do I know the proxy is configured correctly?
After the verification process, MasLogin displays the detected IP address and location. If the information is accurate, the profile is ready to use.
Clean and simple setup guide. MasLogin works like a charm once you pair it with high-trust residential IPs.