
How to Set Up a Proxy in RoxyBrowser: Step-by-Step Guide

How RoxyBrowser Works with Proxies
RoxyBrowser is an anti-detect browser for Windows, macOS, and Linux that allows you to create independent browser profiles. Each profile stores its own browser settings, cookies, device parameters, and can use a separate network connection through a proxy server.
Unlike many anti-detect browsers, RoxyBrowser manages proxy connections through a dedicated Proxies section. You can save proxy configurations in advance, verify that they are working correctly, and assign them to browser profiles whenever needed without entering the same information repeatedly.
This approach is especially convenient when working on multiple projects that require different network environments
Why Proxies Matter in RoxyBrowser
Websites evaluate more than just your browser fingerprint. They also analyze your IP address, location, time zone, and other network-related information.
Using proxies in RoxyBrowser allows you to:
- assign a dedicated IP address to each profile;
- connect through different countries and regions;
- keep projects separated from one another;
- configure network settings independently for every profile;
- reuse previously saved proxy connections.
RoxyBrowser supports several popular proxy protocols, making it compatible with most modern proxy providers.
If you’re just getting started with proxies and would like to understand how they work, we recommend reading our introductory guide:
Setting Up a Proxy in RoxyBrowser
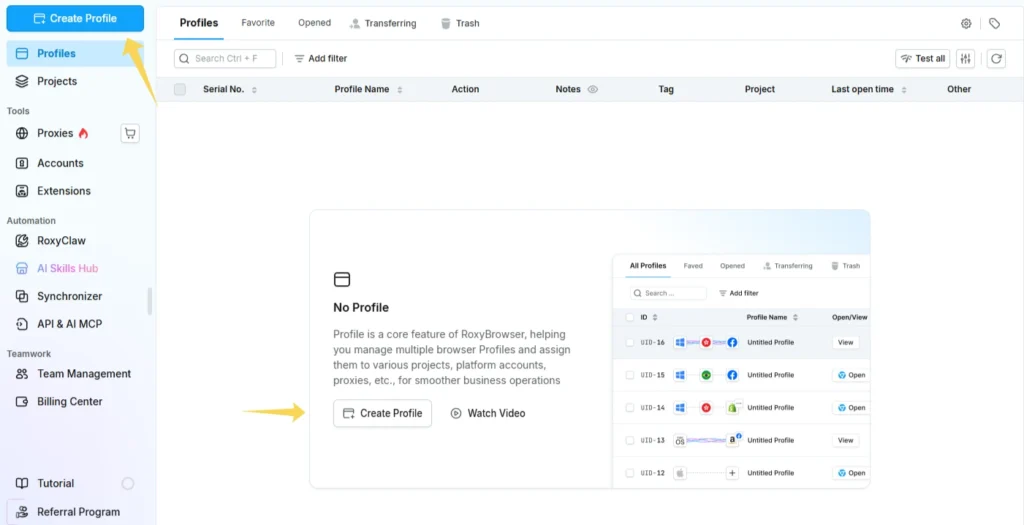
Step 1. Create a New Profile
Launch RoxyBrowser and click Create Profile.
A new profile window will open, where you can configure your browser environment.
Step 2. Open the Proxies Section
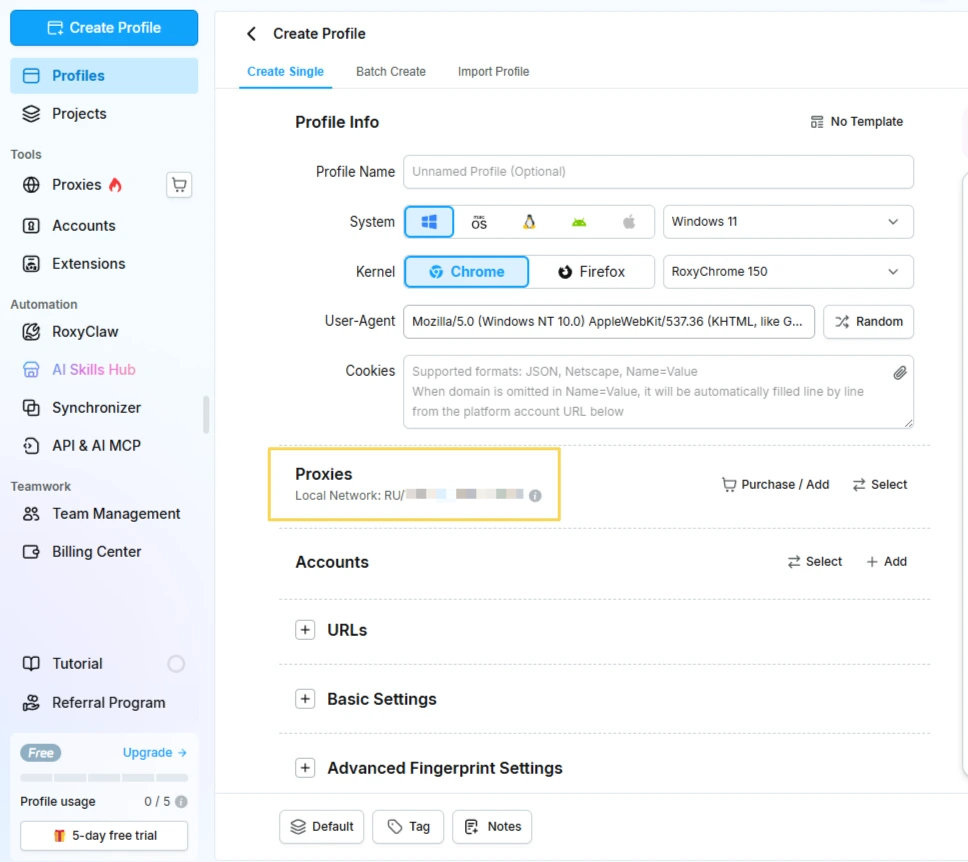
In the profile creation window, locate the Proxies block.
To add a new proxy, click Purchase / Add.
If you’ve already saved proxy connections, you can select one by clicking Select.
Step 3. Add a New Proxy
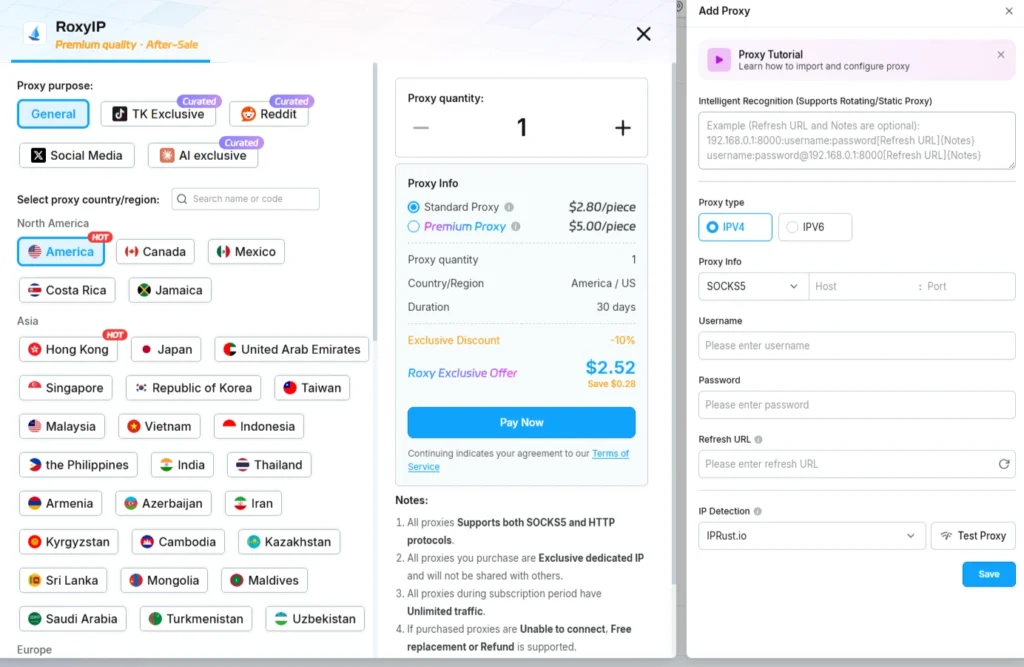
Click Add to open the Add Proxy window.
RoxyBrowser offers two ways to add a proxy:
- manually enter the connection details;
- paste the credentials as a single string using the Intelligent Recognition feature.
When using the second option, the browser automatically fills in the appropriate fields.
Step 4. Enter the Proxy Details
Provide the information supplied by your proxy provider:
- proxy type;
- IP address or hostname;
- port;
- username;
- password.
If your proxy service supports IP rotation through a URL, you can also specify a Refresh URL.
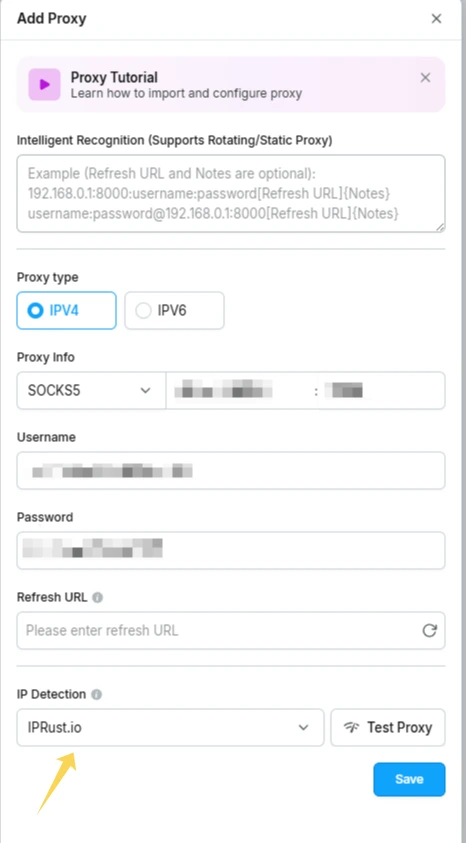
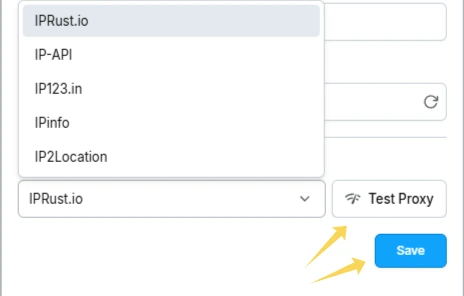
Next, choose the service that will be used to verify your IP address after testing the connection.
Available options include:
- IPRust.io;
- IP-API;
- IP123.in;
- IPInfo;
- IP2Location.
Step 5. Test the Connection
After filling in the required information, click Test Proxy.
If the settings are correct, RoxyBrowser will verify the connection and retrieve information about the current IP address.
Once the test is successful, click Save to store the proxy.
Step 6. Assign the Proxy to a Profile
After saving, the proxy becomes available in your list of saved connections.
Select it while configuring your browser profile and complete the remaining profile settings.
Once the profile is launched, all of its network traffic will be routed through the selected proxy.

Managing Saved Proxies
All saved proxy connections are stored in the dedicated Proxies section.
This allows you to reuse existing proxy configurations instead of creating a new one each time you set up a browser profile.
From this section, you can:
- view your saved proxies;
- add new proxy connections;
- reuse existing proxies;
- test proxy availability;
- edit connection details whenever necessary.
This makes proxy management much easier when working with multiple browser profiles.
Verify Your Connection
Even if the built-in proxy test is successful, it’s still recommended to perform an additional check before starting work. This helps confirm that your public IP address is detected correctly and that your real network information is not exposed.
You can use the following free Mango Proxy tools:
👉 Check Your IP Address & GEO: IP Lookup
👉 Test Your Proxy: Proxy Checker
👉 Check DNS, WebRTC & IPv6 Leaks: DNS Leak Test
👉 Scan Open Ports: Port Scanner
Which Proxies Work Best with RoxyBrowser?
Different proxy types are suitable for different use cases.
- Residential proxies are a good choice when you need IP addresses that appear as regular home internet connections.
- ISP proxies are well suited for long-term use thanks to their stable connections and ISP-assigned IP addresses.
- Datacenter proxies are commonly used for automation, monitoring, and other tasks where speed and performance are essential.
- Mobile proxies are recommended when your workflow requires connections through mobile carrier networks.
If you’d like to learn more about each proxy type, check out our detailed comparison:
👉 Residential vs. ISP vs. Datacenter vs. Mobile Proxies: What’s the Difference?
RoxyBrowser Features
Key features of RoxyBrowser include:
- creating isolated browser profiles;
- support for HTTP, HTTPS, and SOCKS5 proxies;
- storing proxies in a dedicated management section;
- intelligent proxy recognition when pasting connection details;
- multiple IP verification services;
- built-in proxy testing before saving;
- project and profile management tools;
- browser and device fingerprint customization.

Frequently asked questions
Here we answered the most frequently asked questions.
Which proxy protocols does RoxyBrowser support?
RoxyBrowser supports HTTP, HTTPS, and SOCKS5 proxy connections. The desired protocol can be selected while configuring a new proxy.
Can I add a proxy using a single line of text?
What is the Refresh URL used for?
If your proxy provider supports IP rotation through a URL, you can specify it in the Refresh URL field. This allows you to change the proxy’s IP address without modifying the rest of the connection settings.
Clear and practical guide.