
How to Set Up a Proxy in Vision: Step-by-Step Guide
Published: ≈ 8 min read
How Vision Works with Profiles and Proxies
Vision is an anti-detect browser designed for working with separate browser profiles, teams, and projects. Its interface allows users not only to create profiles but also to organize their workspace in advance by arranging profiles into folders, tracking statuses, using tags, and storing proxies in a dedicated section.
Vision includes a separate Proxies tab, so proxy connections are not hidden inside individual profile settings. You can first build and test your own proxy pool and then use those connections with browser profiles as needed.
This approach is especially useful if you:
- work with multiple browser profiles at the same time;
- want to test proxy connections in advance;
- prefer to keep all proxies in one place;
- use different IP addresses for different tasks;
- need to add proxies in bulk rather than one by one.
Vision supports HTTP, HTTPS, SOCKS5, and SSH proxies. The browser also includes Mass Proxy Creation, which allows you to add multiple proxies at once through a dedicated window.
If you’re just getting started with proxies, we recommend reading this introductory guide before proceeding:
Why Use Proxies in Vision
Even when a browser profile is properly configured, websites and online services still analyze network-related data. Your IP address, geolocation, and associated connection parameters help platforms determine where and how a session originates.
In Vision, proxies can help you:
- assign a separate IP to each workflow;
- distribute profiles across different locations;
- avoid routing all sessions through the same local connection;
- monitor proxy status and profile assignments;
- work with a saved pool of IP addresses instead of entering connection details repeatedly.
Another advantage of Vision is that proxies can be uploaded as a list, making it much more convenient when working at scale.
How to Add a Proxy in Vision
Step 1. Open the Browsers Section
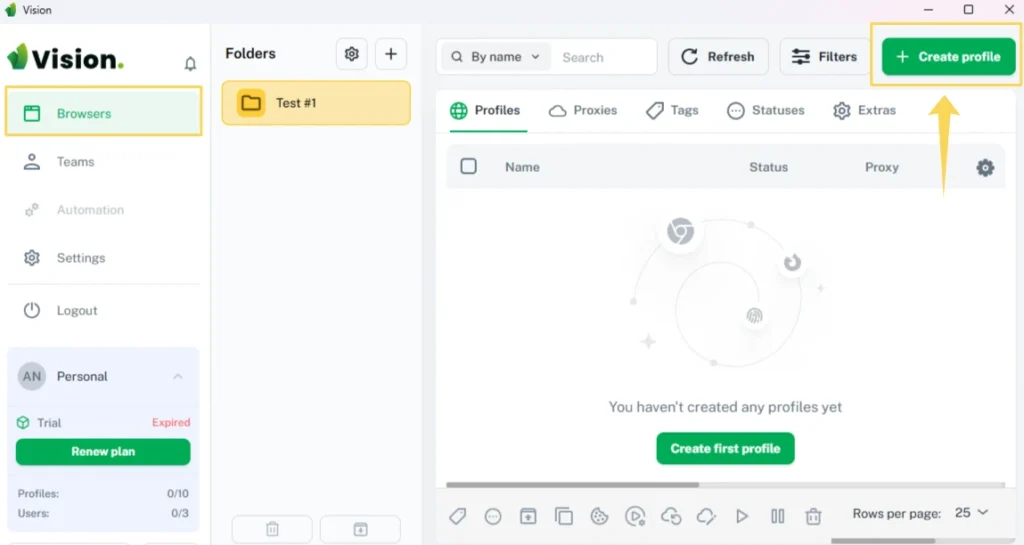
After launching Vision, open Browsers from the left-hand menu.
The main workspace contains several tabs, including:
- Profiles;
- Proxies;
- Tags;
- Statuses;
- Extras.
To configure a connection, open the Proxies tab.
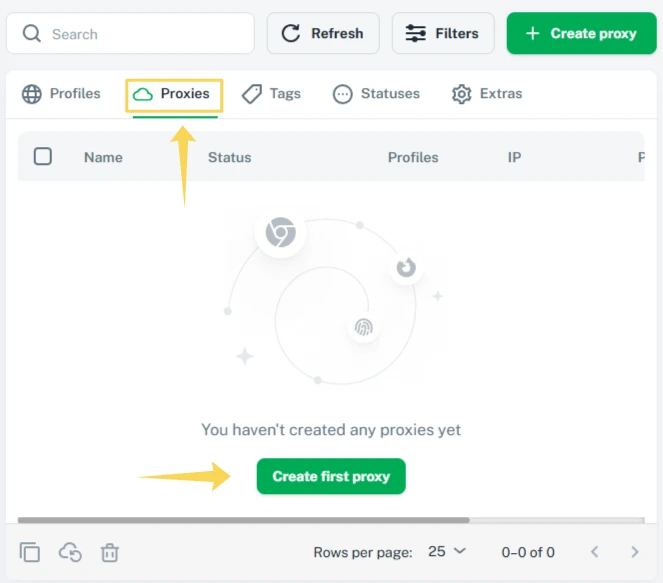
Step 2. Open the Proxies Tab
If you haven’t added any proxies yet, you’ll see the Create first proxy button in the center of the page. If proxies have already been added, use the Create proxy button in the upper-right corner.
Both options open the proxy creation window.
Step 3. Choose How to Add the Proxy
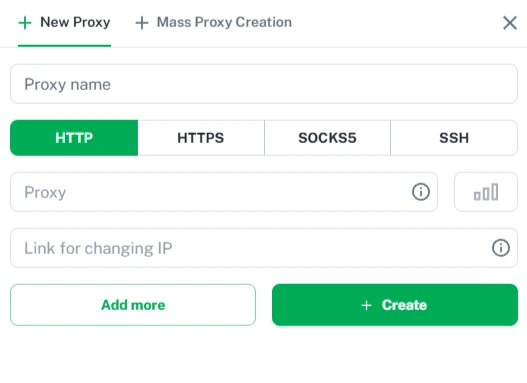
After clicking Create proxy, Vision offers two options:
- New Proxy – add a single proxy;
- Mass Proxy Creation – add multiple proxies at once.
If you only need one proxy for a specific profile or project, New Proxy is the simpler option. If you already have a list of IPs, Mass Proxy Creation will save time.
Step 4. Select the Proxy Type
In the proxy creation window, choose the protocol that matches your connection.
Vision supports:
- HTTP;
- HTTPS;
- SOCKS5;
- SSH.
Select the same protocol specified by your proxy provider. For example, if your credentials are for a SOCKS5 proxy, choose SOCKS5 in Vision as well.
Step 5. Enter the Connection Details
When adding a proxy manually through New Proxy, you can specify:
- Proxy name – a name for the connection;
- Proxy – the proxy connection details;
- Link for changing IP – an IP rotation link, if supported by your provider.
Vision also allows you to test the proxy directly from the same window.
After a successful check, the browser displays useful connection information, such as:
- country and city;
- ZIP code;
- time zone;
- network type and other connection details.
This makes it easy to confirm which IP address is actually being used.
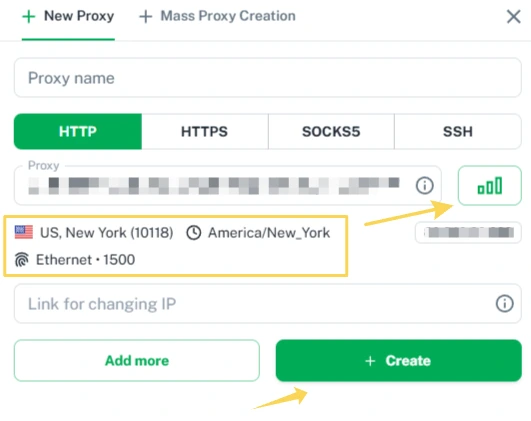
Step 6. Test the Proxy Before Saving
Before clicking Create, run the built-in proxy check.
If everything is configured correctly, Vision will display the detected connection information. This allows you to confirm that:
- the proxy is responding;
- the username and password are correct;
- the expected IP address is being used;
- the geolocation and time zone match your intended configuration.
If no information appears, check the proxy string, selected protocol, and whether the IP itself is currently available.
Step 7. Save the Proxy
After a successful check, click Create.
The new connection will appear in the Proxies tab. The table displays its name, status, number of linked profiles, and IP address.
This makes it easy to see whether a proxy is currently assigned to any profiles and check its status.
Step 8. Create a Profile in Vision
Once your proxy is ready, return to the Profiles tab and click Create profile.
This workflow can be convenient in practice: first prepare and verify your network connections, and then move on to configuring browser profiles.
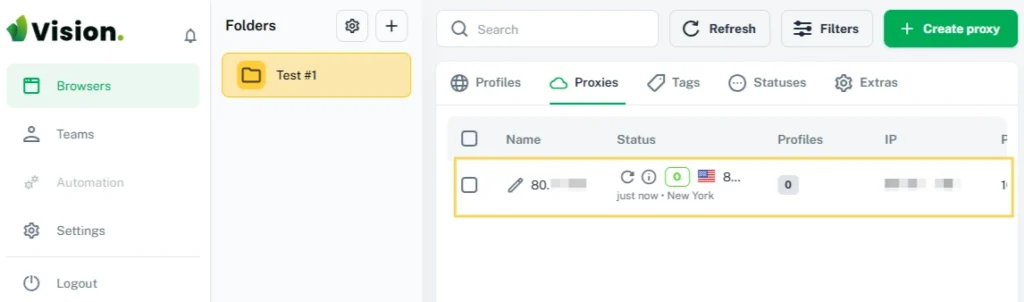
Bulk Proxy Creation in Vision
One of Vision’s useful features is Mass Proxy Creation.
It is designed for situations where you need to add multiple proxies instead of configuring each connection manually. This can be particularly useful for teams, large projects, or when migrating an existing list of IP addresses into Vision.
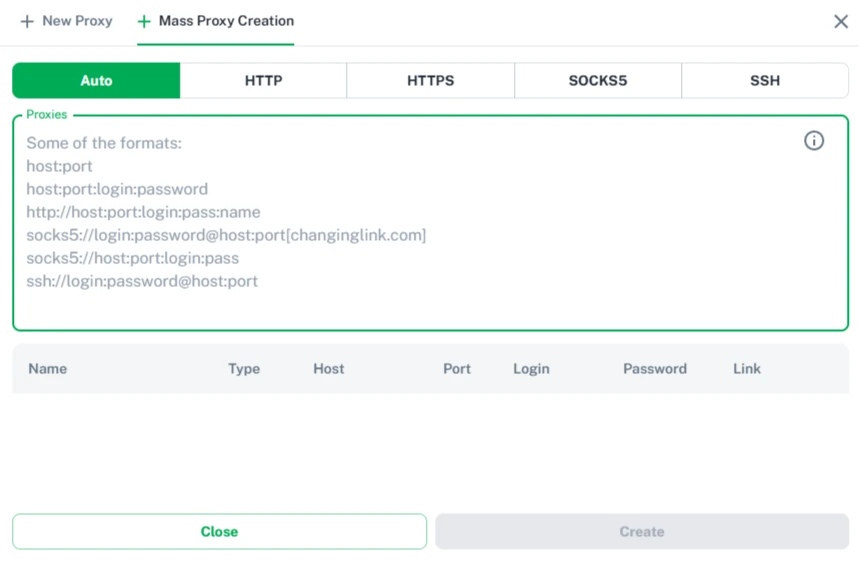
In the Mass Proxy Creation window, you can select a specific protocol or use Auto mode. Vision supports several input formats, including:
host:port
host:port:login:password
http://host:port:login:pass:name
socks5://login:password@host:port[changinglink.com]
socks5://host:port:login:pass
ssh://login:password@host:port
After you paste the list, Vision distributes the information across the following columns:
- Name;
- Type;
- Host;
- Port;
- Login;
- Password;
- Link.
If you’re working with dozens of proxies, this method is significantly faster than adding every connection manually.
What to Check After Adding a Proxy
Even if Vision successfully verifies the connection, it’s useful to check the external IP again after you start using the profile. This helps confirm that the connection works as expected.
You can use the following free MangoProxy tools:
👉 IP Lookup – check your external IP and geolocation
👉 Proxy Checker – verify proxy availability
👉 DNS Leak Test – check DNS, WebRTC, and IPv6 leaks
👉 Port Scanner – check open ports
If the external IP and geolocation are detected correctly and your actual network details are not exposed, the proxy connection is configured properly.
Which Proxies Are Suitable for Vision?
Vision does not require any single specific type of IP. The right choice depends on the tasks your browser profiles are used for.
- Residential proxies – suitable when you need IP addresses associated with regular home internet connections and broad geographic coverage.
- ISP proxies – a good option for long sessions and workflows that require a stable IP address.
- Datacenter proxies – useful when speed and cost are the main priorities.
- Mobile proxies – suitable for scenarios that require IP addresses from mobile carrier networks.
When choosing a proxy, consider not only the IP type but also additional factors such as the supported protocol, geolocation, authentication method, IP rotation requirements, and connection stability.
👉 Learn more: Residential vs. ISP vs. Datacenter vs. Mobile Proxies – Key Differences and Use Cases
Vision Features for Proxy Management
From a network management perspective, Vision provides several useful features:
- a dedicated Proxies tab;
- single proxy creation through New Proxy;
- bulk importing through Mass Proxy Creation;
- support for HTTP, HTTPS, SOCKS5, and SSH;
- Auto mode for recognizing proxy formats;
- Link for changing IP support;
- proxy status and geolocation information after verification;
- visibility into how many profiles are linked to a proxy;
- folders, tags, and statuses for organizing your workspace.
Frequently asked questions
Here we answered the most frequently asked questions.
When Should I Use Mass Proxy Creation Instead of New Proxy?
If you only need to add one or two proxies and want to verify them individually, New Proxy is usually the easiest option. If you already have a larger list of connections, especially dozens of entries, Mass Proxy Creation is much faster.
Is It Better to Add Proxies Before Creating Profiles?
It can be. Vision allows you to prepare and verify your proxy pool first and then move on to browser profiles. This separates network configuration from profile setup and can make larger projects easier to organize.
What Is Link for Changing IP Used For?
This field is useful when your proxy provider supports IP rotation through a dedicated URL. You can save the link together with the proxy and use it later without reconfiguring the entire connection.
Should the Proxy GEO Match the Profile's Intended Region?
Ideally, yes. If a profile is intended for a particular region, it makes sense to choose a proxy from the same country or city. This helps keep the IP address, time zone, and other session parameters consistent.