
How to Set Up a Proxy in VMLogin: Step-by-Step Guide
Managing Browser Profiles in VMLogin
VMLogin is an anti-detect browser designed to create isolated browser profiles with independent system, device, and network settings. Each profile operates separately, allowing you to maintain different configurations without data overlap between work environments.
When creating a profile, you can customize browser fingerprints, WebRTC settings, language preferences, and network configuration. The network connection is handled through a proxy server, enabling every browser profile to use its own external IP address.
For this reason, configuring a proxy is one of the first steps when preparing a new browser profile.
Why Use a Proxy in VMLogin
Even with a properly configured browser fingerprint, websites continue analyzing network-related information such as your IP address, location, timezone, and other connection details.
Using proxies in VMLogin allows you to:
- assign a dedicated IP address to each browser profile;
- connect through different countries and regions;
- isolate projects from one another;
- automatically detect location settings based on the proxy IP;
- manage network settings for each profile independently.
VMLogin supports several widely used proxy protocols, making it compatible with most modern proxy providers.
If you’re new to proxies and want to understand how they work, we recommend starting with our beginner-friendly guide:
Setting Up a Proxy in VMLogin
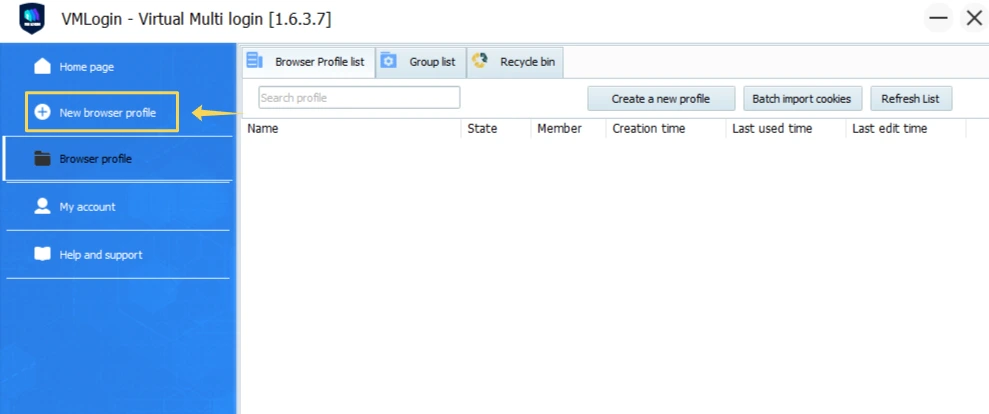
Step 1. Create a New Browser Profile
Launch VMLogin and click New browser profile from the main window.
A new browser profile configuration window will open.
Step 2. Open the Proxy Settings
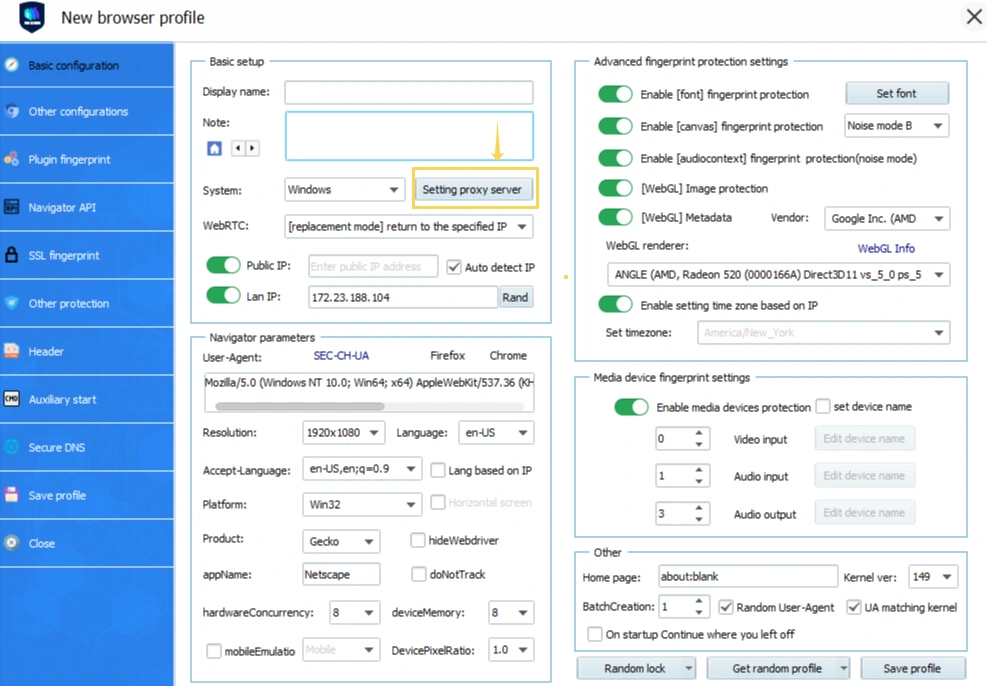
Inside the profile creation window, click Setting proxy server.
This opens a separate window where you can configure your proxy connection.
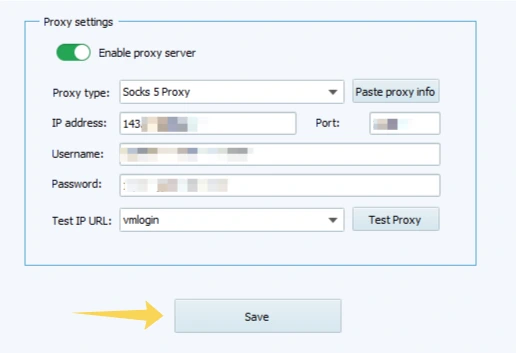
Step 3. Enable Proxy Support
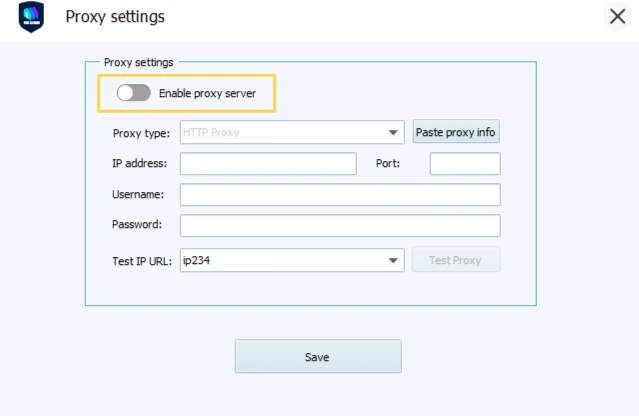
Turn on the Enable proxy server switch at the top of the window.
Once enabled, the proxy configuration fields become available.
Step 4. Select the Proxy Protocol
Open the Proxy type drop-down menu and choose the protocol provided by your proxy service.
VMLogin supports:
- HTTP
- HTTPS
- SOCKS4
- SOCKS5
Make sure the selected protocol matches the one supplied by your proxy provider.
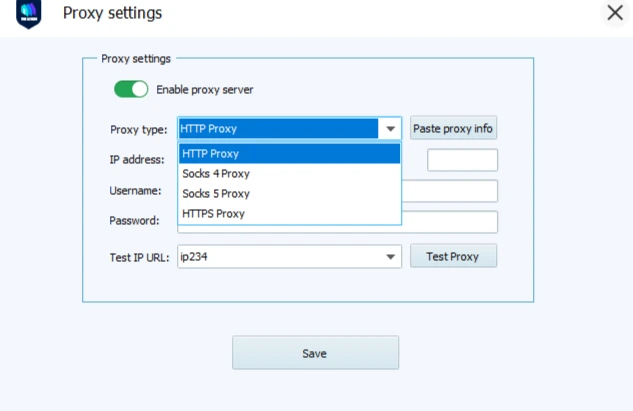
Step 5. Enter Your Proxy Details
Fill in the connection information provided by your proxy provider:
- IP address or hostname;
- Port;
- Username;
- Password.
If your provider supplies the credentials in a single line, click Paste proxy info to populate the fields automatically.
You can also choose the IP verification service using the Test IP URL drop-down menu.
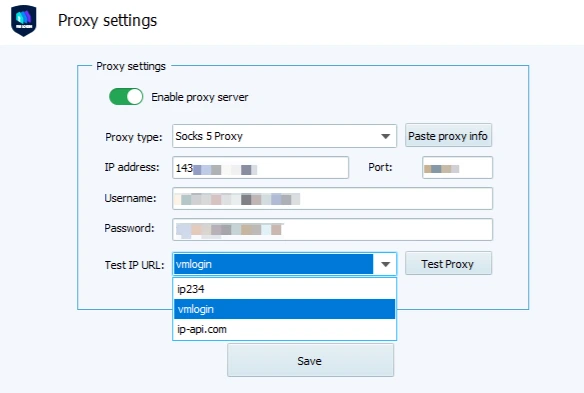
Step 6. Test the Connection
After entering the proxy details, click Test Proxy.
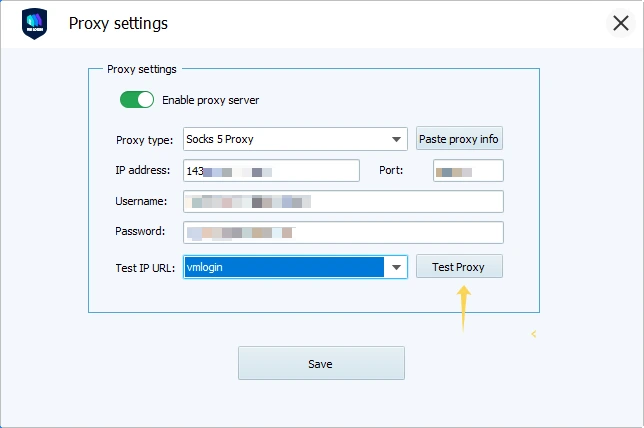
VMLogin will verify the connection and display information such as:
- IP address;
- Country;
- City;
- Region;
- Time zone;
- Coordinates.
If everything looks correct, click Confirm to accept the configuration.
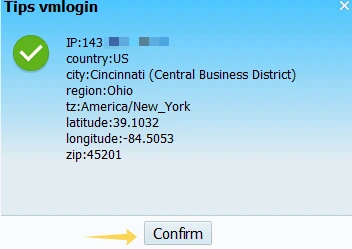
Step 7. Save the Settings
Once the connection test has been completed successfully, click Save.
The configured proxy will now be assigned to the browser profile and used every time it is launched.
Verify Your Connection
Although VMLogin includes its own proxy verification tool, it’s a good idea to perform an additional check before starting work. This helps ensure that your public IP is detected correctly and that there are no DNS, WebRTC, or IPv6 leaks.
You can use the following free Mango Proxy tools:
👉 Check Your IP Address & GEO: IP Lookup
👉 Test Your Proxy: Proxy Checker
👉 Detect DNS, WebRTC & IPv6 Leaks: DNS Leak Test
👉 Scan Open Ports: Port Scanner
Which Proxy Type Should You Choose?
Choosing the right proxy depends on your specific workflow and requirements.
- Residential proxies – ideal when you need IP addresses that appear as regular home internet connections.
- ISP proxies – a good option for long-term use thanks to their stability and high level of trust.
- Datacenter proxies – best suited for tasks where speed and cost efficiency are the priority.
- Mobile proxies – recommended when your workflow requires connections through mobile carrier networks.
If you’re unsure which option best fits your needs, we recommend reading our detailed comparison:
👉 Residential vs. ISP vs. Datacenter vs. Mobile Proxies: What’s the Difference?
VMLogin Features
Key capabilities of VMLogin include:
- isolated browser profiles;
- support for HTTP, HTTPS, SOCKS4, and SOCKS5 proxies;
- quick proxy import using Paste proxy info;
- built-in proxy connection testing;
- selectable IP verification services;
- automatic timezone detection based on the proxy IP;
- browser fingerprint customization;
- advanced WebRTC, WebGL, and environment configuration.

Frequently asked questions
Here we answered the most frequently asked questions.
Which proxy protocols does VMLogin support?
VMLogin supports HTTP, HTTPS, SOCKS4, and SOCKS5 proxy connections.
What is the Test IP URL option used for?
This setting lets you choose which online service VMLogin uses to verify your IP address during the proxy connection test.
Should I test the proxy before saving it?
Yes. Running a connection test helps verify that the proxy credentials are correct and that the connection is working properly.
Very practical tutorial