
How to Set Up a Proxy in XLogin: Step-by-Step Guide
Managing Network Settings in XLogin
XLogin allows users to create browser profiles with separate browser, system, and network configurations. Each profile operates independently, preventing settings from overlapping between different environments.
Network configuration is an important part of profile setup. XLogin lets you assign a dedicated proxy server to each profile and synchronize network parameters with browser fingerprint settings.
Once a proxy is connected, the profile starts using the specified IP address, while XLogin automatically detects location and time zone information associated with that connection.
Why Use Proxies in XLogin?
Browser fingerprints are only one part of profile isolation. Websites also evaluate IP addresses and network-related parameters when analyzing user activity.
Using proxies in XLogin helps you:
- assign unique IP addresses to different profiles;
- connect through specific countries and regions;
- separate workflows across multiple projects;
- configure time zones and geolocation based on IP;
- manage network settings independently for each profile.
XLogin supports several widely used proxy protocols, making it compatible with most modern proxy providers.
If you are new to proxies and would like to understand how they work, we recommend starting with the following guide:
Setting Up a Proxy in XLogin
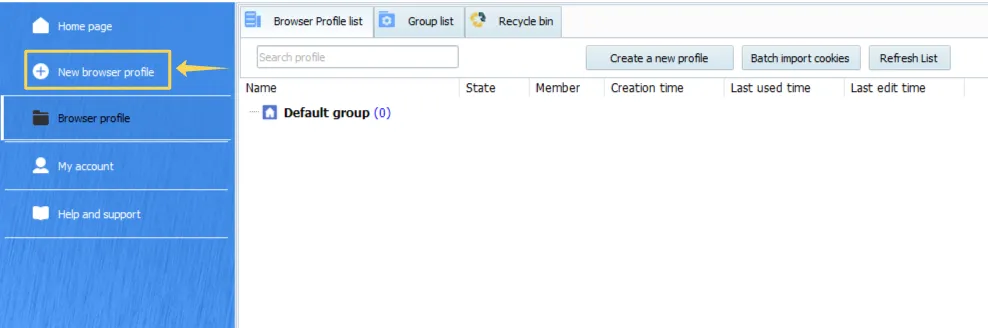
Step 1. Create a New Profile
Launch XLogin and click New browser profile in the main window.
This will open the profile creation form.
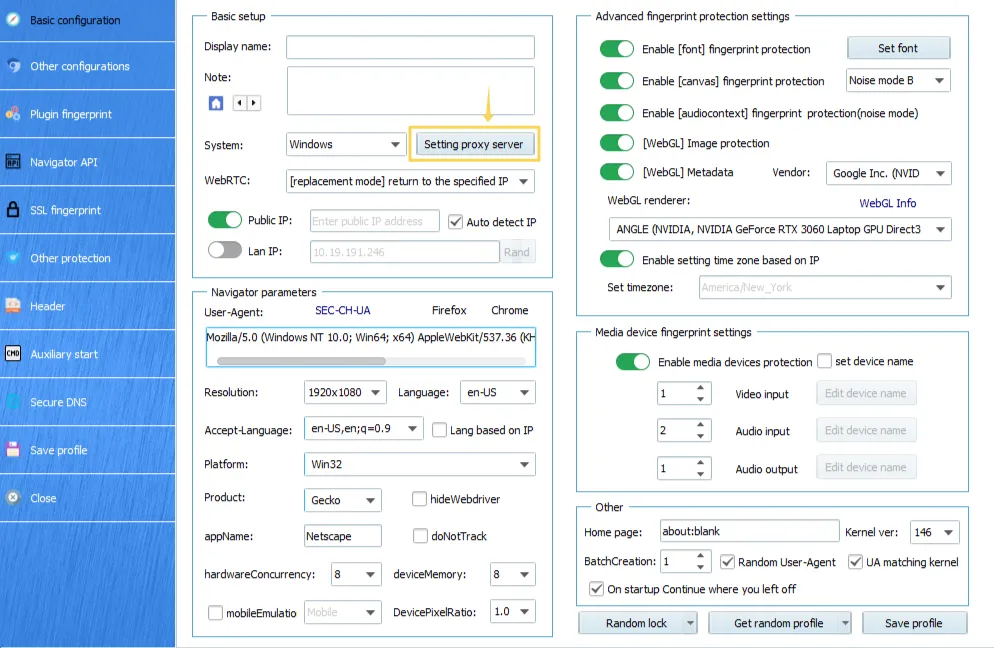
Step 2. Open Proxy Settings
Inside the profile settings window, click Setting proxy server.
A separate proxy configuration window will appear.
Step 3. Enable Proxy Usage
Turn on the Enable proxy server switch.
Once enabled, the proxy configuration fields become available.
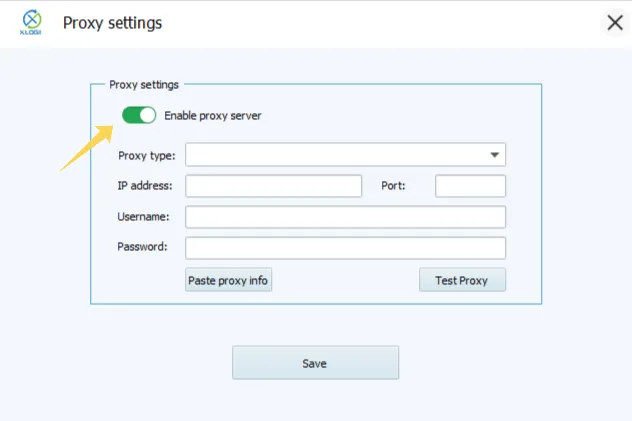
Step 4. Select a Proxy Protocol
Open the Proxy type dropdown menu and choose the required protocol.
XLogin supports:
- HTTP Proxy;
- HTTPS Proxy;
- SOCKS4 Proxy;
- SOCKS5 Proxy.
Make sure the selected protocol matches the proxy information provided by your provider.
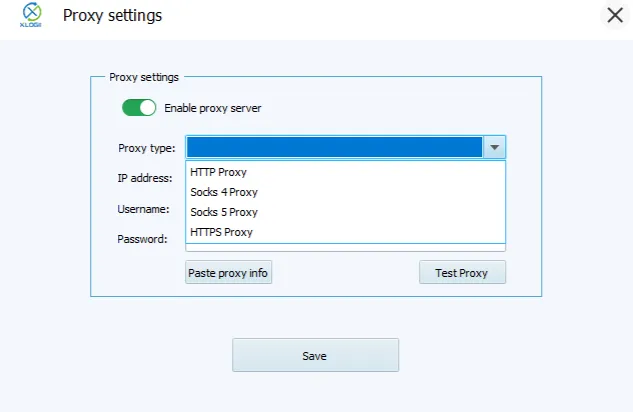
Step 5. Enter Proxy Credentials
Fill in the following fields:
- IP Address;
- Port;
- Username;
- Password.
If your provider supplies the credentials in a single string, you can use the Paste proxy info button to populate the fields automatically.
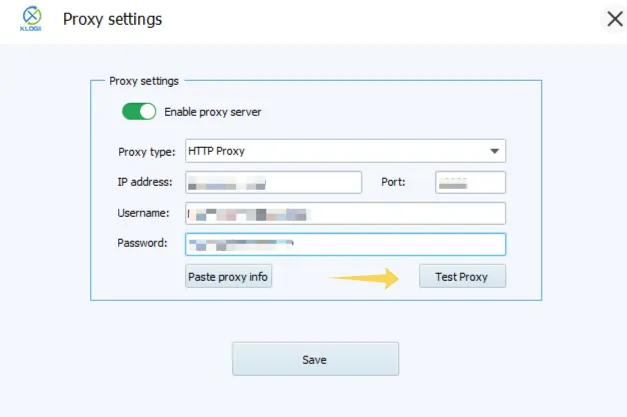
Step 6. Test the Connection
Click Test Proxy after entering the connection details.
XLogin will verify the proxy and display information such as:
- country;
- city;
- region;
- coordinates;
- time zone.
If the information is displayed correctly, click Confirm to apply the settings.
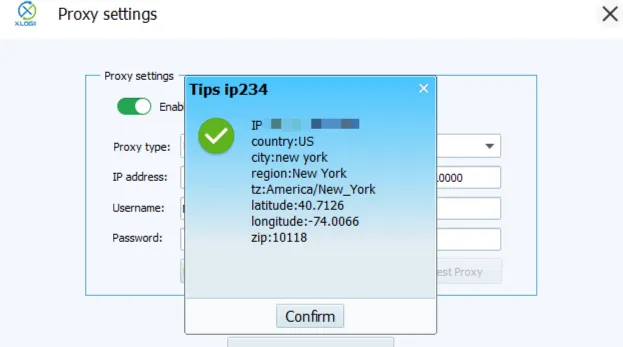
Step 7. Save the Profile
Return to the profile creation window and finish configuring the remaining browser settings.
Once everything is ready, save the profile.
Additional Connection Verification
Even if the built-in proxy test succeeds, it is recommended to verify that the connection is detected correctly by external services and does not expose real network information.
You can use the following tools:
👉 Check IP Address and GEO: IP Lookup
👉 Test Proxy Availability: Proxy Checker
👉 Check DNS, WebRTC, and IPv6 Leaks: DNS Leak Test
👉 Scan Open Ports: Port Scanner
Which Proxies Work Best with XLogin?
The best proxy type depends on your specific workflow.
For services where IP reputation matters, residential proxies are often the preferred option.
For long-term account management, ISP proxies provide a strong balance between stability and trust.
Datacenter proxies are commonly used for automation, monitoring, and large-scale data processing due to their speed and affordability.
Mobile proxies can be useful when a genuine mobile connection is required.
Learn more about the differences between proxy types here:
👉 Residential, ISP, Datacenter, and Mobile Proxies: What’s the Difference?
XLogin Features
Some of the browser’s key features include:
- isolated browser profiles;
- support for HTTP, HTTPS, SOCKS4, and SOCKS5 proxies;
- browser and system fingerprint customization;
- User-Agent management;
- language and time zone configuration;
- WebRTC and WebGL controls;
- browser fingerprint protection;
- profile grouping and organization tools.

Frequently asked questions
Here we answered the most frequently asked questions.
Which proxy protocols does XLogin support?
XLogin supports HTTP, HTTPS, SOCKS4, and SOCKS5 proxies.
Can I test a proxy before saving it?
Yes. The browser includes a built-in Test Proxy function that verifies the connection before you save the profile.
Can different profiles use different proxies?
Yes. Each profile can be configured with its own proxy server and IP address.
Do I need to configure geolocation manually?
How can I tell if the proxy is configured correctly?
If the Test Proxy function successfully displays the connection details and the profile saves without errors, the proxy is ready to use.
Nice walkthrough