How to Set Up a Proxy in DICloak: Step-by-Step Guide
However, an antidetect browser alone is not enough for stable performance. Even with a properly configured fingerprint, websites continue to analyze the network layer – primarily the IP address.
If multiple profiles use the same IP, they become directly linked, which significantly increases the risk of restrictions and bans.
Proxies in DICloak solve this issue by assigning a unique IP and network environment to each profile. This makes account operations more stable and predictable.
In this guide, we’ll walk through how to connect proxies in DICloak and configure them for reliable multi-accounting and automation.
Why You Need Proxies in DICloak
An antidetect browser isolates device parameters, but the IP address remains one of the key signals for websites.
Using proxies allows you to:
- run multiple accounts without overlap
- reduce the risk of bans and CAPTCHAs
- work with different GEOs
- scale automation
- simulate real user behavior
👉 Learn more: What is a proxy server
Step-by-Step Proxy Setup in DICloak
Step 1: Create a Profile in DICloak
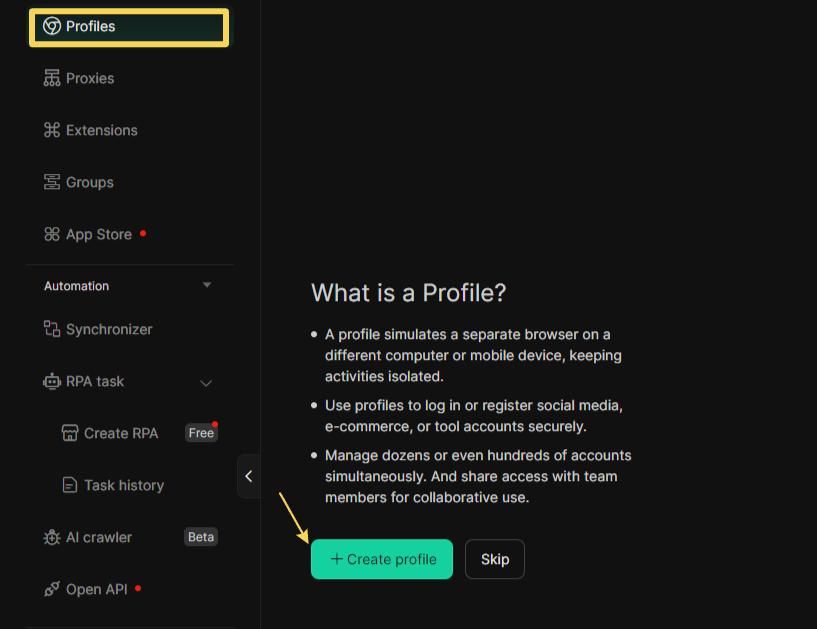
After logging into DICloak, go to the Profiles section in the left menu.
Click Create profile to create a new profile.
A profile in DICloak is an isolated browser environment that simulates a separate device with unique parameters, allowing you to safely manage multiple accounts.
Step 2: Basic Profile Setup
After creating a profile, the configuration window will open. Here you need to set the main parameters:
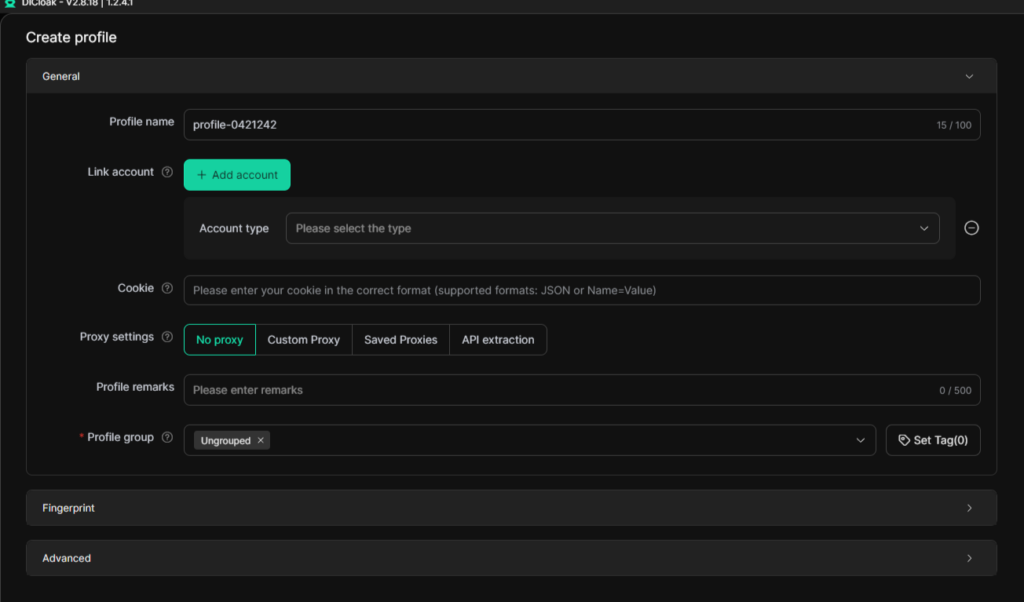
- Profile name – for easy identification
- Account type – optional
- Cookie – add cookies if needed
- Profile group – for organizing profiles
In the same window, you will find the Proxy settings section.
By default, No proxy is selected, so you need to add a proxy manually or choose one from saved proxies.
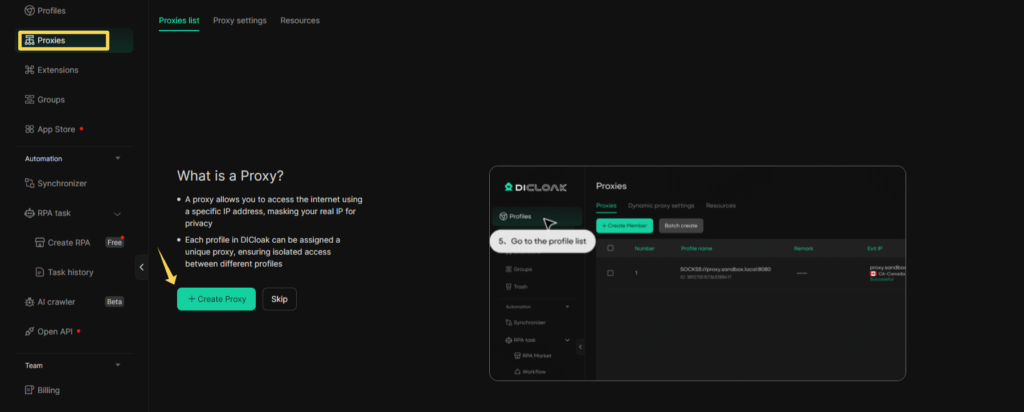
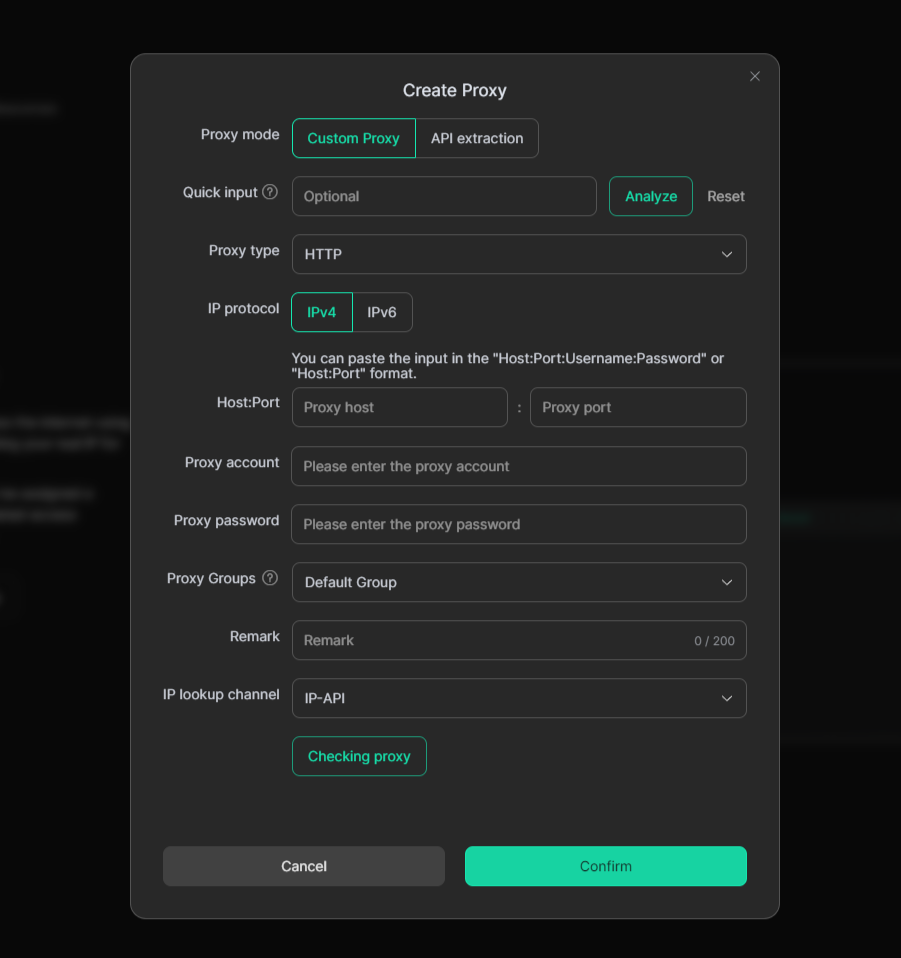
Step 3: Create a Proxy
Go to the Proxies section in the left menu and click Create Proxy.
Step 4: Choose a Setup Method
DICloak supports two ways of adding proxies:
1. Custom Proxy (Manual Setup)
Use this option if you have proxy credentials (host, port, username, password).
Select the proxy type:
- HTTP / HTTPS
- SOCKS5
- dynamic providers
Fill in the fields:
- Proxy Host — server address
- Proxy Port — port
- Username / Password — authentication details
- Remarks — optional notes
You can get these details from your MangoProxy dashboard.
👉 Check proxy here: Proxy Checker
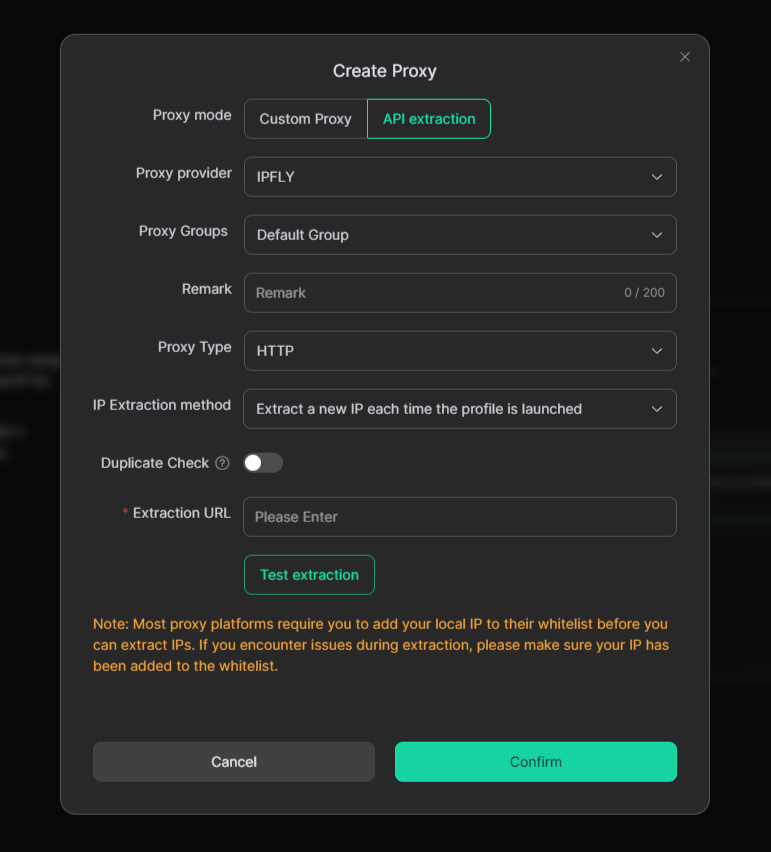
2. API Extraction
If you are using rotating proxies, you can connect them via an extraction URL provided by your proxy service.
Step 5: Check the Proxy
After entering the details, click Check Proxy.
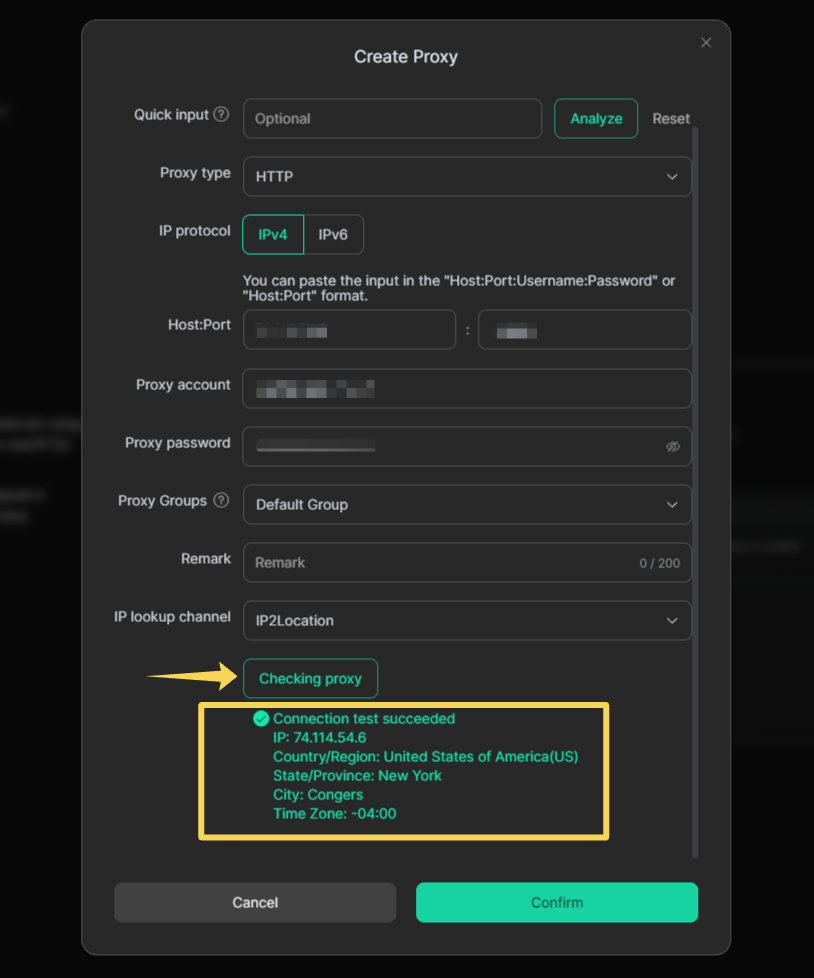
Make sure that:
- the connection is successful
- the IP is detected
- the GEO matches
👉 Verify your IP here: What is my IP
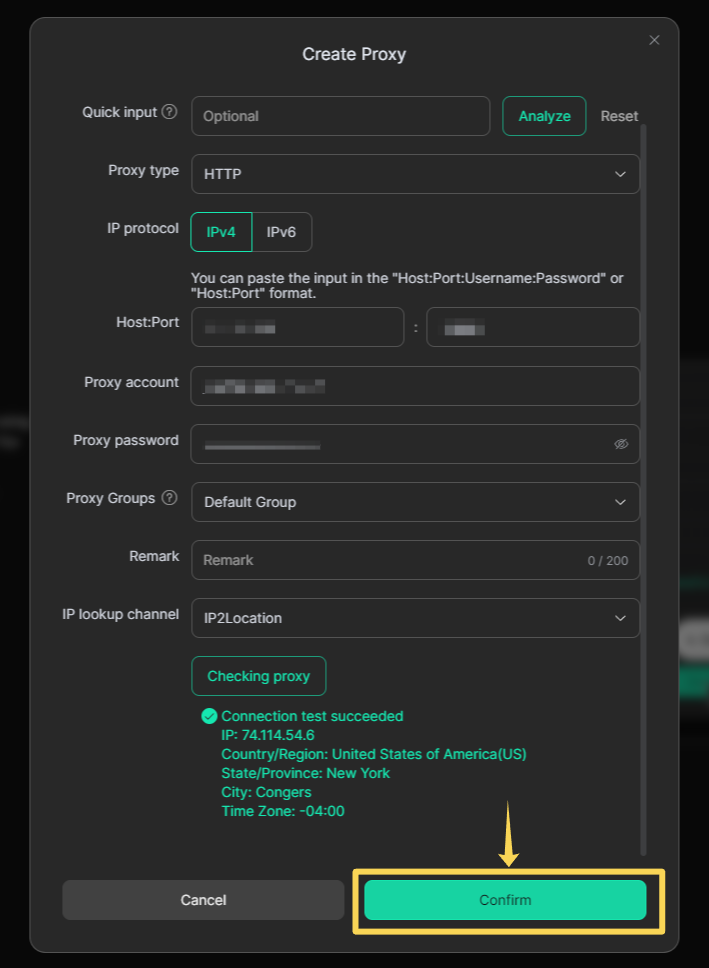
Step 6: Save the Proxy
Click Confirm to save the proxy.
It will then appear in your proxy list.
Step 7: Assign Proxy to a Profile
Go back to Profiles:
- create a new profile or edit an existing one
- select a proxy from the saved list
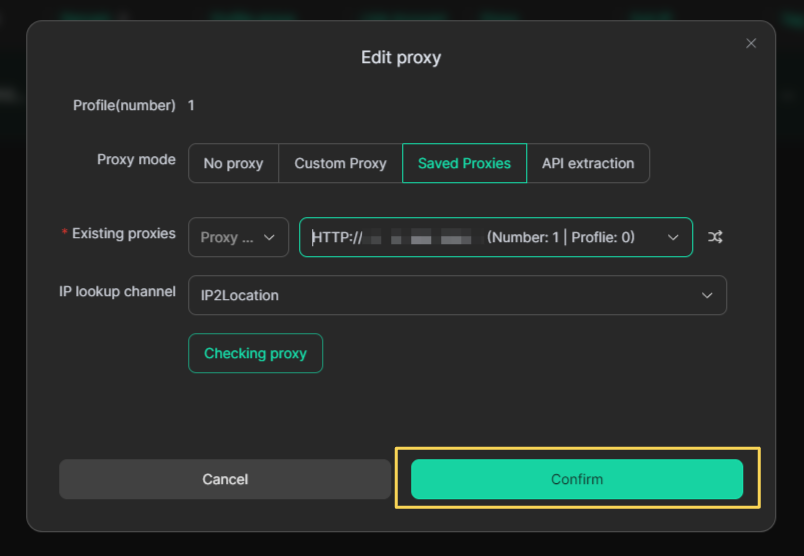
DICloak also supports:
- bulk profile editing
- automatic assignment of unused proxies
Step 8: Verify and Use Proxy in Profiles
Once the proxy is assigned, it will be displayed in the Profiles table.
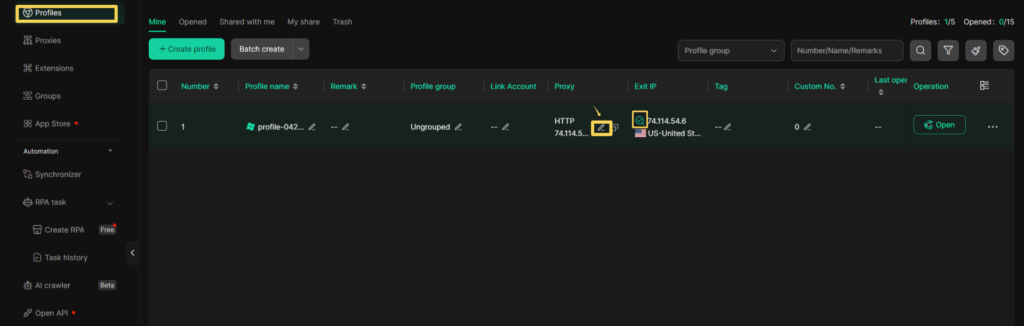
You will see:
- proxy type (HTTP / SOCKS5)
- IP address
- GEO location
- connection status
This helps you quickly verify which proxy is used for each profile.
Verify Proxy IP and Stability
Before starting, make sure that:
- the IP matches the required GEO
- there are no DNS leaks
- the connection is stable
👉 Additional check: IP Lookup
Best Proxy Types to Use
| Proxy Type | Use Case | Stability | Trust Level |
| Residential | social media, ads, scraping | High | Very high |
| ISP | long sessions | Very high | High |
| Datacenter | high-volume tasks, speed | Medium | Medium |
| Mobile | complex platforms | High | Very high |
👉 Learn more: Residential vs Datacenter vs ISP proxies
Main Use Cases
DICloak + proxies is suitable for:
- multi-accounting (Facebook, TikTok, Google)
- traffic arbitrage
- automation
- web scraping
- GEO testing
Common Errors
1. Proxy not connecting
Check host, port, and credentials
2. Incorrect GEO
Make sure the correct region is selected
3. Connection check failed
Verify proxy status and balance
4. Blocks and CAPTCHAs
Reduce load or use higher-quality proxies
5. Low speed
Try a different proxy type or server
Security Tips
- do not use one IP for multiple accounts
- match proxy GEO with fingerprint
- avoid sudden spikes in activity
- use rotation for automation
- regularly monitor IP quality

Frequently asked questions
Here we answered the most frequently asked questions.
Which proxies are best for DICloak?
Residential and ISP proxies work best for most use cases.
Can I use one proxy for multiple profiles?
Not recommended – it increases the risk of bans.
Which protocol should I choose?
SOCKS5 is the most universal and stable option.
Should I test proxies before use?
Yes, it helps prevent errors and unstable performance.
Can I use rotating proxies?
Yes, via API integration or IP rotation.