How to Set Up a Proxy in BitBrowser: Step-by-Step Guide

BitBrowser is an antidetect browser designed for managing multiple accounts by isolating fingerprints and browser environments. It is widely used in traffic arbitrage, automation, and other scenarios where proper profile separation is essential.
However, the browser itself only simulates different devices. For websites to treat profiles as separate users, each one must have a unique IP address – a proxy server.
Proxies in BitBrowser allow you to assign a separate IP and network environment to each profile, making your setup more stable and secure.
In this guide, we’ll explain why proxies are essential when using an antidetect browser and how to set them up in BitBrowser in just 5 minutes.
Why You Need Proxies in BitBrowser
BitBrowser changes your device fingerprints, but your network identity (IP address) remains the same. If you launch multiple profiles using a single IP, website security systems can quickly detect that they are managed by a single user and may block all accounts.
Using proxies provides three key advantages:
Account separation
Each profile gets its own IP address. For websites, this looks like different users operating from different locations.
Location targeting
You can choose any country. For example, you can be in Germany but appear as a user from New York.
Security
Proxies hide your real IP address and reduce the risk of CAPTCHAs and restrictions.
👉 Learn more: What is a proxy server
Step-by-Step Proxy Setup in BitBrowser
Step 1: Go to Browser Profiles
After logging into BitBrowser, open the Browser Profiles section in the left menu.
Click Add to create a new profile.
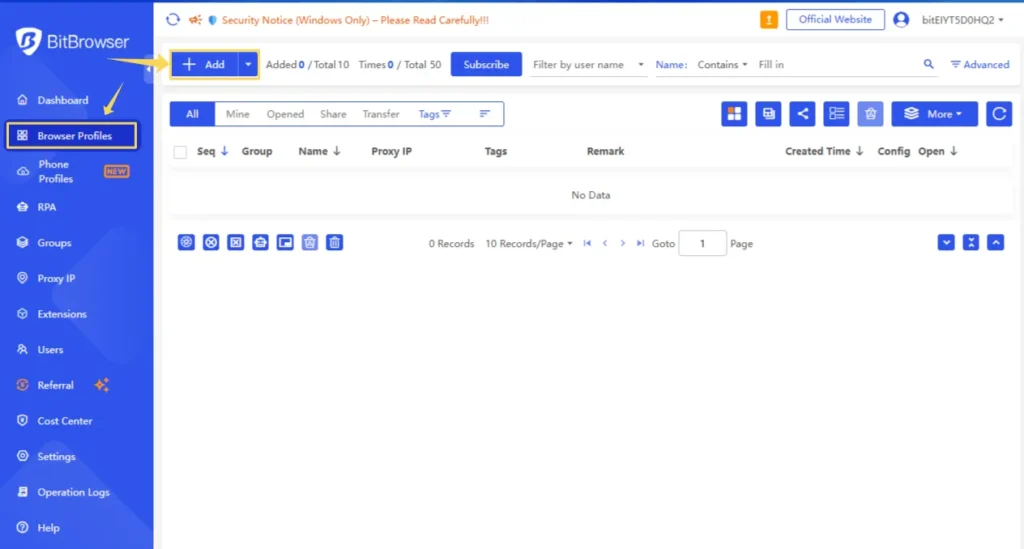
A profile is an isolated browser environment with its own unique parameters.
Step 2: Basic Profile Setup
In the settings window, configure the main parameters:
- Name – profile name
- Group – for organizing profiles
- optional: login, password, tags

These settings help you manage multiple accounts more efficiently.
Step 3: Open Proxy Settings
In the same window, find the Proxy section.
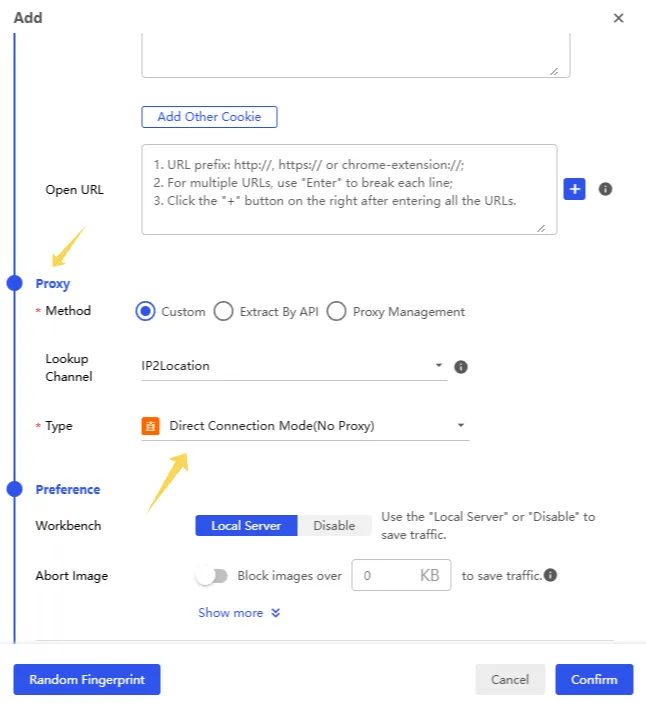
By default, Direct Connection Mode (No Proxy) may be selected – this needs to be changed. We recommend choosing SOCKS5, as it provides the most stable and reliable performance.
👉 Learn more: HTTP vs SOCKS5 Proxy
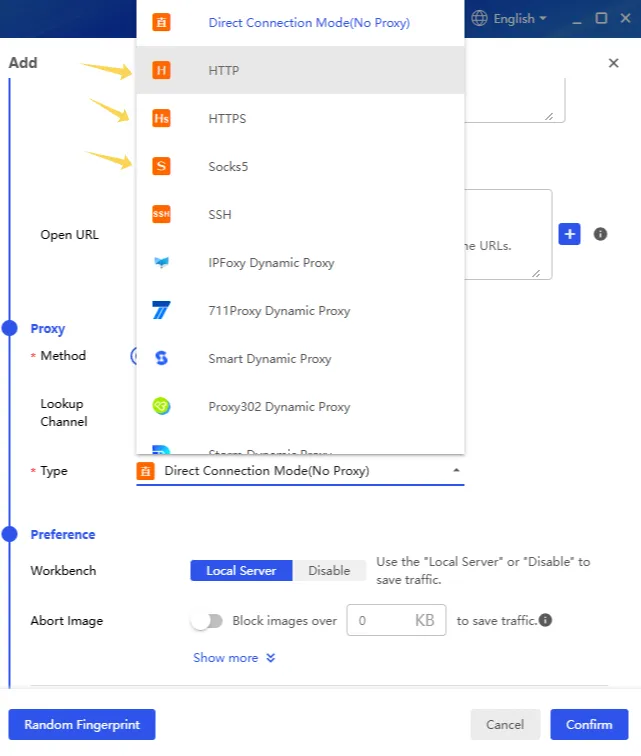
Step 4: Add a Proxy
Select the connection type:
- HTTP
- HTTPS
- SOCKS5
Then enter your proxy details:
- Host – server address
- Port – port
- Username / Password – authentication credentials
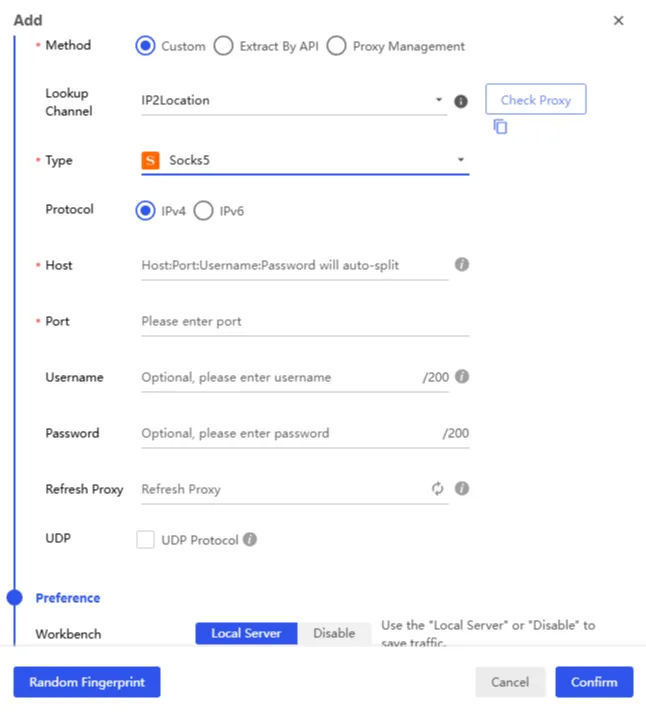
You can find these details in your MangoProxy dashboard.
👉 Test your proxy before connecting: Proxy Checker
Step 5: Check the Proxy
Click Check Proxy to verify the connection.
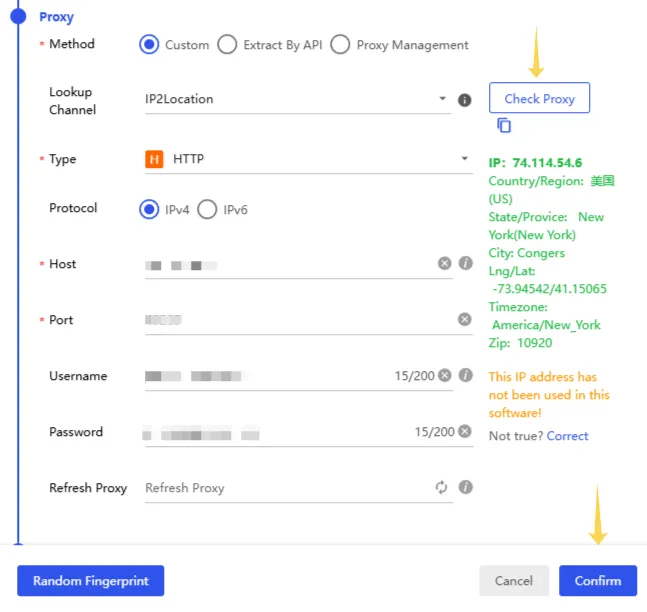
If everything is set up correctly, you will see a green status along with the detected country and city.
If there is an error, use a proxy checker to verify that the proxy is active. You can also launch the profile and use IP Lookup to see how your IP appears to websites.
Step 6: Save Settings
Click Confirm to save the profile with the proxy.
The proxy will now be assigned to the profile and ready to use.
Verify IP and Stability
Before launching, make sure that:
- the IP matches the required GEO
- there are no DNS leaks
- the connection is stable
Best Proxy Types to Use
| Proxy Type | Best For | Trust Level |
| Residential | social media, ads, purchases | Maximum |
| Mobile | complex platforms, registrations | Very high |
| ISP (Static) | long-term work, banking | High |
| Datacenter | scraping, simple tasks | Medium |
Not sure which proxy type is right for your task? We’ve prepared a detailed comparison to help you save budget and avoid blocks: Residential vs Datacenter vs ISP Proxies
Main Use Cases
BitBrowser combined with proxies is commonly used for:
- multi-accounting (Facebook, TikTok, Google)
- traffic arbitrage
- automation
- web scraping
- GEO testing
👉 Also check:
Common Errors
1. Proxy not connecting
Check host, port, and credentials
2. Incorrect GEO
Verify proxy location settings
3. Connection error
Make sure the proxy is active
4. CAPTCHAs and blocks
Reduce activity or use higher-quality IPs
5. Low speed
Try a different proxy type or server
Security Tips
- use a separate proxy for each profile
- match proxy GEO with browser settings
- avoid sudden spikes in activity (logins, actions, requests)
- use IP rotation for automation and scraping
- regularly monitor IP quality and reputation

Frequently asked questions
Here we answered the most frequently asked questions.
Which proxies work best with BitBrowser?
Residential and ISP proxies are the most commonly used for stable performance.
Can I use one proxy for multiple profiles?
Not recommended – it increases the risk of account linking and restrictions.
Which protocol should I choose?
SOCKS5 is the most universal and stable option for antidetect environments.
Should I test proxies before using them?
Yes, it helps identify connection issues and avoid unstable performance.
Can I use rotating proxies in BitBrowser?
Yes, if your provider supports IP rotation.